A Coffee Lover’s Dream: The Ultimate Coffee Cheesecake Recipe
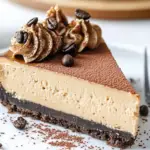
There’s something about the combination of coffee and dessert that speaks to the soul. The rich, slightly bitter notes of coffee balance perfectly with the sweet, creamy textures of cheesecake. If you’re a coffee lover, this Coffee Cheesecake recipe is an absolute must-try. With an indulgent Oreo cookie crust, a luscious, espresso-flavored cheesecake filling, and a decadent coffee-infused chocolate ganache, this dessert will not only satisfy your coffee cravings but also leave your guests asking for more.
- Prep Time: 45 minutes
- Cook Time: 50 minutes
- Total Time: 7 hours 35 minutes (including chilling)
- Yield: 12 servings 1x
- Category: Dessert
- Method: Baking
- Cuisine: American
- Diet: Vegetarian
Ingredients
For the Oreo Crust:
- 25 Oreo cookies (including the filling and wafers)
- 1/3 cup unsalted butter, melted
For the Cheesecake Filling:
- 2–3 teaspoons instant coffee powder (depending on how strong you want the coffee flavor)
- 1 tablespoon hot water
- 24 oz cream cheese (full-fat, brick style)
- 1 1/4 cups white sugar
- 1 teaspoon vanilla extract
- 2/3 cup sour cream
- 3 large eggs
- Hot water (for the water bath)
For the Chocolate Ganache:
- 6 oz dark chocolate (50–70% cocoa)
- 2/3 cup heavy cream
- 1 teaspoon instant coffee powder (optional)
For the Coffee Whipped Cream (Optional):
- 1/2 cup heavy cream
- 1 teaspoon instant coffee powder
Instructions
1. Preparing the Oreo Crust
The first step in making any cheesecake is preparing the crust, and in this case, we’re using a delicious Oreo crust that perfectly complements the coffee cheesecake filling. Start by preheating your oven to 350°F (175°C). Take your 9-inch springform pan and wrap the outside of it with aluminum foil. This step is crucial because it prevents water from seeping into the pan during the water bath process.
Now, place the Oreo cookies (filling and wafers included) into a food processor or high-powered blender. Pulse until you achieve fine crumbs. If you don’t have a food processor, you can also place the cookies into a zip-top bag and crush them with a rolling pin. Once you have the crumbs, mix them with melted butter. Stir until the mixture is evenly coated and begins to hold together when pressed.
Press the crumb mixture firmly into the bottom of your prepared springform pan, making sure to create a slight edge around the sides of the pan. Bake the crust for 10 minutes, then remove it from the oven and reduce the temperature to 325°F (163°C) as you prepare the cheesecake filling.
2. Making the Cheesecake Filling
Now that the crust is done, it’s time to make the cheesecake filling. Start by dissolving the instant coffee powder in hot water. This will help bring out the full depth of flavor in the coffee. Next, beat the cream cheese and sugar together in a large bowl until the mixture is smooth and free of lumps. It’s important that the cream cheese is at room temperature before you start, as this helps achieve a smooth filling.
Once the cream cheese mixture is smooth, add the dissolved coffee, vanilla extract, and sour cream. Continue beating until everything is well combined. Then, add the eggs one at a time, mixing gently after each addition. Be careful not to overmix, as this can cause the cheesecake to crack when baking.
Once your cheesecake batter is ready, it’s time to assemble everything. Place the springform pan with the pre-baked crust inside a large roasting pan. Pour the cheesecake batter over the crust, smoothing the top with a spatula. Then, add hot water to the roasting pan, ensuring that the water comes up about 1/2 to 1 inch around the sides of the springform pan. This water bath helps create an even temperature while baking, preventing the cheesecake from cracking.
Bake the cheesecake at 325°F (163°C) for 50 to 60 minutes, or until the edges are set and the center has a slight wobble when gently nudged. The cheesecake should still look a little jiggly in the center, but the edges should be firm. Once done, remove the roasting pan from the oven and let the cheesecake cool to room temperature in the water bath. This gradual cooling process helps prevent cracking. After it’s cooled, cover the pan with aluminum foil and refrigerate the cheesecake for at least 6 hours, or overnight for the best results.
3. Making the Chocolate Ganache
While the cheesecake chills, it’s time to make the chocolate ganache. Start by chopping the dark chocolate into small pieces and placing it in a heatproof bowl. Heat the heavy cream with instant coffee powder (if using) in a small saucepan or microwave until it’s almost boiling. Pour the hot cream over the chopped chocolate and let it sit for 3 minutes to allow the chocolate to melt. After the waiting time, whisk the ganache until smooth and glossy.
Once the ganache is ready, remove the cheesecake from the fridge and carefully unclamp the sides of the springform pan. Pour the ganache over the top of the cheesecake, letting it drip down the edges for a beautiful presentation. Place the cheesecake back in the fridge to set the ganache before serving.
4. Making the Coffee Whipped Cream (Optional)
For an extra touch of decadence, consider making a coffee whipped cream to serve alongside your cheesecake. To do this, add instant coffee powder to the heavy cream and let it sit for a few minutes to dissolve. Then, whip the cream until stiff peaks form. Once the whipped cream is ready, use it to garnish the cheesecake just before serving. A dollop of this whipped cream adds a light, creamy contrast to the richness of the cheesecake.
Notes
- Use Room Temperature Ingredients: Make sure the cream cheese, sour cream, and eggs are at room temperature before starting. This helps create a smooth batter and prevents lumps in the filling.
- Don’t Overmix the Batter: Be sure to mix the ingredients until just combined. Overmixing can incorporate too much air, causing the cheesecake to crack while baking.
- Prevent Cracks with a Water Bath: A water bath helps regulate the temperature around the cheesecake, preventing it from cracking during baking.
- Chill Properly: For the best texture, let the cheesecake chill in the fridge for at least 6 hours. Overnight chilling is even better, as it allows the flavors to develop fully.
- Use Quality Coffee: The coffee flavor is the star of this dessert, so be sure to use a high-quality instant coffee powder to get the best flavor.