Butterscotch Graham Cracker Cheesecake Bars: A Decadent Delight for Every Occasion
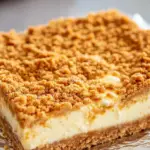
When it comes to indulgent desserts, there’s something incredibly satisfying about a combination of contrasting textures and flavors that come together perfectly in one bite. The Butterscotch Graham Cracker Cheesecake Bars are the epitome of this concept, offering a delightful fusion of chewy, buttery graham cracker crust, a rich, tangy cheesecake filling, and a sweet butterscotch topping that creates a harmonious balance of flavors. These cheesecake bars are an absolute showstopper for any occasion, whether you’re hosting a family gathering, attending a holiday party, or simply enjoying a quiet evening at home. The combination of the smooth, creamy cheesecake layer with the chewy, crunchy graham cracker crust and the warm butterscotch topping is irresistible, making it an ideal dessert for any celebration.
- Prep Time: 15 minutes
- Cook Time: 30 minutes
- Total Time: 2 hours 45 minutes (including chill time)
- Yield: 16 bars 1x
- Category: Dessert
- Method: Baking
- Cuisine: American
- Diet: Vegetarian
Ingredients
- 11 ounces butterscotch chips
- ½ cup unsalted butter
- 2 cups graham cracker crumbs
- 8 ounces cream cheese (very well softened to room temperature)
- 1 large egg
- One 14-ounce can sweetened condensed milk
- 2 teaspoons vanilla extract
- ½ teaspoon salt
Instructions
Step 1: Preheat the Oven and Prepare the Pan
The first step in making these cheesecake bars is preheating your oven to 350°F (175°C). This ensures that your oven is at the ideal temperature for baking. While the oven is heating up, line a 9×9-inch baking pan with aluminum foil for easy cleanup and give it a light spray with cooking spray to prevent the dessert from sticking. This simple step will make it much easier to remove the bars from the pan later on, and it also helps to keep the bars from sticking to the sides.
Step 2: Melt the Butterscotch Chips and Butter
In a medium saucepan, combine the butterscotch chips and butter. Place the saucepan over medium to medium-low heat and allow the butter and butterscotch chips to melt together. Stir the mixture constantly to ensure it doesn’t burn, and continue stirring until it becomes smooth and fully melted. This process will take about 5 minutes. It’s important to be patient as the butterscotch chips may take some time to fully melt, and the mixture might look a bit strange at first. But as you continue whisking, the texture will smooth out, and the rich, sweet butterscotch flavor will start to shine through.
Step 3: Add the Graham Cracker Crumbs
Once the butterscotch and butter mixture is completely melted and smooth, it’s time to add the graham cracker crumbs. Stir the crumbs into the melted mixture until they are well-coated and fully combined. The graham cracker crumbs will soak up the butterscotch, making the mixture thick and crumbly. The texture should be a bit rough but still able to hold together when pressed. Take a moment to taste the mixture and adjust the sweetness if desired. The rich butterscotch flavor will be the star of the crust, so feel free to add more graham cracker crumbs if you want a slightly thicker crust or more butterscotch if you like it sweeter.
Step 4: Set Aside Some of the Crust for Topping
After mixing the graham cracker crumbs into the butterscotch mixture, remove one heaping cup of the mixture and set it aside in a small bowl. This reserved butterscotch-crumb mixture will serve as the topping for the cheesecake bars. The remaining mixture will form the crust, so press it into the prepared baking pan to create a solid, even layer. Use the back of a spoon or your fingers to press the crumbs down firmly to form a compact crust. Make sure it’s evenly spread out and covers the entire bottom of the pan. The more evenly you press the crust, the more stable it will be when you slice the bars later.
Step 5: Prepare the Cheesecake Filling
With the crust in place, it’s time to prepare the cheesecake filling. In a stand mixer or large mixing bowl, add the softened cream cheese. Beat the cream cheese on high speed for about 2 to 3 minutes until it becomes smooth and fluffy. The cream cheese should be at room temperature to ensure a smooth texture, so make sure to let it sit out for a while before starting the recipe. Scrape down the sides of the bowl to make sure all the cream cheese is incorporated and there are no lumps left. Once the cream cheese is smooth, add the egg, sweetened condensed milk, vanilla extract, and salt. Beat the mixture on high for an additional minute or two until it’s fully combined and smooth. If you see a few small lumps of cream cheese in the mixture, don’t worry! Just keep beating, and they will disappear. The result should be a velvety, creamy cheesecake filling that will pair perfectly with the crust.
Step 6: Pour the Cheesecake Filling Over the Crust
Once the cheesecake filling is ready, carefully pour it over the graham cracker crust. Use a spatula to spread the filling evenly, ensuring that it covers the entire surface of the crust. The filling should be smooth and creamy, filling the pan completely. Make sure to spread it out evenly to avoid any uneven spots in the bars. Once the filling is spread out, it’s time for the final touch.
Step 7: Add the Reserved Butterscotch Crumbs as Topping
Take the reserved butterscotch-crumb mixture and sprinkle it evenly over the top of the cheesecake filling. This topping adds both texture and flavor to the bars, giving them a slightly crunchy, sweet finish. Sprinkle it evenly so that every bite will have a little bit of the sweet butterscotch crunch. Don’t press it down too firmly; the crumbs should stay loose enough to create a topping that contrasts with the smooth filling below.
Step 8: Bake the Cheesecake Bars
Now it’s time to bake the cheesecake bars! Place the pan in the preheated oven and bake for about 32 to 35 minutes. The bars will be done when the top is set and springy to the touch, though the center will still be slightly jiggly. It’s important to check the bars after about 25 to 30 minutes, as all ovens vary. If your oven takes a bit longer, that’s okay—just bake the bars until they are set and the top is golden brown. The final texture should be firm enough to slice but with a slight wobble in the center.
Step 9: Cool and Chill
Once the cheesecake bars are baked, remove the pan from the oven and allow them to cool for about 1 hour at room temperature. After the bars have cooled, cover the pan and refrigerate the bars for at least 2 hours to allow them to fully chill and set. This chilling time is crucial for ensuring that the bars are firm and easy to slice. You can also prepare these bars the day before you plan to serve them, as the flavors will continue to develop and the texture will be even better after chilling overnight.
Notes
- Whipped Cream: A dollop of freshly whipped cream is the perfect complement to the rich cheesecake. The lightness of the whipped cream balances the dense, creamy filling.
- Caramel Sauce: Drizzle some warm caramel sauce over the top of the bars to enhance the butterscotch flavor and add a glossy, decadent finish.
- Berries: Fresh berries, like raspberries or strawberries, add a pop of color and a tart contrast to the sweet bars.
- Ice Cream: Serve the bars with a scoop of vanilla or caramel ice cream for an extra indulgence. The cold, creamy ice cream pairs beautifully with the rich cheesecake.