Cheesy Garlic Pull-Apart Bread: The Ultimate Comfort Appetizer for Beginners
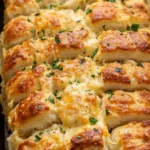
There’s nothing better than warm, cheesy bread loaded with garlic butter. This Cheesy Garlic Pull-Apart Bread is perfect for beginners—simple, flavorful, and ready in just over an hour. Made with biscuit dough, mozzarella, sharp cheddar, and a garlic butter drizzle, it’s a crowd-pleasing appetizer or side dish that everyone will love. No fancy skills required, just delicious layers of cheesy goodness waiting to be pulled apart and enjoyed. Let’s get baking!
- Prep Time: 10 minutes
- Cook Time: 1 hour
- Total Time: 1 hour 10 minutes
- Yield: 6 servings 1x
- Category: Appetizer
- Method: Baking
- Cuisine: American
- Diet: Vegetarian
Ingredients
- 1 can (8-count) buttermilk biscuits
- ½ cup (1 stick / 113 g) unsalted butter, melted
- 1 tablespoon garlic, minced
- 1 tablespoon parsley, chopped, plus extra for garnish
- ½ teaspoon kosher salt
- 1 cup (113 g) mozzarella cheese, shredded
- ½ cup (56.5 g) sharp cheddar cheese, shredded
Instructions
Preheat the Oven and Prepare the Loaf Pan
Begin by preheating your oven to 350°F (175°C). This ensures that the bread will bake evenly and achieve that golden-brown color. While the oven is heating up, spray a 9×5-inch loaf pan with non-stick cooking spray. This will prevent the bread from sticking to the pan and make it easy to remove once it’s baked. Set the pan aside and move on to the next steps.
Make the Garlic Butter
In a small bowl, combine the melted unsalted butter, minced garlic, chopped parsley, and kosher salt. Stir well to ensure that the garlic and parsley are evenly distributed in the butter. The garlic will infuse the butter with its rich, aromatic flavor, which will then coat the biscuit layers for a mouthwatering result. Set the garlic butter aside for later use.
Prepare the Cheese Mixture
In a separate bowl, combine the shredded mozzarella cheese and sharp cheddar cheese. These two cheeses create a perfectly balanced flavor—mozzarella provides that classic, melty texture, while cheddar adds a sharp, tangy bite. Stir the cheese mixture together to combine and set it aside as well.
Prepare the Biscuit Layers
Open the can of buttermilk biscuits and carefully separate each biscuit. Next, gently peel each biscuit into two layers, creating a total of 16 layers. This is where the magic happens—the layers will allow the bread to pull apart easily once it’s baked, and they’ll help create pockets of cheese and garlic butter in between.
Coat the Biscuit Layers
Take each biscuit layer and dip it into the garlic butter mixture, ensuring it’s completely coated on both sides. After the biscuit layer is coated in butter, sprinkle approximately 1 tablespoon of the shredded cheese mixture on top. Repeat this process with the remaining biscuit layers, stacking them on top of each other as you go. You’ll end up with two stacks of 8 layers each. Make sure the cheese is evenly distributed between the layers so that every bite has a good amount of cheesy goodness.
Arrange the Biscuit Stacks in the Loaf Pan
Carefully place each stack of biscuit layers horizontally in the prepared loaf pan, starting from one end of the pan and working your way to the other end. The biscuit stacks should fit snugly together in the pan, ensuring they bake evenly. Don’t worry if they don’t perfectly align—it’s all about getting the layers to fit tightly and create that pull-apart texture.
Top with Garlic Butter and Cheese
Once the biscuit stacks are in place, brush the top of the stacked biscuits with the remaining garlic butter mixture. This will add extra flavor and help the bread brown beautifully during baking. Then, sprinkle the remaining shredded cheese on top of the bread, ensuring that every surface is covered with cheesy goodness.
Bake the Bread
Cover the loaf pan with aluminum foil and bake for 35 minutes. This initial bake will allow the biscuits to cook through while maintaining their soft texture. After 35 minutes, remove the foil and bake for an additional 25 minutes, or until the bread is golden brown and cooked through. The cheese should be melted and bubbling, and the garlic butter should have soaked into the biscuit layers, creating a deliciously aromatic crust.
Cool and Garnish
Once the bread is finished baking, remove it from the oven and let it cool for a few minutes. This will allow the bread to firm up slightly and make it easier to cut. Garnish the bread with extra chopped parsley for a pop of color and added freshness. This final touch elevates the bread and adds a hint of brightness to complement the rich flavors.
Serve and Enjoy
Once the bread has cooled slightly, it’s ready to serve! Tear off the pull-apart pieces and enjoy the cheesy, garlicky goodness. This Cheesy Garlic Pull-Apart Bread is perfect for sharing with family and friends, and it pairs beautifully with a variety of meals.
Notes
- How to Avoid Overbaking: If you notice that the top of the bread is getting too brown before the center is fully baked, you can cover it with foil again to prevent burning while the bread finishes cooking. Just keep an eye on the bread during the final 25 minutes of baking.
- Using Fresh Garlic vs. Pre-Minced Garlic: Freshly minced garlic will provide the most robust and aromatic flavor, but if you’re short on time, pre-minced garlic from a jar works fine. Just be sure to adjust the amount to suit your taste.
- Don’t Skimp on the Garlic Butter: The garlic butter is what makes this bread so flavorful, so make sure to coat each biscuit layer generously. If you want to kick things up a notch, consider adding some red pepper flakes for a touch of heat.
- Alternative Pan Sizes: If you don’t have a 9×5-inch loaf pan, feel free to use an 8×8-inch square baking dish. The key is to ensure the biscuit layers fit tightly together to create the pull-apart texture.
- How to Tell if the Bread Is Done: The bread is done when the cheese is melted and bubbly, the bread is golden brown, and the layers have expanded. If you insert a toothpick in the center, it should come out clean without any raw dough sticking to it.