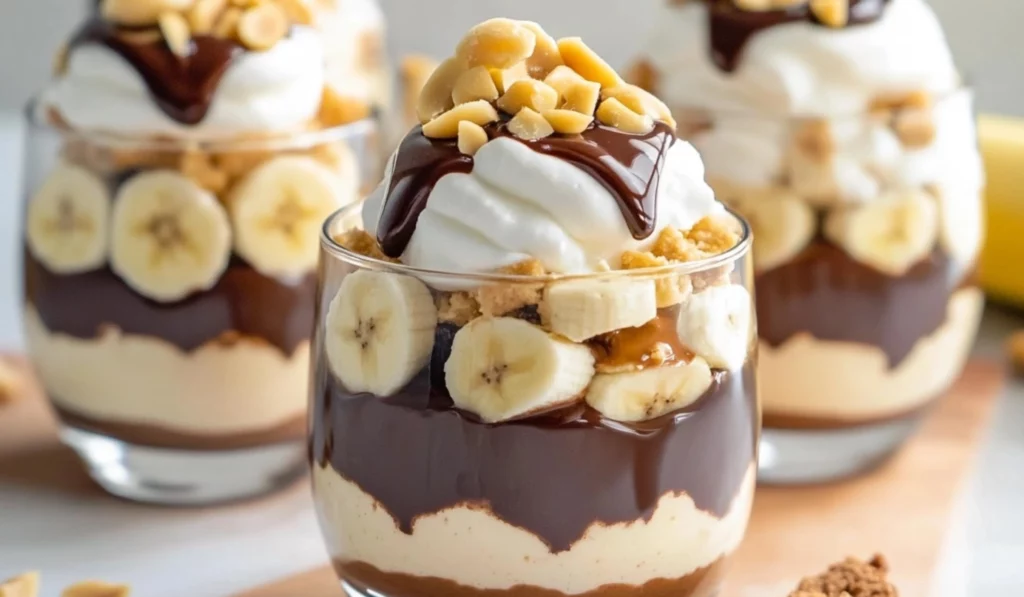
There’s something special about combining two well-loved desserts into one beautiful creation. The warm, comforting flavors of banana pudding paired with the rich indulgence of chocolate come together in these Chocolate-Covered Banana Pudding Cups. This fun and easy recipe brings together all the elements of two beloved desserts: the smooth vanilla pudding, the sweetness of ripe bananas, and the satisfying crunch of vanilla wafers, all topped with a layer of rich chocolate sauce. It’s a mashup that not only tastes amazing but also presents beautifully, making it a perfect choice for any occasion.
Chocolate-Covered Banana Pudding Cups: A Sweet Mashup of Two Dessert Classics
Banana pudding has always been a beloved dessert in my family, but one day I decided to mix things up by adding a rich layer of chocolate. The result was a decadent mashup of two favorite desserts that’s both comforting and exciting. These Chocolate-Covered Banana Pudding Cups are perfect for beginners—they’re quick to assemble, require only a few simple ingredients, and deliver big flavor. In just 15 minutes, you can create a delightful treat with creamy pudding, sweet bananas, crunchy vanilla wafers, and a touch of chocolate. It’s the ultimate dessert for any occasion!
- Prep Time: 15 minutes
- Cook Time: 0 minutes
- Total Time: 15 minutes
- Yield: 4 servings 1x
- Category: Dessert
- Method: No-bake, Layering
- Cuisine: American
- Diet: Vegetarian
Ingredients
- 1 box of instant vanilla pudding mix (made according to package directions)
- 3 ripe bananas, sliced just before assembling to prevent browning
- ¼ cup chopped peanuts (for added crunch)
- 16 vanilla wafers
- ¼ cup chocolate sauce or warmed fudge sauce (for drizzling)
- 1 cup whipped cream or Cool Whip (for topping)
Instructions
- Prepare the Instant Pudding: Start by preparing the vanilla pudding according to the instructions on the box. This usually involves whisking the pudding mix with cold milk and then allowing it to sit for a few minutes until it thickens. The pudding should be smooth and creamy when done. You can make this ahead of time if you’d like to save a bit of prep time.
- Prepare the Cups: Choose individual cups or small glass jars to serve this dessert. These cups should be clear, so the beautiful layers can be seen, but any small, sturdy container will work. You’ll want a cup that’s large enough to accommodate several layers, but not too big that the portions feel overwhelming.
- Swirl the Chocolate Sauce: Drizzle chocolate sauce or warmed fudge sauce into the bottom of each cup. Use the back of a spoon to swirl the sauce around the bottom to create a thin, even layer. The chocolate sauce adds a decadent base for the other ingredients, so don’t be shy with it! A generous swirl will ensure the chocolate flavor comes through in every bite.
- Layer the Vanilla Wafers: Break the vanilla wafers into smaller pieces so that they fit comfortably inside the cup. Arrange a layer of broken wafers on top of the chocolate sauce, pressing them down gently. The wafers will soften as they absorb the pudding, but they’ll still maintain a nice crunch, adding texture to each bite. The wafers serve as the base of this dessert, so it’s important to cover the bottom of the cup evenly.
- Add the Banana Slices: Slice the bananas just before you begin assembling, as they can brown quickly. Layer the banana slices on top of the vanilla wafers. The bananas provide a natural sweetness that balances out the richness of the pudding and chocolate. Be sure to cover the wafers with a layer of bananas for that classic banana pudding flavor.
- Add the Pudding: Spoon a generous amount of the prepared pudding over the banana slices, making sure they’re completely covered. The pudding will be thick and creamy, providing a smooth texture that contrasts nicely with the crunch of the wafers and the soft bananas. Be sure to spread it evenly to cover all the layers below.
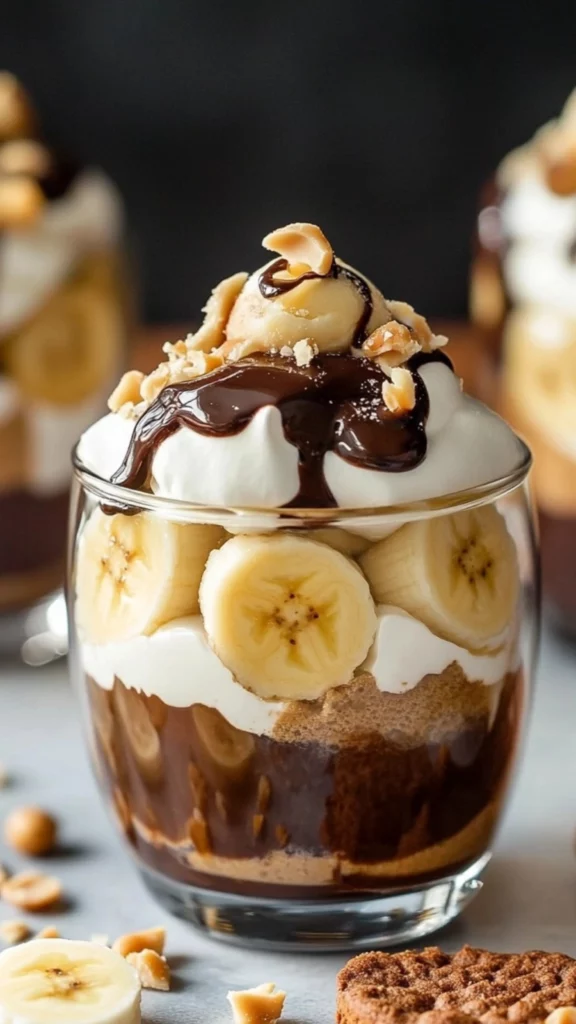
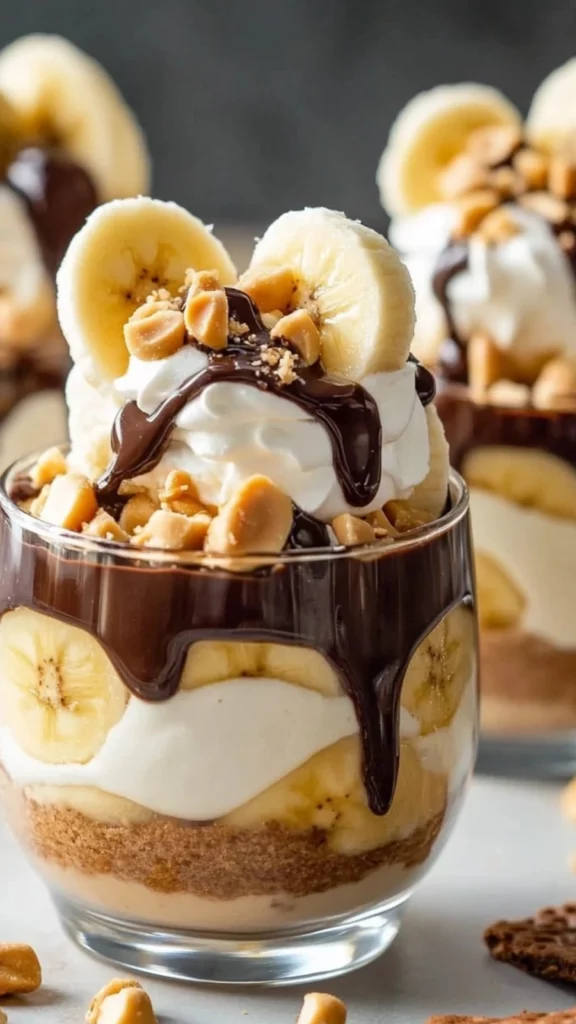
- Repeat the Layers: Repeat the layering process with more vanilla wafers, bananas, and pudding until the cups are nearly full. Be sure to finish with a layer of pudding on top, as this will form the beautiful top layer. The beauty of this dessert lies in the visual appeal of the layers, so take your time to create a pleasing presentation.
- Top with Whipped Cream: Spoon a dollop of whipped cream or Cool Whip on top of the final layer of pudding. This adds a light, airy element that complements the creamy texture of the pudding and the richness of the chocolate. You can pipe the whipped cream on top for a more decorative look or simply use a spoon for a more rustic presentation.
- Garnish with Chocolate Sauce and Peanuts: Drizzle a little more chocolate sauce over the whipped cream, then sprinkle the chopped peanuts on top for a crunchy finish. The peanuts not only add texture but also bring a savory element to balance out the sweetness. You can also garnish with a slice of banana or a vanilla wafer if you want to add an extra decorative touch.
- Chill and Serve: Refrigerate the cups for at least 30 minutes before serving. This allows the layers to set and makes the pudding cool and refreshing. The dessert will be easier to eat once it’s chilled, and the flavors will have had time to meld together.
- Enjoy: Once chilled, your Chocolate-Covered Banana Pudding Cups are ready to be enjoyed! Whether you serve them in individual cups or bowls, each bite will be a delicious combination of creamy, crunchy, chocolatey goodness.
Notes
- Don’t Overmix the Pudding: When making the instant pudding, simply whisk it until it thickens. Overmixing can cause it to become too firm. If you’re using homemade pudding, be careful not to let it overcook and curdle.
- Prevent Banana Browning: To prevent the bananas from browning before serving, slice them right before assembling the dessert. If you’re preparing the cups in advance, you can also toss the banana slices in a little lemon juice to keep them fresh.
- Layer with Care: The beauty of this dessert lies in the layers, so take your time when assembling the cups. Use a spoon to gently press down on each layer to ensure that everything stays in place.
- Chill Before Serving: Let the dessert chill in the fridge for at least 30 minutes to help the layers set and the flavors meld. This also makes it easier to scoop and enjoy.
For me, the inspiration for this dessert comes from those cozy family gatherings where banana pudding is a staple. But one day, I wanted to shake things up a bit, so I decided to drizzle some chocolate sauce on top and add a few more layers of flavor. The result was nothing short of magical: a dessert that tasted like pure comfort, with the added richness of chocolate. From that moment on, I knew I had to share this recipe.
This dessert is perfect for beginner cooks, especially those who are looking for a fun and easy treat to impress family or guests without spending hours in the kitchen. Whether you’re a seasoned cook or just starting out, this recipe is simple enough to allow you to enjoy the process while still achieving a showstopping result. Plus, with just a few basic ingredients, it’s easy to customize to your liking, making it a versatile dessert for any occasion.
So, let’s dive into the details of how to make these incredible Chocolate-Covered Banana Pudding Cups!
Ingredients and Preparation
The beauty of this dessert lies in its simplicity. You don’t need a long list of exotic ingredients or complicated techniques. Instead, you’ll be using pantry staples and a few fresh ingredients to build layers of flavor and texture. Here’s what you’ll need:
Ingredients:
- 1 box of instant vanilla pudding mix (made according to package directions)
- 3 ripe bananas, sliced just before assembling to prevent browning
- ¼ cup chopped peanuts (for added crunch)
- 16 vanilla wafers
- ¼ cup chocolate sauce or warmed fudge sauce (for drizzling)
- 1 cup whipped cream or Cool Whip (for topping)
Optional Substitutes & Variations:
- Chocolate Sauce: If you prefer a richer, more intense chocolate flavor, you can swap the chocolate sauce for melted dark chocolate. The deep cocoa flavor pairs wonderfully with the sweetness of the pudding and bananas.
- Nuts: If you prefer a different crunch or are allergic to peanuts, try substituting with other nuts such as crushed almonds, pecans, or even granola.
- Whipped Cream: While Cool Whip works perfectly here for convenience, you can make homemade whipped cream for a fresher taste. Simply whip heavy cream with a bit of sugar until it forms soft peaks, and use it in place of Cool Whip.
- Pudding: If you prefer a more indulgent pudding, you could make a homemade vanilla pudding instead of using the instant mix. Homemade pudding requires a bit more time but offers a richer, creamier result.
These ingredients are easy to find and offer flexibility, so feel free to adjust based on your preferences or what you have available.
Step-by-Step Instructions
This dessert is all about layering and assembling the ingredients in an orderly yet creative way. Even though it’s simple to make, the result is impressive enough to make it look like you spent hours in the kitchen. Let’s break down the steps to make sure you have all the guidance you need:
Instructions:
- Prepare the Instant Pudding: Start by preparing the vanilla pudding according to the instructions on the box. This usually involves whisking the pudding mix with cold milk and then allowing it to sit for a few minutes until it thickens. The pudding should be smooth and creamy when done. You can make this ahead of time if you’d like to save a bit of prep time.
- Prepare the Cups: Choose individual cups or small glass jars to serve this dessert. These cups should be clear, so the beautiful layers can be seen, but any small, sturdy container will work. You’ll want a cup that’s large enough to accommodate several layers, but not too big that the portions feel overwhelming.
- Swirl the Chocolate Sauce: Drizzle chocolate sauce or warmed fudge sauce into the bottom of each cup. Use the back of a spoon to swirl the sauce around the bottom to create a thin, even layer. The chocolate sauce adds a decadent base for the other ingredients, so don’t be shy with it! A generous swirl will ensure the chocolate flavor comes through in every bite.
- Layer the Vanilla Wafers: Break the vanilla wafers into smaller pieces so that they fit comfortably inside the cup. Arrange a layer of broken wafers on top of the chocolate sauce, pressing them down gently. The wafers will soften as they absorb the pudding, but they’ll still maintain a nice crunch, adding texture to each bite. The wafers serve as the base of this dessert, so it’s important to cover the bottom of the cup evenly.
- Add the Banana Slices: Slice the bananas just before you begin assembling, as they can brown quickly. Layer the banana slices on top of the vanilla wafers. The bananas provide a natural sweetness that balances out the richness of the pudding and chocolate. Be sure to cover the wafers with a layer of bananas for that classic banana pudding flavor.
- Add the Pudding: Spoon a generous amount of the prepared pudding over the banana slices, making sure they’re completely covered. The pudding will be thick and creamy, providing a smooth texture that contrasts nicely with the crunch of the wafers and the soft bananas. Be sure to spread it evenly to cover all the layers below.
- Repeat the Layers: Repeat the layering process with more vanilla wafers, bananas, and pudding until the cups are nearly full. Be sure to finish with a layer of pudding on top, as this will form the beautiful top layer. The beauty of this dessert lies in the visual appeal of the layers, so take your time to create a pleasing presentation.
- Top with Whipped Cream: Spoon a dollop of whipped cream or Cool Whip on top of the final layer of pudding. This adds a light, airy element that complements the creamy texture of the pudding and the richness of the chocolate. You can pipe the whipped cream on top for a more decorative look or simply use a spoon for a more rustic presentation.
- Garnish with Chocolate Sauce and Peanuts: Drizzle a little more chocolate sauce over the whipped cream, then sprinkle the chopped peanuts on top for a crunchy finish. The peanuts not only add texture but also bring a savory element to balance out the sweetness. You can also garnish with a slice of banana or a vanilla wafer if you want to add an extra decorative touch.
- Chill and Serve: Refrigerate the cups for at least 30 minutes before serving. This allows the layers to set and makes the pudding cool and refreshing. The dessert will be easier to eat once it’s chilled, and the flavors will have had time to meld together.
- Enjoy: Once chilled, your Chocolate-Covered Banana Pudding Cups are ready to be enjoyed! Whether you serve them in individual cups or bowls, each bite will be a delicious combination of creamy, crunchy, chocolatey goodness.
Beginner Tips and Notes
As a beginner cook, you may have a few questions about making this dessert. Here are some helpful tips to ensure your Chocolate-Covered Banana Pudding Cups turn out perfectly:
- Don’t Overmix the Pudding: When making the instant pudding, simply whisk it until it thickens. Overmixing can cause it to become too firm. If you’re using homemade pudding, be careful not to let it overcook and curdle.
- Prevent Banana Browning: To prevent the bananas from browning before serving, slice them right before assembling the dessert. If you’re preparing the cups in advance, you can also toss the banana slices in a little lemon juice to keep them fresh.
- Layer with Care: The beauty of this dessert lies in the layers, so take your time when assembling the cups. Use a spoon to gently press down on each layer to ensure that everything stays in place.
- Chill Before Serving: Let the dessert chill in the fridge for at least 30 minutes to help the layers set and the flavors meld. This also makes it easier to scoop and enjoy.
Serving Suggestions
While these Chocolate-Covered Banana Pudding Cups are delicious on their own, you can elevate the experience by pairing them with complementary sides or sauces. Here are some ideas:
- Fresh Fruit: A side of fresh berries, such as strawberries, raspberries, or blueberries, can add a tart contrast to the sweetness of the pudding. The vibrant colors of the fruit also add visual appeal.
- Ice Cream: If you want to make this dessert even more indulgent, serve it with a scoop of vanilla or chocolate ice cream on the side. The cold ice cream pairs wonderfully with the rich and creamy pudding.
- Caramel Sauce: A drizzle of warm caramel sauce over the top would complement the chocolate and banana flavors beautifully, adding a sweet and slightly salty finish.
For leftovers, you can store the pudding cups in the fridge for up to two days. Just be sure to cover them tightly to prevent the whipped cream from losing its texture.
Conclusion
Chocolate-Covered Banana Pudding Cups are the ultimate dessert for any occasion. Combining the best of banana pudding and chocolate, they’re sure to satisfy anyone’s sweet tooth. With their easy-to-follow layers, you’ll be able to create a stunning dessert even if you’re a beginner cook. Not only is it simple to prepare, but it’s also flexible enough to allow for customization based on your preferences.
The layers of rich chocolate, creamy vanilla pudding, fresh bananas, and crunchy wafers create a harmonious balance of textures and flavors that will leave your guests asking for seconds. Whether you’re making these for a family gathering, a party, or just as a special treat, this dessert is sure to impress.
So go ahead, give this recipe a try, and let us know what you think! We’d love to hear your thoughts and see how you make it your own. Happy cooking, and enjoy every delicious bite of your Chocolate-Covered Banana Pudding Cups!


