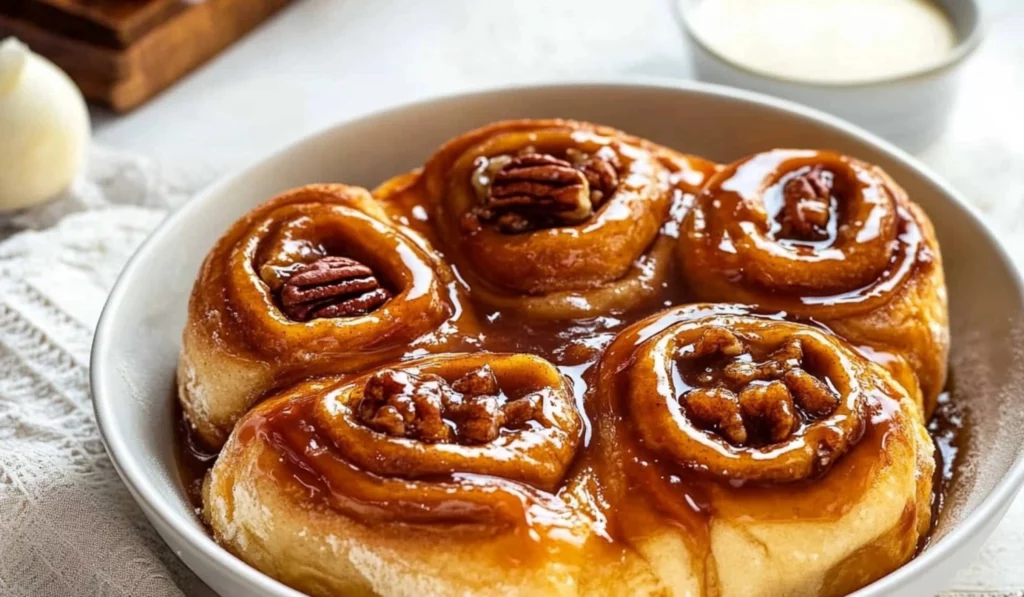
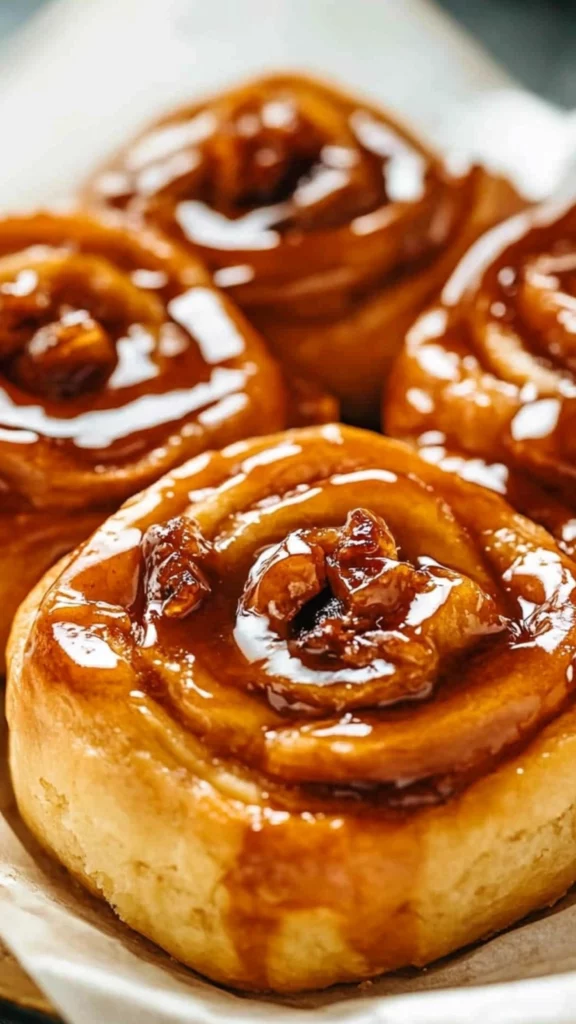
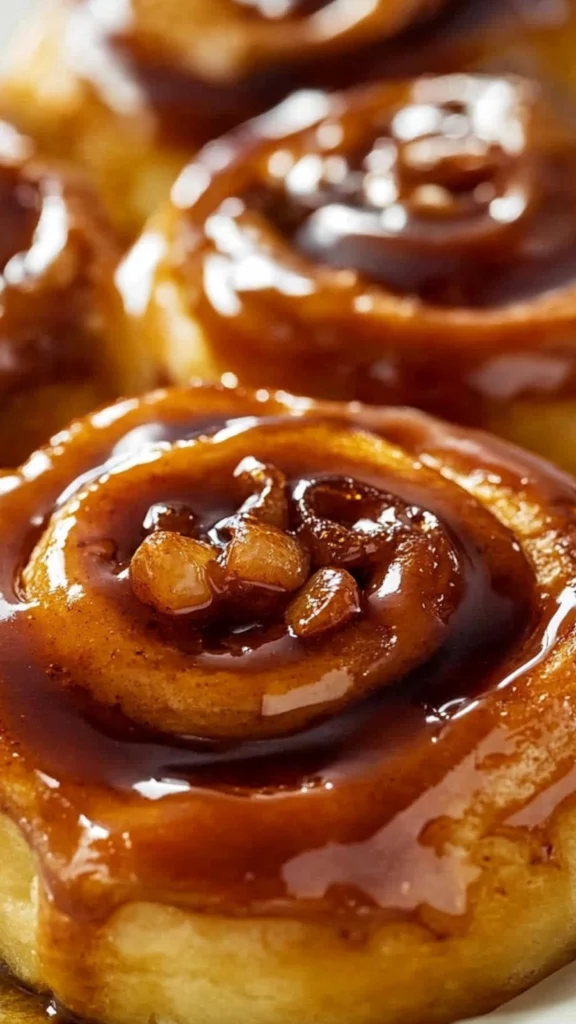
Picture this: warm, gooey sticky buns, their golden-brown tops glistening with a rich caramel sauce, the sweet aroma of cinnamon filling the air. It’s a classic comfort food that brings back memories of cozy mornings and special occasions. That’s the magic of Classic Sticky Buns. I remember the first time I attempted to make these. I was a novice baker, intimidated by the idea of working with yeast and dough. But the promise of homemade sticky buns was too tempting to resist. Following the recipe step-by-step, I was amazed at how easily the dough came together and how wonderfully the buns turned out. The joy of pulling apart a warm, sticky bun, its layers of cinnamon and caramel melting in my mouth, was incredibly rewarding.
Classic Sticky Buns: A Sweet and Satisfying Treat for Beginner Bakers
These Classic Sticky Buns are a sweet and comforting breakfast or brunch treat, featuring a soft, yeasty dough filled with cinnamon sugar and topped with a rich caramel sauce and optional pecans.
- Prep Time: 3 hours 30 minutes
- Cook Time: 30 minutes
- Total Time: 4 hours
- Yield: 12 servings 1x
- Category: Breakfast, Dessert
- Method: Baking, Yeast Baking
- Cuisine: American
Ingredients
- For the Dough:
- 1 cup whole milk, warmed
- ½ cup plus 2 tablespoons granulated sugar, divided
- 1½ tablespoons yeast
- 8 tablespoons unsalted butter, softened
- 2 large eggs, room temperature
- ½ teaspoon salt
- 4½ cups all-purpose flour, plus more as needed
- 1 tablespoon oil
- For the Filling:
- 4 tablespoons butter, melted and cooled
- ⅓ cup light brown sugar
- ⅓ cup granulated sugar
- 2 tablespoons ground cinnamon
- For the Topping:
- ½ cup butter
- 1 cup light brown sugar, packed
- ½ cup golden syrup or maple syrup
- 2 tablespoons heavy cream
- ½ cup chopped pecans (optional)
Instructions
-
- Activate Yeast: Get a big bowl or use your mixer’s bowl. Mix warm milk (heated to about 100°F or 38°C), 2 tablespoons of sugar, and yeast. Stir until it gets foamy on top, which takes around 5 minutes. Foamy yeast indicates it’s active. If it doesn’t foam, your yeast might be old. Use a thermometer to check the milk temperature. Use a whisk for mixing. Beginner Note: Use a timer to track the 5 minutes.
-
- Add Remaining Sugar, Eggs, and Salt: Start by adding the rest of the sugar (1/2 cup/100g) and the softened butter to the bowl. Mix them on medium until the butter looks a little broken up. Next, put in the eggs and salt and mix again on medium. Softened butter incorporates easily. Room temperature eggs mix better. Use a stand mixer or hand mixer. Use a spatula to scrape the bowl. Beginner Note: Mix until the ingredients are just combined.
-
- Gradually Add Flour: Lower the mixer speed and slowly add all-purpose flour, one cup at a time. Make sure each cup mixes in before adding the next one. Sometimes, stop to scrape the sides of the bowl to ensure everything mixes evenly. After adding the first 4 cups, add the remaining ½ cup and keep mixing until the dough comes together and pulls away from the sides of the bowl. This should take about 3 minutes. Your dough will be soft. Adding flour gradually prevents lumps. Scrape the bowl to ensure even mixing. Use a stand mixer or hand mixer. Use a spatula to scrape the bowl. Beginner Note: Add the flour slowly to prevent a mess.
-
- Knead the Dough: Keep the dough in the mixer (use the dough hook if you started with the paddle attachment) and knead it for another 5 minutes. Alternatively, you can knead it by hand on a lightly floured surface for the same amount of time. If the dough gets too sticky while kneading, add 1 teaspoon of flour at a time until it becomes soft and a bit tacky. Be careful not to add too much flour; you don’t want the dough to become dry. The dough should still feel somewhat soft after kneading. To check if it’s ready, poke it with your finger; it should slowly bounce back. You can also do a “windowpane test” by stretching a small piece of dough until light passes through it without tearing. Kneading develops gluten, making the dough elastic. The windowpane test shows if the gluten is developed. Use a stand mixer with a dough hook or knead by hand. Use a light floured surface for hand kneading. Beginner Note: Knead until the dough is smooth and elastic.
-
- First Rise: Lightly grease a large bowl with oil or use nonstick spray. Put the dough in the bowl, turning it to coat all sides with oil. Cover the bowl with aluminum foil, plastic wrap, or a kitchen towel. Allow the dough to rise in a warm spot for about 2 hours or until it doubles in size. Usually, it takes about 2 hours on the counter. A warm, draft-free spot is ideal for rising. Doubling in size indicates the dough is ready. Use a large bowl for rising. Use oil or nonstick spray. Beginner Note: Place the bowl in a warm location, like a slightly warm oven or a sunny spot.
-
- Prepare Baking Dish: Grease the bottom and sides of a 9×13-inch metal or glass baking dish. Greasing prevents the buns from sticking. Use parchment paper for easier cleanup. Use butter or nonstick spray. Use a baking dish that is in good condition. Beginner Note: Line with parchment paper for easy removal.
-
- Make the Sauce: While the dough is undergoing its first rise, take this time to prepare the sauce for the sticky buns. In a saucepan over medium heat, melt the butter, then add the brown sugar and syrup. Stir constantly until the mixture is smooth and well combined. This should take about 2-3 minutes. Remove the saucepan from the heat and stir in the whipping cream. Remove from heat, add the cream, mix well to combine. Pour into the prepared pan and set aside to cool. Constant stirring prevents the sauce from burning. Add cream off the heat to prevent splattering. Use a medium saucepan. Use a whisk for stirring. Beginner Note: Do not leave the sauce unattended.
-
- Roll Out the Dough: After the dough has risen, gently punch it down to release the air. Place it on a floured work surface and use a floured rolling pin to roll it out into a smooth 12×18-inch rectangle. Ensure the dough is even and doesn’t shrink as you roll it. Cover it lightly. If it does, let it rest for 10 minutes to relax the gluten. This will make it easier to roll out. Punching down releases carbon dioxide. Resting the dough relaxes the gluten, preventing shrinkage. Use a floured surface. Use a rolling pin. Beginner Note: Roll the dough evenly for uniform buns.
-
- Prepare the Filling: Spread melted butter evenly over the dough. In a small bowl, mix sugar and cinnamon and sprinkle this mixture evenly over the butter. Roll up the dough tightly into an 18-inch-long log. If some filling spills out, sprinkle it on top of the roll. Use a sharp knife to cut the log into 12 equal rolls, each about 1.5 inches wide. If you’re using the pecans, scatter them evenly over the sauce in the pan. Then arrange these rolls in the sauce. An even spread of filling ensures even flavor. Use a serrated knife for clean cuts. Use a pastry brush for spreading butter. Beginner Note: Roll the dough tightly to prevent gaps.
-
- Second Rise: Cover the rolls tightly and let them rise until they get puffy, which should take about 1 hour. Alternatively, you can follow the overnight option mentioned in the recipe notes. A second rise makes the buns light and fluffy. Puffy rolls indicate they’re ready. Use plastic wrap or a kitchen towel. Use a warm place for rising. Beginner Note: Do not over proof the rolls.
-
- Preheat the Oven: Heat your oven to 350°F (177°C). Preheat the oven to ensure even baking. Use an oven thermometer to verify the temperature. Use an oven that is in good working order. Beginner Note: Use a timer to track preheating time.
-
- Bake: Bake for 20 – 30 minutes or until golden brown. Let cool in the pan for 5 minutes before carefully flipping onto a serving tray and serve warm, sticky-side-up. Golden brown indicates the buns are cooked. Cooling slightly makes them easier to handle. Invert the pan onto a serving tray. Use oven mitts. Use a cooling rack. Beginner Note: Check the buns at 20 minutes to prevent over baking.
Notes
- Ensure milk is warm, not hot.
- Knead dough until smooth.
- Let dough rise in a warm place.
- Don’t overfill with filling.
- Cool slightly before inverting.
This recipe is perfect for beginner bakers because it breaks down the process into manageable steps, making it less daunting. It’s a fantastic way to learn the basics of yeast dough and create a truly indulgent treat. Plus, the satisfaction of making these from scratch is unmatched. If you’re looking for a baking project that’s both fun and rewarding, Classic Sticky Buns are the perfect choice. It’s a culinary adventure that’s accessible to everyone, regardless of their baking experience. It’s also a great way to learn the art of creating a classic sweet bread, proving that even a beginner can bake something truly special. This recipe offers a wonderful opportunity to develop confidence in baking, showing that even complex-sounding recipes can be broken down into simple, achievable tasks.
Ingredients and Preparation: The Building Blocks of Sweet Success
This recipe uses simple, readily accessible ingredients, making it a breeze for even the most novice bakers to assemble.
For the Dough:
- 1 cup whole milk, warmed to about 100°F (38°C) – Alternative: You can use 2% milk or a non-dairy alternative like almond milk. Warm milk activates the yeast. Use a food thermometer to check the temperature. Ensure the milk isn’t too hot, as it can kill the yeast. Use a microwave or stovetop to warm the milk.
- ½ cup plus 2 tablespoons granulated sugar, divided – Alternative: You can use cane sugar. Sugar feeds the yeast and adds sweetness. Use a measuring cup for accurate measurements. Use a light colored measuring cup to see the sugar level.
- 1½ tablespoons active dry or instant yeast (2 standard size packets) – Alternative: You can use fresh yeast, but you’ll need to adjust the amount. Yeast is essential for the dough to rise. Ensure the yeast is fresh and within its expiration date. Check the expiration date on the yeast packet.
- 8 tablespoons unsalted butter, softened to room temperature and cut into 4 pieces – Alternative: You can use salted butter, but omit the salt in the dough. Softened butter incorporates easily into the dough. Ensure the butter is at room temperature. Leave the butter out for an hour before baking.
- 2 large eggs, at room temperature – Alternative: You can use egg substitutes, but the texture may vary. Room temperature eggs incorporate better into the dough. Ensure the eggs are fresh. Leave the eggs out for an hour before baking.
- ½ teaspoon salt – Alternative: You can use sea salt or kosher salt. Salt enhances the flavor of the dough. Use a measuring spoon for accurate measurements. Use a level measuring spoon.
- 4½ cups all-purpose flour, plus more as needed – Alternative: You can use bread flour for a chewier texture. All-purpose flour provides structure to the dough. Use a measuring cup for accurate measurements. Use a sifter for smooth flour.
- 1 tablespoon oil (canola, vegetable, or olive oil) – Alternative: You can use melted butter. Oil prevents the dough from sticking to the bowl. Use a neutral oil for this recipe. Use a measuring spoon for accurate measurements.
For the Filling:
- 4 tablespoons butter, melted and cooled – Alternative: You can use margarine. Melted butter adds richness to the filling. Allow the butter to cool slightly before using. Use a microwave or stovetop to melt the butter.
- ⅓ cup light brown sugar – Alternative: You can use dark brown sugar for a richer flavor. Brown sugar adds sweetness and moisture to the filling. Use packed brown sugar for accurate measurements. Pack the brown sugar tightly in the measuring cup.
- ⅓ cup granulated sugar – Alternative: You can use cane sugar. Granulated sugar adds sweetness to the filling. Use a measuring cup for accurate measurements. Use a light colored measuring cup.
- 2 tablespoons ground cinnamon – Alternative: You can use a cinnamon blend. Ground cinnamon adds a warm, spicy flavor. Use fresh ground cinnamon for the best flavor. Use a measuring spoon for accurate measurements.
For the Topping:
- ½ cup butter – Alternative: You can use margarine. Butter adds richness to the topping. Use unsalted butter. Use a microwave or stovetop to melt the butter.
- 1 cup light brown sugar, packed – Alternative: You can use dark brown sugar for a richer flavor. Brown sugar adds sweetness and moisture to the topping. Use packed brown sugar for accurate measurements. Pack the brown sugar tightly in the measuring cup.
- ½ cup golden syrup or maple syrup – Alternative: You can use corn syrup or honey. Golden syrup adds a unique sweetness. Use a measuring cup for accurate measurements. Use a silicone spatula to scrape the syrup.
- 2 tablespoons heavy cream or whipping cream – Alternative: You can use half-and-half. Cream adds richness to the topping. Use fresh cream. Use a measuring spoon for accurate measurements.
- ½ cup chopped pecans (optional) – Alternative: You can use walnuts, almonds, or other nuts. Pecans add a nutty crunch to the topping. Toast the pecans for added flavor. Use a sharp knife for chopping the pecans.
Step-by-Step Instructions: Crafting Classic Sticky Buns (Extended Version)
These easy-to-follow instructions will guide you through each step of creating your delicious Classic Sticky Buns:
- Activate Yeast: Get a big bowl or use your mixer’s bowl. Mix warm milk (heated to about 100°F or 38°C), 2 tablespoons of sugar, and yeast. Stir until it gets foamy on top, which takes around 5 minutes. Foamy yeast indicates it’s active. If it doesn’t foam, your yeast might be old. Use a thermometer to check the milk temperature. Use a whisk for mixing. Beginner Note: Use a timer to track the 5 minutes.
- Add Remaining Sugar, Eggs, and Salt: Start by adding the rest of the sugar (1/2 cup/100g) and the softened butter to the bowl. Mix them on medium until the butter looks a little broken up. Next, put in the eggs and salt and mix again on medium. Softened butter incorporates easily. Room temperature eggs mix better. Use a stand mixer or hand mixer. Use a spatula to scrape the bowl. Beginner Note: Mix until the ingredients are just combined.
- Gradually Add Flour: Lower the mixer speed and slowly add all-purpose flour, one cup at a time. Make sure each cup mixes in before adding the next one. Sometimes, stop to scrape the sides of the bowl to ensure everything mixes evenly. After adding the first 4 cups, add the remaining ½ cup and keep mixing until the dough comes together and pulls away from the sides of the bowl. This should take about 3 minutes. Your dough will be soft. Adding flour gradually prevents lumps. Scrape the bowl to ensure even mixing. Use a stand mixer or hand mixer. Use a spatula to scrape the bowl. Beginner Note: Add the flour slowly to prevent a mess.
- Knead the Dough: Keep the dough in the mixer (use the dough hook if you started with the paddle attachment) and knead it for another 5 minutes. Alternatively, you can knead it by hand on a lightly floured surface for the same amount of time. If the dough gets too sticky while kneading, add 1 teaspoon of flour at a time until it becomes soft and a bit tacky. Be careful not to add too much flour; you don’t want the dough to become dry. The dough should still feel somewhat soft after kneading. To check if it’s ready, poke it with your finger; it should slowly bounce back. You can also do a “windowpane test” by stretching a small piece of dough until light passes through it without tearing. Kneading develops gluten, making the dough elastic. The windowpane test shows if the gluten is developed. Use a stand mixer with a dough hook or knead by hand. Use a light floured surface for hand kneading. Beginner Note: Knead until the dough is smooth and elastic.
- First Rise: Lightly grease a large bowl with oil or use nonstick spray. Put the dough in the bowl, turning it to coat all sides with oil. Cover the bowl with aluminum foil, plastic wrap, or a kitchen towel. Allow the dough to rise in a warm spot for about 2 hours or until it doubles in size. Usually, it takes about 2 hours on the counter. A warm, draft-free spot is ideal for rising. Doubling in size indicates the dough is ready. Use a large bowl for rising. Use oil or nonstick spray. Beginner Note: Place the bowl in a warm location, like a slightly warm oven or a sunny spot.
- Prepare Baking Dish: Grease the bottom and sides of a 9×13-inch metal or glass baking dish. Greasing prevents the buns from sticking. Use parchment paper for easier cleanup. Use butter or nonstick spray. Use a baking dish that is in good condition. Beginner Note: Line with parchment paper for easy removal.
- Make the Sauce: While the dough is undergoing its first rise, take this time to prepare the sauce for the sticky buns. In a saucepan over medium heat, melt the butter, then add the brown sugar and syrup. Stir constantly until the mixture is smooth and well combined. This should take about 2-3 minutes. Remove the saucepan from the heat and stir in the whipping cream. Remove from heat, add the cream, mix well to combine. Pour into the prepared pan and set aside to cool. Constant stirring prevents the sauce from burning. Add cream off the heat to prevent splattering. Use a medium saucepan. Use a whisk for stirring. Beginner Note: Do not leave the sauce unattended.
- Roll Out the Dough: After the dough has risen, gently punch it down to release the air. Place it on a floured work surface and use a floured rolling pin to roll it out into a smooth 12×18-inch rectangle. Ensure the dough is even and doesn’t shrink as you roll it. Cover it lightly. If it does, let it rest for 10 minutes to relax the gluten. This will make it easier to roll out. Punching down releases carbon dioxide. Resting the dough relaxes the gluten, preventing shrinkage. Use a floured surface. Use a rolling pin. Beginner Note: Roll the dough evenly for uniform buns.
- Prepare the Filling: Spread melted butter evenly over the dough. In a small bowl, mix sugar and cinnamon and sprinkle this mixture evenly over the butter. Roll up the dough tightly into an 18-inch-long log. If some filling spills out, sprinkle it on top of the roll. Use a sharp knife to cut the log into 12 equal rolls, each about 1.5 inches wide. If you’re using the pecans, scatter them evenly over the sauce in the pan. Then arrange these rolls in the sauce. An even spread of filling ensures even flavor. Use a serrated knife for clean cuts. Use a pastry brush for spreading butter. Beginner Note: Roll the dough tightly to prevent gaps.
- Second Rise: Cover the rolls tightly and let them rise until they get puffy, which should take about 1 hour. Alternatively, you can follow the overnight option mentioned in the recipe notes. A second rise makes the buns light and fluffy. Puffy rolls indicate they’re ready. Use plastic wrap or a kitchen towel. Use a warm place for rising. Beginner Note: Do not over proof the rolls.
- Preheat the Oven: Heat your oven to 350°F (177°C). Preheat the oven to ensure even baking. Use an oven thermometer to verify the temperature. Use an oven that is in good working order. Beginner Note: Use a timer to track preheating time.
- Bake: Bake for 20 – 30 minutes or until golden brown. Let cool in the pan for 5 minutes before carefully flipping onto a serving tray and serve warm, sticky-side-up. Golden brown indicates the buns are cooked. Cooling slightly makes them easier to handle. Invert the pan onto a serving tray. Use oven mitts. Use a cooling rack. Beginner Note: Check the buns at 20 minutes to prevent over baking.
Beginner Tips and Notes: Your Baking Buddy (Extended Version)
Even simple baking projects have a few tricks to make them even better:
- Yeast Activation: Ensure your milk is the correct temperature. Too hot and it will kill the yeast, too cold and it wont activate it. Use a food thermometer.
- Kneading: Don’t over or under knead the dough. The window pane test is a great tool. Use a timer to track kneading time.
- Rising: Find a warm area for your dough to rise. A cold environment will greatly extend your rising time. Use a warm, draft free location.
- Don’t Overfill: Be sure to not over fill your buns when adding in your filling. This will cause them to overflow while baking. Use a moderate amount of filling.
Serving Suggestions: Completing the Sweet Treat
These Classic Sticky Buns are delicious and satisfying on their own, but you can also enhance them with some complementary toppings and pairings.
- Vanilla Ice Cream: A scoop of vanilla ice cream adds a cool and creamy contrast.
- Whipped Cream: Whipped cream adds a light and airy texture.
- Fresh Berries: Fresh berries add a pop of color and a touch of acidity.
- Coffee or Tea: Coffee or tea pairs well with the sweet and warm buns.
Storage Tips for Leftovers:
Store leftover Classic Sticky Buns in an airtight container at room temperature for up to 2 days. Reheat in the microwave or oven until warm. The buns may become slightly dry when stored, so reheating is recommended.
Conclusion: A Sweet and Satisfying Treat for Home Bakers (Extended Version)
These Classic Sticky Buns are a delightful and rewarding baking project for beginners. They’re a fantastic way to learn the basics of yeast dough and create a truly indulgent treat. I encourage you to try this recipe and make it your own. Don’t be afraid to experiment with different ingredients and toppings to create your perfect sticky bun masterpiece. Share your culinary creations and experiences in the comments below – I’d love to see your variations! This easy and versatile recipe is a game-changer for weekend brunches, holiday gatherings, or any time you need a sweet and comforting treat. It’s a flavorful way to get a delicious and impressive dessert on the table without any fuss. And the best part? It’s so easy to customize! You can adjust the ingredients to your liking, pair it with a variety of toppings, and even make it ahead of time.
These Classic Sticky Buns are more than just a recipe; they’re an experience. It’s a celebration of flavor, texture, and the joy of creating a delicious and satisfying treat. It’s a perfect blend of sweet, warm, and comforting flavors, a delightful way to nourish your body and your soul. It’s a testament to the fact that baking doesn’t have to be complicated or intimidating; it can be fun, creative, and incredibly rewarding. It’s a reminder that even the simplest ingredients, when combined with a little creativity and love, can create something truly special. It’s a chance to explore new flavors and create your own baking masterpieces. It’s an invitation to gather around the table with loved ones and share a treat that’s both comforting and delicious. So, what are you waiting for? Get baking and create some sticky bun magic!


