Coconut Cream Lush: A Slice of Summer in Every Bite
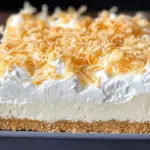
When the heat of summer arrives, nothing feels more satisfying than a cold, creamy, and refreshing dessert to cool down. Coconut Cream Lush is a decadent, no-bake treat that combines the rich, tropical flavor of coconut with a variety of textures that will keep you coming back for more. With its layers of creamy coconut goodness, crisp graham cracker crust, and toasted coconut topping, this dessert is the perfect balance of indulgence and lightness. Whether you’re hosting a summer BBQ, celebrating a special occasion, or simply craving a delightful sweet treat, Coconut Cream Lush will undoubtedly be the star of the show.
- Prep Time: 25 minutes
- Cook Time: 10 minutes
- Total Time: 35 minutes (plus 6 hours chilling time)
- Yield: 18 servings 1x
- Category: Dessert
- Method: No-Bake, Chilled
- Cuisine: American
- Diet: Vegetarian
Ingredients
For the Graham Cracker Crust:
- 1 1/2 cups graham cracker crumbs (about 12–14 graham cracker sheets)
- 2 tbsp granulated sugar
- 1/2 cup unsalted butter, melted
For the Coconut Cheesecake Layer:
- 16 oz cream cheese, softened (2–8 ounce blocks)
- 1 cup powdered sugar
- 1 tsp coconut extract
- 8 oz Cool Whip, thawed
For the Coconut Pudding Layer:
- 2 (3.4 oz) boxes instant coconut cream pudding mix (or a 6.8 oz box)
- 3 cups half-and-half (or whole milk)
For the Topping:
- 8 oz Cool Whip
- 1 cup sweetened shredded coconut, toasted
Instructions
Step 1: Prepare the Graham Cracker Crust
The first layer is the graham cracker crust, which forms the foundation of this dessert. Start by spraying a 9×13-inch baking pan with non-stick spray to make sure the dessert comes out easily after it has chilled. This ensures that the dessert will hold its shape when you cut into it.
In a medium-sized bowl, combine the graham cracker crumbs, granulated sugar, and melted butter. Mix the ingredients together until the crumbs are evenly coated with butter. The mixture should feel slightly damp and stick together when pressed. If the mixture is too dry, you can add a little more melted butter to get the right texture.
Press the graham cracker mixture firmly and evenly into the bottom of the prepared pan. Use the back of a spoon or your fingers to press the crumbs down so that they are compact and even. This step is important because it helps the crust hold together and gives it a nice, firm texture. Once the crust is pressed into place, transfer the pan to the freezer and let it chill while you work on the next layer.
Step 2: Make the Coconut Cheesecake Layer
The coconut cheesecake layer is the first creamy layer of this dessert, and it’s rich, smooth, and bursting with coconut flavor. In a large mixing bowl, beat the softened cream cheese and powdered sugar together until the mixture is smooth and well combined. The powdered sugar helps to sweeten the cream cheese, while the coconut extract gives it that unmistakable tropical flavor.
Once the cream cheese and sugar are well-mixed, fold in the thawed Cool Whip. This will make the cheesecake layer light, airy, and perfectly creamy. Stir until everything is evenly combined, ensuring that there are no lumps and the texture is smooth.
Next, spread the coconut cheesecake mixture evenly over the chilled graham cracker crust. Be sure to spread the mixture all the way to the edges of the pan, covering the entire surface. Once this layer is in place, return the pan to the freezer to chill while you prepare the coconut pudding layer.
Step 3: Prepare the Coconut Pudding Layer
The coconut pudding layer is the heart of this dessert, providing a rich and creamy texture that balances the lighter cheesecake layer. In a large bowl, whisk together the two boxes of instant coconut cream pudding mix and the half-and-half. You can use whole milk if you prefer, but half-and-half gives the pudding a richer, creamier consistency.
Whisk the mixture for about 2 minutes, or until the pudding starts to thicken. You’ll notice the texture becoming thicker and smoother as you whisk. Once the pudding has thickened, spread it evenly over the coconut cheesecake layer, making sure to cover the entire surface. The pudding layer should be smooth and even, with no gaps or uneven spots.
Step 4: Add the Topping
The final layer of this dessert is the whipped topping, which adds lightness and sweetness. Spread the remaining container of Cool Whip over the top of the coconut pudding layer, ensuring that the entire surface is covered. This creates a fluffy, airy layer that complements the denser layers below.
For the finishing touch, toast the shredded coconut. To do this, spread the coconut in a single layer on a baking sheet and toast it in the oven at 350°F for 8-10 minutes. Stir the coconut halfway through to ensure it toasts evenly. Be sure to keep an eye on it, as coconut can burn quickly. Once the coconut is golden brown and fragrant, remove it from the oven and let it cool.
Sprinkle the toasted coconut over the top of the Cool Whip layer, covering the dessert with a crunchy, flavorful garnish that adds both texture and an extra coconut kick.
Step 5: Chill and Serve
Cover the pan with plastic wrap or a lid, and refrigerate the dessert for at least 6 hours, or overnight if possible. The chilling time allows the layers to firm up and set, making it easier to slice and serve. The flavors will meld together, creating a dessert that’s even more delicious after it’s had time to rest. When ready to serve, slice into squares and enjoy the cool, creamy layers of coconut goodness.
Notes
Flavor Variations: While this recipe is already packed with coconut flavor, you can experiment with different flavors if you’d like. For example, you could swap out the coconut pudding for banana cream pudding or use pineapple-flavored pudding for a tropical twist. The graham cracker crust pairs wonderfully with any fruity variation.
Dairy-Free Version: If you need a dairy-free alternative, you can substitute the cream cheese with a dairy-free cream cheese, like those made from cashews or almonds. You can also use dairy-free whipped topping and coconut milk instead of half-and-half for a fully dairy-free version of this dessert.
Nutty Twist: For an extra crunch and flavor, try adding chopped toasted almonds or macadamia nuts to the toasted coconut topping. These nuts will complement the coconut flavor while adding texture to the dessert.
Storage: Leftovers can be stored in the refrigerator for up to 3 days. Just be sure to cover the dessert tightly to keep it fresh and prevent it from absorbing other flavors in the fridge.