
Cranberry Pineapple Upside Down Cake is a show-stopping dessert that combines the delightful tartness of cranberries with the sweet, tropical flavor of pineapple. This cake is a twist on the classic upside-down cake, where layers of fruit are caramelized under the cake batter, creating a luscious, golden topping. Perfectly sized into individual portions, this recipe brings a burst of color and flavor to any gathering. The combination of the juicy pineapple, tangy cranberry sauce, and a rich, buttery cake creates a symphony of flavors that will captivate anyone who takes a bite. If you’re looking for a dessert that feels both special and comforting, this Cranberry Pineapple Upside Down Cake should be at the top of your list.
PrintCranberry Pineapple Upside-Down Cake: A Festive Delight for Any Occasion

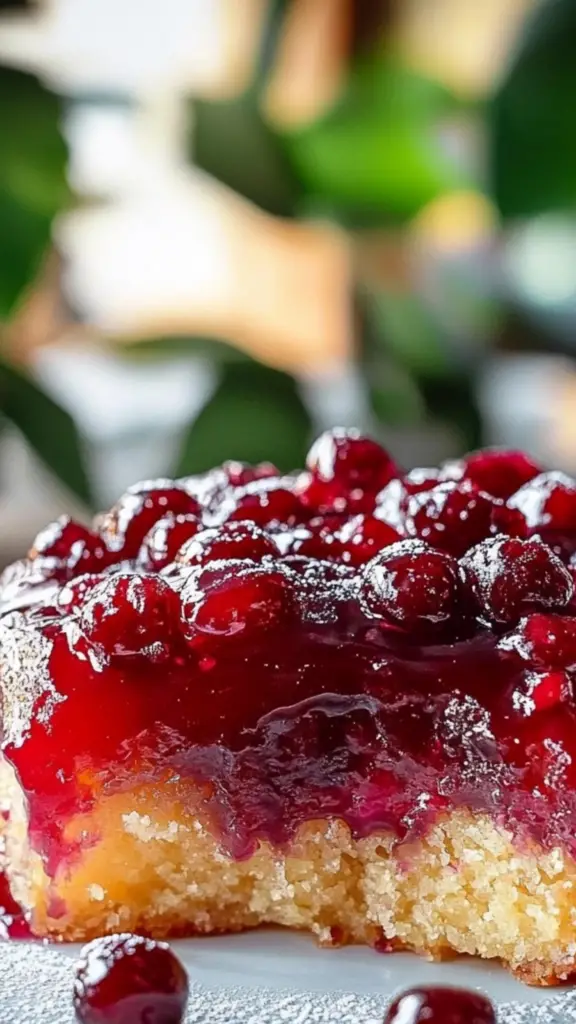
Cranberry Pineapple Upside Down Cake is a perfect blend of tart and sweet flavors, combining the bright zest of cranberries with the tropical warmth of pineapple. The individual-sized cakes feature a rich caramel glaze that slowly soaks into the soft, buttery layers, creating a satisfying bite of textures. The golden pineapple rings sitting atop a tart cranberry sauce provide both flavor and visual appeal, making this dessert an unforgettable experience for any occasion. Whether served as a charming treat for an intimate gathering or a standout dish for a festive meal, these mini cakes capture the essence of celebration in every bite. The prep and cook time may seem a little lengthy, but the end result is more than worth the effort, offering a delightful balance of sweetness and tartness, with a glorious caramelized finish.
- Prep Time: 1 hour
- Cook Time: 35 minutes
- Total Time: 1 hour 35 minutes
- Yield: Six 4-inch cakes 1x
- Category: Dessert, Cake
- Method: Baking
- Cuisine: American
- Diet: Vegetarian
Ingredients
Cranberry Sauce:
- 6 oz fresh or frozen cranberries
- ½ – 1 cup granulated sugar (adjust based on desired sweetness)
- 1 tablespoon orange zest
- 1 tablespoon freshly squeezed lemon juice
- Salt and pepper, to taste
Caramel Glaze and Pineapple:
- ½ cup (4 oz) butter, at room temperature
- 1 cup dark brown sugar
- 2 tablespoons corn syrup
- 2 teaspoons pure vanilla extract
- ½ teaspoon salt
- 6 sliced rings of canned pineapple
For the Cakes:
- 4 large eggs, at room temperature
- ¾ cup granulated sugar, divided
- ½ cup (4 oz) butter
- ¼ cup dark brown sugar
- 3 teaspoons pure vanilla extract
- 1 ½ cups unbleached all-purpose flour
- ¼ cup cornstarch
- 1 teaspoon baking powder
- 1 teaspoon table salt (or 1 ¼ teaspoon kosher salt)
- ½ cup buttermilk, at room temperature
Instructions
Step 1: Prepare the Cranberry Sauce
Start by making the cranberry sauce to give it time to cool before layering it into the cake pans. In a heavy-bottomed saucepan, combine 6 oz of cranberries with ½ cup of granulated sugar, orange zest, and lemon juice. Set the saucepan over medium-low heat and cook, stirring frequently, until the cranberries soften and the sugar dissolves. Once the sugar is fully incorporated and the cranberries have softened, raise the heat to medium-high. The cranberries will start to burst within a few minutes.
As the cranberries burst and release their juices, you’ll notice a slight change in color as the sauce turns a rich crimson. After 5-6 minutes, reduce the heat to low and add the reserved cranberries, which will retain their shape and add texture to the sauce. Stir to incorporate. Taste the sauce at this point and adjust the sweetness by adding more sugar if necessary. If you prefer a more tart cranberry sauce, you can skip this step or only add a small amount of extra sugar.
Add a pinch of salt and pepper to balance the flavors. The salt will enhance the tanginess of the cranberries, while the pepper adds an unexpected layer of depth. Let the cranberry sauce cool to room temperature, and then transfer it to a jar or airtight container. It can be stored in the refrigerator for up to two weeks, and it makes for a wonderful accompaniment to other desserts or even roasted meats.
Step 2: Prepare the Cake Pans and Caramel Glaze
The caramel glaze and the fruit layers are what make this cake so special. To ensure the caramel doesn’t seep out while baking, prepare your six 4-inch springform pans by greasing both the bottoms and sides with vegetable shortening. Then, cut out six circles of parchment paper, about ½ inch larger than the pans. Press the parchment into the pans and lightly grease the paper. Dust each pan with a small amount of flour to coat the surface. This will help the caramel glaze adhere and prevent any unwanted sticking.
Now, for the caramel glaze. In the bowl of a standing electric mixer, combine the butter, dark brown sugar, corn syrup, vanilla extract, and salt. Beat on high speed for 4-5 minutes until the mixture is light, fluffy, and smooth. This step is crucial for achieving the perfect caramel texture that will form the base of the cakes.
Once the glaze is ready, divide it evenly among the six prepared pans. Gently press the glaze into the bottom of each pan to form an even layer. This caramel will soak into the cake during baking, giving it a rich, sweet flavor.
Spread the cranberry sauce evenly over the glaze, making sure to cover it completely. Top each pan with a pineapple ring, gently pressing it down into the cranberry sauce. You can also experiment by reversing the order of the layers (glaze, pineapple, cranberry sauce), which will leave the pineapple visible when the cakes are flipped over. Both methods create beautiful cakes, so feel free to choose whichever style you prefer.
Step 3: Prepare the Cake Batter
Now it’s time to make the cake batter. Begin by preheating the oven to 350°F (175°C) and separating the egg whites from the yolks. Using an electric mixer, beat the egg whites on medium-high speed until frothy. Gradually add ¼ cup of the granulated sugar and continue to beat until the egg whites form glossy peaks that hold their shape. Set the egg whites aside.
In a separate bowl, cream together the butter, remaining ½ cup of granulated sugar, and dark brown sugar. Beat on high speed for 4-5 minutes, scraping the sides of the bowl occasionally, until the mixture becomes light and fluffy. Add the vanilla extract and continue mixing until incorporated.
Add the egg yolks, two at a time, beating well between each addition. Scrape down the sides of the bowl to ensure even mixing. The batter should be smooth and airy.
In a separate bowl, whisk together the flour, cornstarch, baking powder, and salt. Gradually add this dry mixture to the wet ingredients, alternating with the buttermilk. Start with the dry ingredients, add some buttermilk, then more dry ingredients, followed by the remaining buttermilk. Beat the mixture on low speed to avoid overmixing. The goal is to create a smooth batter with just enough air to ensure a light, fluffy cake.
Finally, gently fold the beaten egg whites into the batter using a wooden spoon or rubber spatula. Be careful not to deflate the egg whites. The batter should remain light and airy, with small pockets of air that will help the cake rise.
Step 4: Assemble and Bake the Cakes
Divide the batter evenly among the six prepared pans. The batter should come nearly to the top of the pans. The cakes will rise during baking, so don’t worry if the batter looks a bit high. Place the pans on a rimmed baking sheet lined with aluminum foil to catch any caramel that may spill over.
Bake the cakes in the preheated oven for about 30-35 minutes. A toothpick inserted into the center of one of the cakes should come out clean when they’re done. If necessary, bake for a few more minutes, checking periodically. Once the cakes are finished baking, remove them from the oven and let them rest for 5 minutes.
Step 5: Flip and Serve
After the cakes have rested, carefully flip each pan onto a plate or large serving platter. Wait about 5 minutes before releasing the sides of the springform pans. This brief wait allows the caramel to drip down into the cakes, creating a beautiful sauce. Once you’ve removed the sides and the parchment paper, the mini cakes will be ready to serve.
These cakes are best served warm, as the caramel glaze is at its most decadent when fresh. You can also serve them with a dollop of whipped cream or a scoop of vanilla ice cream for an extra indulgent treat. These individual-sized portions make serving easy, and the beautiful fruit topping will leave your guests impressed.
Notes
- If you prefer a less sweet cranberry sauce, you can reduce the amount of sugar used or add extra lemon or orange juice for a more tangy flavor.
- You can substitute fresh pineapple for canned if preferred, though canned pineapple rings hold their shape better during baking.
- For a citrusy twist, try adding a teaspoon of lime zest to the batter or cranberry sauce for added depth of flavor.
- These mini cakes can also be topped with toasted coconut for an extra tropical flair or a sprinkle of cinnamon for a warm, spiced note.
The Appeal of Cranberry Pineapple Upside Down Cake
The beauty of upside-down cakes lies in their simplicity and elegance. The fruit on the bottom caramelizes as the cake bakes, creating a glossy, sweet topping. But what makes this version stand out is the use of cranberries, which offer a sharp contrast to the sweetness of the pineapple. The fresh cranberry sauce balances the sweetness of the brown sugar and pineapple, creating a perfect harmony of flavors. The buttery caramel glaze holds the cake together while soaking into the layers, making each bite a delicious experience of soft cake and tart-sweet fruit.
The individual-sized cakes are ideal for serving at dinner parties, special occasions, or casual gatherings. Not only does this recipe cater to smaller portions, but it also makes serving easier. Each cake is a miniature masterpiece, showcasing the fruit topping in its own little world. Whether you’re serving it as a dessert after a family dinner or as a treat for a celebration, these cakes will surely impress your guests. They can be served warm or at room temperature, and are even delicious the next day, making them perfect for make-ahead treats.
Ingredients
Cranberry Sauce:
- 6 oz fresh or frozen cranberries
- ½ – 1 cup granulated sugar (adjust according to your preference for sweetness)
- 1 tablespoon orange zest
- 1 tablespoon freshly squeezed lemon juice
- Salt and pepper to taste
Caramel Glaze and Pineapple:
- ½ cup (4 oz) butter, at room temperature
- 1 cup dark brown sugar
- 2 tablespoons corn syrup
- 2 teaspoons pure vanilla extract
- ½ teaspoon salt
- 6 sliced rings of canned pineapple (fresh can be substituted, but canned works best for this recipe)
For the Cakes:
- 4 large eggs, at room temperature
- ¾ cup granulated sugar, divided
- ½ cup (4 oz) butter
- ¼ cup dark brown sugar
- 3 teaspoons pure vanilla extract
- 1 ½ cups unbleached all-purpose flour
- ¼ cup cornstarch
- 1 teaspoon baking powder
- 1 teaspoon table salt (or 1 ¼ teaspoon kosher salt)
- ½ cup buttermilk, at room temperature
Instructions
Step 1: Prepare the Cranberry Sauce
Start by making the cranberry sauce to give it time to cool before layering it into the cake pans. In a heavy-bottomed saucepan, combine 6 oz of cranberries with ½ cup of granulated sugar, orange zest, and lemon juice. Set the saucepan over medium-low heat and cook, stirring frequently, until the cranberries soften and the sugar dissolves. Once the sugar is fully incorporated and the cranberries have softened, raise the heat to medium-high. The cranberries will start to burst within a few minutes.
As the cranberries burst and release their juices, you’ll notice a slight change in color as the sauce turns a rich crimson. After 5-6 minutes, reduce the heat to low and add the reserved cranberries, which will retain their shape and add texture to the sauce. Stir to incorporate. Taste the sauce at this point and adjust the sweetness by adding more sugar if necessary. If you prefer a more tart cranberry sauce, you can skip this step or only add a small amount of extra sugar.
Add a pinch of salt and pepper to balance the flavors. The salt will enhance the tanginess of the cranberries, while the pepper adds an unexpected layer of depth. Let the cranberry sauce cool to room temperature, and then transfer it to a jar or airtight container. It can be stored in the refrigerator for up to two weeks, and it makes for a wonderful accompaniment to other desserts or even roasted meats.
Step 2: Prepare the Cake Pans and Caramel Glaze
The caramel glaze and the fruit layers are what make this cake so special. To ensure the caramel doesn’t seep out while baking, prepare your six 4-inch springform pans by greasing both the bottoms and sides with vegetable shortening. Then, cut out six circles of parchment paper, about ½ inch larger than the pans. Press the parchment into the pans and lightly grease the paper. Dust each pan with a small amount of flour to coat the surface. This will help the caramel glaze adhere and prevent any unwanted sticking.
Now, for the caramel glaze. In the bowl of a standing electric mixer, combine the butter, dark brown sugar, corn syrup, vanilla extract, and salt. Beat on high speed for 4-5 minutes until the mixture is light, fluffy, and smooth. This step is crucial for achieving the perfect caramel texture that will form the base of the cakes.
Once the glaze is ready, divide it evenly among the six prepared pans. Gently press the glaze into the bottom of each pan to form an even layer. This caramel will soak into the cake during baking, giving it a rich, sweet flavor.
Spread the cranberry sauce evenly over the glaze, making sure to cover it completely. Top each pan with a pineapple ring, gently pressing it down into the cranberry sauce. You can also experiment by reversing the order of the layers (glaze, pineapple, cranberry sauce), which will leave the pineapple visible when the cakes are flipped over. Both methods create beautiful cakes, so feel free to choose whichever style you prefer.
Step 3: Prepare the Cake Batter
Now it’s time to make the cake batter. Begin by preheating the oven to 350°F (175°C) and separating the egg whites from the yolks. Using an electric mixer, beat the egg whites on medium-high speed until frothy. Gradually add ¼ cup of the granulated sugar and continue to beat until the egg whites form glossy peaks that hold their shape. Set the egg whites aside.
In a separate bowl, cream together the butter, remaining ½ cup of granulated sugar, and dark brown sugar. Beat on high speed for 4-5 minutes, scraping the sides of the bowl occasionally, until the mixture becomes light and fluffy. Add the vanilla extract and continue mixing until incorporated.
Add the egg yolks, two at a time, beating well between each addition. Scrape down the sides of the bowl to ensure even mixing. The batter should be smooth and airy.
In a separate bowl, whisk together the flour, cornstarch, baking powder, and salt. Gradually add this dry mixture to the wet ingredients, alternating with the buttermilk. Start with the dry ingredients, add some buttermilk, then more dry ingredients, followed by the remaining buttermilk. Beat the mixture on low speed to avoid overmixing. The goal is to create a smooth batter with just enough air to ensure a light, fluffy cake.
Finally, gently fold the beaten egg whites into the batter using a wooden spoon or rubber spatula. Be careful not to deflate the egg whites. The batter should remain light and airy, with small pockets of air that will help the cake rise.
Step 4: Assemble and Bake the Cakes
Divide the batter evenly among the six prepared pans. The batter should come nearly to the top of the pans. The cakes will rise during baking, so don’t worry if the batter looks a bit high. Place the pans on a rimmed baking sheet lined with aluminum foil to catch any caramel that may spill over.
Bake the cakes in the preheated oven for about 30-35 minutes. A toothpick inserted into the center of one of the cakes should come out clean when they’re done. If necessary, bake for a few more minutes, checking periodically. Once the cakes are finished baking, remove them from the oven and let them rest for 5 minutes.
Step 5: Flip and Serve
After the cakes have rested, carefully flip each pan onto a plate or large serving platter. Wait about 5 minutes before releasing the sides of the springform pans. This brief wait allows the caramel to drip down into the cakes, creating a beautiful sauce. Once you’ve removed the sides and the parchment paper, the mini cakes will be ready to serve.
These cakes are best served warm, as the caramel glaze is at its most decadent when fresh. You can also serve them with a dollop of whipped cream or a scoop of vanilla ice cream for an extra indulgent treat. These individual-sized portions make serving easy, and the beautiful fruit topping will leave your guests impressed.
Storing and Reheating
These Cranberry Pineapple Upside Down Cakes can be stored at room temperature for up to 1 day or refrigerated for up to 3 days. To reheat, simply microwave the cakes on 50% power for 20-30 seconds until they’re warm and the glaze becomes soft again. The individual-sized portions make it easy to store, and you can enjoy the leftovers just as much as the freshly baked cakes.
Tips and Variations
- If you prefer a less sweet cranberry sauce, you can reduce the amount of sugar used or add extra lemon or orange juice for a more tangy flavor.
- You can substitute fresh pineapple for canned if preferred, though canned pineapple rings hold their shape better during baking.
- For a citrusy twist, try adding a teaspoon of lime zest to the batter or cranberry sauce for added depth of flavor.
- These mini cakes can also be topped with toasted coconut for an extra tropical flair or a sprinkle of cinnamon for a warm, spiced note.
Final Thoughts
Cranberry Pineapple Upside Down Cake is a stunning dessert that’s both simple and luxurious. The tart cranberries and sweet pineapple complement each other perfectly, and the buttery cake offers a satisfying texture that absorbs the rich caramel glaze. Whether you’re making it for a special occasion or simply treating yourself, this cake is sure to bring smiles with every bite. It’s a perfect dessert for the holidays, but can easily be enjoyed year-round. So go ahead, gather your ingredients, and bake these little treasures for your next gathering—you won’t regret it!


