I remember the first time I tried to make crispy chicken. I had visions of golden, crunchy perfection, but the reality was often soggy and uneven. That’s why I was so excited when I discovered this Crispy Cheddar Chicken recipe. It was a game-changer! The combination of shredded cheddar and cheese cracker crumbs created a coating that was not only incredibly flavorful but also reliably crispy. What I loved most was how simple it was to make.
Crispy Cheddar Chicken: A Cheesy, Crunchy Delight for Beginner Cooks

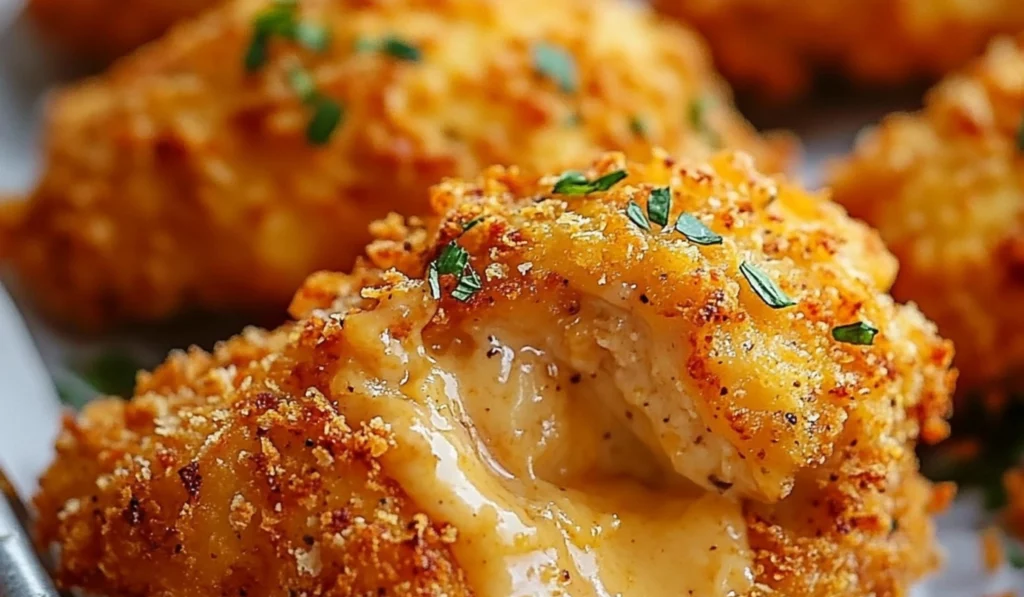
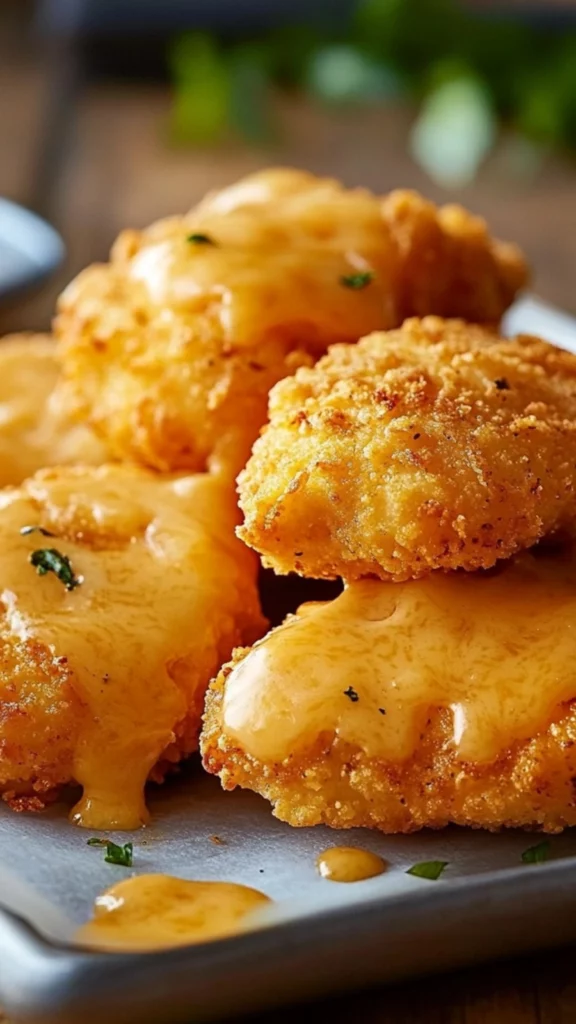
Crispy baked cheddar and cracker crusted chicken, a simple and flavorful meal perfect for any night. Enjoy the crunchy, cheesy coating and tender chicken.
- Prep Time: 10 minutes
- Cook Time: 25 minutes
- Total Time: 35 minutes
- Yield: 4 servings 1x
- Category: Main Course, Dinner
- Method: Baking, Coating
- Cuisine: American
Ingredients
- 1 pound boneless, skinless chicken breasts or thighs
- 1/4 teaspoon onion powder (optional)
- 1/4 teaspoon garlic powder (optional)
- 1/2 teaspoon oregano (optional)
- Salt and pepper, to taste
- 1/4 cup flour (gluten-free option available)
- 2 eggs, lightly beaten
- 1 cup cheddar cheese, shredded
- 1 cup cheese cracker crumbs or panko breadcrumbs (gluten-free option available)
Instructions
- Season the Chicken: Season the chicken with onion powder, garlic powder, oregano, salt, and pepper. This adds flavor to the chicken.
- Prepare the Coating Stations: Set up three shallow dishes: one with flour, one with beaten eggs, and one with a mixture of shredded cheddar and cracker crumbs. This makes the coating process efficient.
- Dredge in Flour: Dredge each piece of chicken in flour, shaking off excess. This helps the egg adhere to the chicken.
- Dip in Eggs: Dip the floured chicken in beaten eggs. This acts as a binder for the cheesy coating.
- Coat with Cheese and Cracker Crumbs: Press the egg-dipped chicken into the shredded cheddar and cracker crumbs, ensuring it’s fully coated. This creates the crispy coating.
- Place on Baking Sheet: Place the coated chicken on a rack set over a baking sheet. This allows air to circulate, ensuring even crisping.
- Bake: Bake for 20-25 minutes, or until the chicken is cooked through, the cheese has melted, and the crumb coating is golden brown and crispy. This cooks the chicken and crisps the coating.
- Check for Doneness: To ensure the chicken is cooked through, use a meat thermometer. The internal temperature should reach 165°F (74°C). If you don’t have a thermometer, cut into the thickest part of the chicken; the juices should run clear.
- Serve and Enjoy: Allow the chicken to cool slightly before serving. This allows the coating to set and prevents burning.
Notes
- Use a rack for crispy coating.
- Don’t overcook the chicken.
- Prepare coating stations for efficiency.
- Use a meat thermometer for accuracy.
- Experiment with different cheeses and herbs.
This recipe is perfect for beginner cooks because it requires minimal prep, uses basic ingredients, and delivers a restaurant-quality meal with very little effort. Imagine biting into a piece of chicken with a crunchy, cheesy crust, the savory flavors melting in your mouth. This Crispy Cheddar Chicken is perfect for a weeknight dinner, and it’s sure to become a family favorite. This recipe is not only easy and time-efficient but also offers a fun and delicious way to incorporate protein into your meals. Let’s dive into this simple and satisfying recipe!
Ingredients and Preparation: Your Crispy Cheddar Chicken Essentials – Simple and Flavorful
Creating this Crispy Cheddar Chicken involves a few basic ingredients, making it ideal for beginner cooks. Proper preparation ensures a smooth and delicious outcome.
For the Chicken: The Protein Base – The Heart of the Dish:
- 1 pound boneless, skinless chicken breasts or thighs, trimmed and butterflied – Provides the protein base. Alternatives: You can use bone-in chicken pieces, but cooking time will vary. Chicken breasts are lean. Chicken thighs are more juicy.
- 1/4 teaspoon onion powder (optional) – Adds aromatic flavor. Alternatives: You can use fresh minced onion or granulated onion. Onion powder is convenient. Fresh onion is an alternative.
- 1/4 teaspoon garlic powder (optional) – Adds pungent flavor. Alternatives: You can use fresh minced garlic or granulated garlic. Garlic powder is convenient. Fresh garlic is an alternative.
- 1/2 teaspoon oregano (optional) – Adds herbaceous flavor. Alternatives: You can use other dried herbs like thyme or Italian seasoning. Oregano is classic. Thyme is an alternative.
- Salt and pepper, to taste – Enhances the flavors. Alternatives: Sea salt or kosher salt. Salt enhances flavor. Sea salt is an alternative.
For the Coating: The Crispy Delight – The Heart of the Flavor:
- 1/4 cup flour (use gluten-free flour for gluten-free option) – Helps the coating adhere to the chicken. Alternatives: You can use cornstarch or almond flour. All-purpose flour is standard. Cornstarch is a gluten-free alternative.
- 2 eggs, lightly beaten – Acts as a binder for the coating. Alternatives: You can use milk or yogurt. Eggs are standard. Milk is an alternative.
- 1 cup cheddar cheese, shredded – Provides cheesy flavor and crispiness. Alternatives: You can use other cheeses like Monterey Jack or a blend of cheddar and mozzarella. Cheddar is classic. Monterey Jack is a milder alternative.
- 1 cup cheese cracker crumbs or panko breadcrumbs (use gluten-free for gluten-free option) – Adds crunch and flavor. Alternatives: You can use crushed potato chips or cornflakes. Cheese cracker crumbs are flavorful. Panko is a lighter alternative.
Step-by-Step Instructions: Your Guide to Crispy Cheddar Chicken Success – Easy and Clear
- Season the Chicken: Season the chicken with onion powder, garlic powder, oregano, salt, and pepper. This adds flavor to the chicken.
- Prepare the Coating Stations: Set up three shallow dishes: one with flour, one with beaten eggs, and one with a mixture of shredded cheddar and cracker crumbs. This makes the coating process efficient.
- Dredge in Flour: Dredge each piece of chicken in flour, shaking off excess. This helps the egg adhere to the chicken.
- Dip in Eggs: Dip the floured chicken in beaten eggs. This acts as a binder for the cheesy coating.
- Coat with Cheese and Cracker Crumbs: Press the egg-dipped chicken into the shredded cheddar and cracker crumbs, ensuring it’s fully coated. This creates the crispy coating.
- Place on Baking Sheet: Place the coated chicken on a rack set over a baking sheet. This allows air to circulate, ensuring even crisping.
- Bake: Bake for 20-25 minutes, or until the chicken is cooked through, the cheese has melted, and the crumb coating is golden brown and crispy. This cooks the chicken and crisps the coating.
- Check for Doneness: To ensure the chicken is cooked through, use a meat thermometer. The internal temperature should reach 165°F (74°C). If you don’t have a thermometer, cut into the thickest part of the chicken; the juices should run clear.
- Serve and Enjoy: Allow the chicken to cool slightly before serving. This allows the coating to set and prevents burning.
Beginner Tips and Notes: Your Kitchen Companion – Helpful Advice and Hacks
- Troubleshooting:
- Coating Not Crispy: Ensure the oven is preheated to the correct temperature. A too low oven will result in a soggy coating. Also, ensure you are using a rack over the baking sheet. This allows for air circulation and crisping on all sides.
- Chicken Dry: Don’t overcook the chicken. Use a meat thermometer to check for doneness. If you don’t have one, cut into the thickest part. If the juices run clear, the chicken is done.
- Cheese Burning: Ensure the cheese is evenly distributed and don’t overcrowd the baking sheet. Overcrowding can cause uneven cooking and burning.
- Prep Efficiency:
- Prepare Coating Stations: Set up the flour, egg, and cheese/cracker crumb stations before starting. This streamlines the coating process and prevents delays.
- Preheat Oven: Preheat the oven while preparing the chicken. This ensures the oven is at the correct temperature when you place the chicken inside.
- Use Pre-Shredded Cheese: Buy pre-shredded cheddar cheese to save time. This is a simple shortcut that makes prep quicker.
- Tool Substitutions:
- No Rack: Place the chicken directly on a greased baking sheet, but the bottom may not be as crispy. Using parchment paper can also help prevent sticking.
- No Food Processor: Use a zip-top bag and a rolling pin to crush the crackers. This is a simple way to crush the crackers without specialized equipment.
- No Meat Thermometer: Use the visual check method, but a thermometer is more accurate. A meat thermometer takes the guesswork out of cooking.
- Flavor Boosters:
- Add Spices: Add a pinch of cayenne pepper or smoked paprika to the cracker crumbs. This adds a kick of heat or smokiness.
- Use Different Cheeses: Experiment with other cheeses like Monterey Jack or pepper jack. This allows for variety and customization.
- Add Herbs: Mix dried herbs like thyme or rosemary into the cracker crumbs. This adds an herbaceous flavor.
- Add a squeeze of lemon: A small amount of lemon juice on top of the cooked chicken will brighten the dish. This adds a zesty freshness.
Serving Suggestions: Enhancing Your Crispy Cheddar Chicken
This Crispy Cheddar Chicken is a complete meal on its own, but you can elevate the experience with complementary sides and sauces.
- Sides:
- Mashed Potatoes: Serve with creamy mashed potatoes. This classic side pairs perfectly with the chicken.
- Steamed Vegetables: Serve with steamed broccoli, carrots, or green beans. This adds a healthy vegetable side.
- Side Salad: Serve with a fresh green salad. This adds a light and refreshing side.
- Sauces:
- Sriracha Cheese Sauce: Drizzle with a homemade sriracha cheese sauce. This adds a spicy and cheesy kick.
- Honey Mustard: Serve with honey mustard for dipping. This adds a sweet and tangy flavor.
- Ranch Dressing: Serve with ranch dressing for dipping. This adds a creamy and herby flavor.
- Storage:
- Refrigerate: Store leftover chicken in an airtight container in the refrigerator for up to 3 days.
- Reheat: Reheat in a microwave or oven until warm, but the coating may not be as crispy. Reheating in an air fryer or oven is recommended to maintain crispiness.

A Crunchy Conclusion: Sharing the Joy of Crispy Cheddar Chicken
This Crispy Cheddar Chicken is a delightful and simple meal, perfect for any weeknight dinner. It’s a testament to how easy and delicious homemade crispy chicken can be. The crunchy, cheesy coating and tender chicken create a harmonious blend of flavors and textures that everyone will love. Don’t be afraid to experiment with variations and add your personal touch. And most importantly, have fun! We’d love to see your crispy cheddar chicken creations! Share your photos and any variations you try in the comments below. Happy cooking!
What other quick and easy meals would you like to see us explore? Are you interested in learning more about different coating techniques or mastering other cooking skills? Let us know in the comments! We’re here to support you on your culinary journey, one delicious bite at a time. We can’t wait to hear about your culinary triumphs! Share your photos and tag us in your creations – we’re excited to see what you make! We’re confident that this recipe will become a regular part of your weeknight dinner rotation. It’s a guaranteed way to bring some crispy, cheesy, and delicious goodness to your table. Enjoy! And remember, cooking doesn’t have to be complicated or intimidating. With a little planning and the right recipes, you can create delicious and impressive meals that everyone will love. This Crispy Cheddar Chicken is a perfect example of that. So, get in the kitchen, get creative, and get ready to impress your friends and family (and yourself!) with your cooking skills! You’ve got this!


