Decadent Chocolate Raspberry Mousse Cake: A Step-by-Step Guide for Beginners
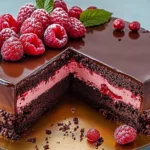
Chocolate and raspberry—these two ingredients are a match made in dessert heaven, and when combined in a cake, they create a flavor profile that is simply irresistible. Imagine a rich, velvety cocoa brownie base that gives way to a crunchy layer of chocolate raspberry goodness, topped off with a light, airy raspberry mousse. Then, as if it wasn’t already tempting enough, everything is coated in a smooth, glossy chocolate ganache and adorned with fresh raspberries for that perfect finishing touch. This Chocolate Raspberry Mousse Cake is a dessert that is as impressive as it is delicious, and while it may look and taste like a professional creation, it’s actually surprisingly beginner-friendly.
- Prep Time: 40 minutes
- Cook Time: 10 minutes
- Total Time: 50 minutes
- Yield: 12 servings 1x
- Category: Dessert
- Method: Baking, Assembling
- Cuisine: American, French
- Diet: Vegetarian
Ingredients
For the Cocoa Brownie
- 1 large egg
- 1/3 cup (70g) sugar
- 1 tsp (5g) vanilla extract
- 1/3 cup (70g) vegetable oil
- 1/4 cup (30g) unsweetened cocoa powder
- 1/4 tsp (1g) salt
- 1/4 cup (30g) all-purpose flour
For the Chocolate Raspberry Crunch
- 2.5 oz (70g) shortbread cookie crumbs
- 1/2 cup (30g) paillete feuilletine (crunchy flakes of wafer)
- 3 tbsp (6g) freeze-dried raspberries (optional, but highly recommended)
- 1.5 oz (40g) milk chocolate
- 1.5 oz (40g) semisweet chocolate
- 3 tbsp (42g) butter
For the Raspberry Mousse
- 18 oz (510g) raspberries (fresh or frozen)
- 2/3 cup (135g) sugar
- 1 tbsp (15ml) lemon juice
- 1 tbsp (10g) gelatin powder
- 1/4 cup (60ml) water
- 1 ⅔ cup (400g) whipping cream (35% fat)
For the Chocolate Glaze
- 5.5 oz (150g) semisweet chocolate
- 6 oz (170g) whipping cream
Optional Chocolate Raspberry Shards
- 2.5 oz (70g) semisweet chocolate
- 1 oz (30g) semisweet chocolate (for tempering)
- freeze-dried raspberries
- coconut flakes (optional)
For Decoration
- Fresh raspberries
- Powdered sugar
- Chocolate shards
- Fresh mint leaves
Instructions
Step 1: Prepare the Raspberry Sauce
- Start by making the raspberry sauce. In a small saucepan, combine the raspberries, sugar, and lemon juice. Place the saucepan over medium heat and bring to a boil. Stir occasionally to help the raspberries break down and release their juices.
- Once the mixture has boiled for about 10 minutes and slightly thickened, remove it from the heat and strain it through a fine-mesh sieve to remove the seeds.
- Set the raspberry sauce aside to cool while you prepare the gelatin. In a separate small bowl, sprinkle the gelatin powder over the water and let it sit for about 5 to 10 minutes to allow it to bloom.
- After the gelatin has bloomed, stir it into the warm raspberry sauce until fully dissolved. Allow the raspberry mixture to cool to room temperature.
Step 2: Prepare the Cocoa Brownie
- Preheat your oven to 350°F (180°C) and grease and line an 8-inch (20cm) springform pan with parchment paper.
- In a medium bowl, whisk the egg and sugar together until smooth. Add the vanilla extract and vegetable oil, whisking until everything is well combined.
- Sift the flour, cocoa powder, and salt into the egg mixture and stir until fully incorporated.
- Pour the batter into the prepared pan and spread it evenly.
- Bake the brownie for 10-12 minutes, or until a toothpick inserted into the center comes out clean or with just a few moist crumbs attached. Let it cool completely before moving on to the next step.
Step 3: Prepare the Chocolate Raspberry Crunch
- While the brownie cools, prepare the crunch layer. Melt the milk chocolate, semisweet chocolate, and butter in a heatproof bowl set over a pan of simmering water (bain-marie). Stir until the mixture is smooth.
- In a medium bowl, combine the shortbread cookie crumbs, paillete feuilletine, and freeze-dried raspberries (if using).
- Once the chocolate and butter mixture has melted, pour it over the dry ingredients and mix well to combine.
- Spread the chocolate crunch mixture evenly over the cooled brownie, leaving a small border around the edges. Refrigerate the cake until the mousse layer is ready.
Step 4: Prepare the Raspberry Mousse
- In a large mixing bowl, whip the cold whipping cream until stiff peaks form.
- Add the cooled raspberry mixture to the whipped cream and gently fold them together until fully combined.
- Line the sides of the springform pan with an acetate sheet for easy removal after the cake has set.
- Pour the raspberry mousse over the chocolate crunch layer, smoothing the top with a spatula.
- Refrigerate the cake for at least 4 to 6 hours, or overnight if possible, to allow the mousse to set completely.
Step 5: Prepare the Chocolate Glaze
- For the glaze, melt the semisweet chocolate and whipping cream together over a bain-marie. Stir until smooth and glossy.
- Once the mousse has set, remove the cake from the refrigerator. If you used an acetate sheet, gently peel it away from the sides of the cake.
- Place the cake on a wire rack set over a baking sheet or another pan to catch any drips. Pour the chocolate glaze over the top and allow it to cover the sides of the cake.
- Use a spatula to smooth out any drips and to decorate the base of the cake with chopped chocolate.
- Place the cake back in the refrigerator for 20-30 minutes to allow the glaze to set completely.
Step 6: Optional Chocolate Raspberry Shards
- If you want to add a decorative touch, melt the semisweet chocolate and stir in some tempered chocolate for a smooth finish.
- Spread the melted chocolate onto a parchment-lined baking sheet and sprinkle it with freeze-dried raspberries and coconut flakes if desired.
- Refrigerate the chocolate until set, then break it into shards.
- Decorate the top of the cake with these chocolate shards, fresh raspberries, a dusting of powdered sugar, and fresh mint leaves.
Notes
- How to prevent overbaking the brownies: Keep an eye on the brownies toward the end of baking. A toothpick inserted into the center should come out clean or with a few moist crumbs attached. Don’t overbake to maintain a soft, moist texture.
- How to whip cream properly: Be sure to use chilled cream, and whip it on medium-high speed to avoid turning it into butter. Stop when you see stiff peaks, meaning the cream holds its shape when lifted with a whisk.
- How to prevent the mousse from separating: The key to a smooth mousse is folding the raspberry mixture gently into the whipped cream. Be careful not to deflate the cream while mixing.