Mini Turtle Cheesecakes: The Perfect Blend of Decadence and Bite-Sized Charm
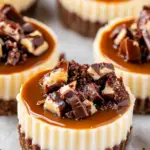
Mini turtle cheesecakes are a dessert lover’s dream, bringing together the creamy richness of cheesecake with the classic flavors of a turtle candy: chocolate, caramel, and nuts. These little treats are a perfect way to indulge without committing to a large slice, making them ideal for parties, potlucks, or any occasion that calls for a sweet finish. With their crunchy graham cracker crust, smooth cheesecake filling, and decadent toppings, they offer a multi-layered experience in every bite.
- Prep Time: 20 minutes
- Cook Time: 20 minutes
- Total Time: 40 minutes
- Yield: 12 cheesecakes 1x
- Category: Dessert
- Method: Baking
- Cuisine: American
- Diet: Vegetarian
Ingredients
Crust
- 1 cup graham cracker crumbs
- 4 tablespoons unsalted butter, melted (1/2 stick)
Cheesecake Filling
- 16 ounces full-fat cream cheese (two 8-ounce packages, softened to room temperature)
- 1/2 cup granulated sugar
- 1 teaspoon vanilla extract
- 2 large eggs
Toppings
- Jarred caramel sauce
- Chocolate ganache (1/2 cup semi-sweet chocolate chips and 1/4 cup heavy whipping cream)
- Chopped nuts (pecans recommended)
Instructions
1. Preparing the Crust
Preheat your oven to 350°F. Line a regular-sized muffin pan with paper liners. In a mixing bowl, combine the graham cracker crumbs and melted butter. Stir until the mixture has a wet, sandy consistency. Divide the mixture evenly among the muffin cups, using about 1–2 tablespoons of crust per cup. Press the crumbs firmly into the bottom of each cup using the back of a spoon or a flat-bottomed tool like a measuring cup. Bake for 5 minutes, then remove from the oven and allow the crusts to cool while you prepare the cheesecake filling.
2. Making the Cheesecake Filling
In a large mixing bowl, combine the cream cheese and sugar. Beat with an electric mixer on medium speed until smooth and creamy, about 1–2 minutes. Add the vanilla extract and mix briefly to incorporate. Crack the eggs into the bowl one at a time, mixing gently after each addition until just combined. Avoid overmixing at this stage, as this can introduce air bubbles and lead to cracks in the baked cheesecakes.
Evenly divide the cheesecake batter among the prepared muffin cups, filling them nearly to the top. The batter will settle slightly during baking, so don’t worry about overfilling.
3. Baking the Cheesecakes
Place the muffin pan in the preheated oven and bake for 15–17 minutes, or until the centers of the cheesecakes are set but still slightly jiggly when gently shaken. Remove the pan from the oven and let the cheesecakes cool to room temperature. Once cooled, transfer the pan to the refrigerator and chill the cheesecakes for at least 4 hours or overnight.
4. Preparing the Toppings
- Caramel Sauce: Use a high-quality jarred caramel sauce or make your own for an extra homemade touch. Simply heat slightly before spooning over the chilled cheesecakes.
- Chocolate Ganache: In a heatproof bowl, combine the chocolate chips and heavy whipping cream. Heat the cream in a small saucepan over low heat until just about to boil, then pour it over the chocolate chips. Let sit for 1–2 minutes before stirring until smooth and glossy. Allow the ganache to cool to room temperature before using.
- Chopped Nuts: Pecans are the traditional choice for turtle desserts, but you can substitute walnuts, almonds, or even hazelnuts. Chop them finely for easy sprinkling.
5. Assembling the Cheesecakes
Once the cheesecakes are fully chilled, it’s time to add the finishing touches. Spoon a small amount of caramel sauce onto each cheesecake, spreading it gently to create a thin layer. Drizzle chocolate ganache over the caramel, then sprinkle with chopped nuts. For an extra decorative touch, you can pipe whipped cream onto the cheesecakes or add a small chocolate curl or whole pecan as a garnish.
Notes
- Use Room-Temperature Ingredients: Ensure the cream cheese is fully softened before mixing to prevent lumps in the batter.
- Avoid Overmixing: When adding the eggs, mix only until just combined to avoid introducing too much air, which can lead to cracking.
- Chill Thoroughly: Allow the cheesecakes to chill for at least 4 hours to ensure they set properly and develop their full flavor.
- Plan Ahead: These cheesecakes can be made a day in advance, making them a convenient dessert for special occasions.
- Customize the Toppings: Don’t be afraid to get creative with your toppings! Try adding crushed cookies, sprinkles, or even a drizzle of white chocolate for variety.