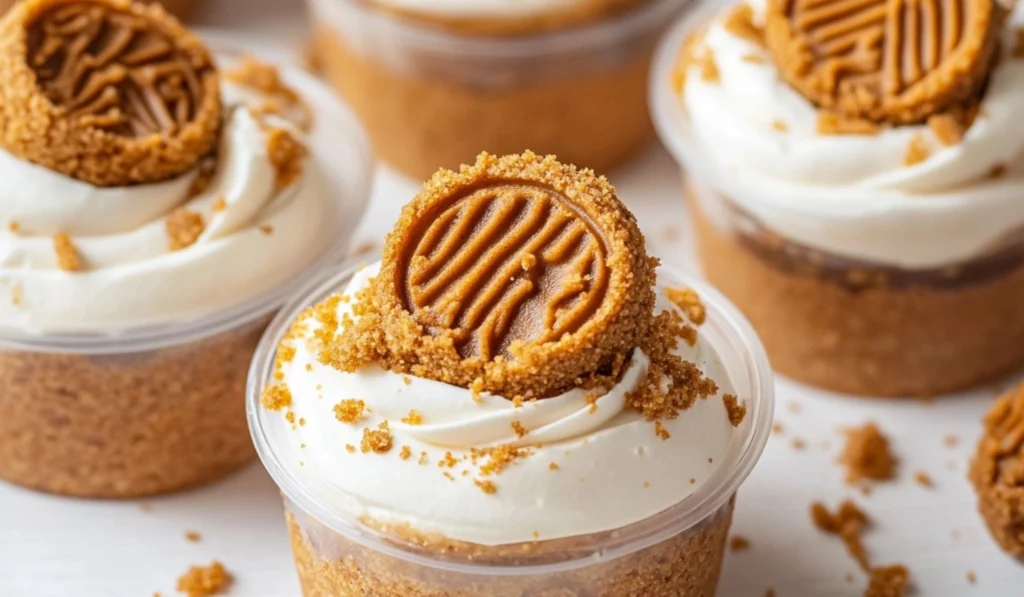
If you’ve ever been captivated by the indulgent flavor of cookie butter, then you’re going to fall head over heels for these No-Bake Biscoff Cheesecake Cups. Creamy, rich, and oh-so-decadent, these cheesecake cups capture the perfect balance of sweetness and a unique, spiced flavor that makes Biscoff cookies so beloved. What’s even better? They’re incredibly easy to make—perfect for beginners looking to make a big impression without the need for complicated techniques. Whether you’re preparing for a family gathering, a dinner party, or just want a treat that’s as satisfying as it is simple, these No-Bake Biscoff Cheesecake Cups are sure to become your go-to dessert.
No-Bake Biscoff Cheesecake Cups: The Ultimate Easy Dessert for Beginners
No-bake desserts are a game-changer, especially when you’re looking for something quick, easy, and indulgent. These No-Bake Biscoff Cheesecake Cups are the perfect choice for beginners. With a creamy, dreamy cheesecake filling and a crunchy Biscoff cookie base, they’re simple to make and packed with flavor. Whether you’re a first-time baker or simply craving something sweet without turning on the oven, these cheesecake cups will quickly become your go-to dessert!
- Prep Time: 20 minutes
- Cook Time: 0 minutes
- Total Time: 4 hours 20 minutes
- Yield: 8 cups 1x
- Category: Dessert
- Method: No-bake
- Cuisine: American
- Diet: Vegetarian
Ingredients
For the Crumb Base:
- 30 Lotus Biscoff biscuits
- 2 tablespoons unsalted butter, melted
For the Cheesecake Filling:
- 16 oz (2 cups) heavy cream
- 8 oz cream cheese, at room temperature
- ½ cup powdered sugar
- ½ cup Biscoff spread (this is the magic ingredient that gives the cheesecake its signature flavor!)
- 1 teaspoon vanilla extract
For Garnish:
- ½ cup Biscoff spread
- 8 Biscoff cookies, cut in half
Instructions
1. Prepare the Crumb Base:
Start by crushing your Biscoff cookies. If you have a food processor, this is the easiest way to do it. Simply pulse the cookies until you have fine crumbs. Don’t worry if the crumbs are a little uneven—this will still work perfectly! If you don’t have a food processor, place the cookies in a ziplock bag and crush them with a rolling pin until you get a fine consistency.
Once the cookies are crushed, transfer the crumbs into a medium-sized bowl. Add the melted butter and stir until the mixture resembles wet sand. You want it to be damp enough to stick together when pressed. Reserve a few tablespoons of the mixture for decorating the tops of your cheesecake cups later.
2. Assemble the Crumb Base:
Now, it’s time to assemble the base of your cheesecake cups. Divide the crumb mixture evenly among your cups. You should have enough to make about 8 regular-sized cups or 16 mini-shot cups, depending on the size of the cups you use. Press the crumbs down firmly using the back of a spoon to create an even layer. This base will add a delicious crunch to each bite of the creamy cheesecake filling. Once all the cups are filled, set them aside.
3. Make the Cheesecake Filling:
In a large bowl, start by whipping the heavy cream. You want to beat it until stiff peaks form. This might take a few minutes with an electric mixer, but it’s a crucial step to getting the right texture for the cheesecake filling.
In another bowl, whisk together the cream cheese, powdered sugar, Biscoff spread, and vanilla extract. You should end up with a smooth and creamy mixture that’s rich and slightly thick. Now, gently fold in the whipped heavy cream with a spatula, being careful not to deflate the cream too much. You want to keep the filling light and airy. Continue folding until the mixture is fully incorporated and smooth.
4. Pipe the Cheesecake Filling:
Once your cheesecake filling is ready, transfer it to a piping bag. If you don’t have a piping bag, you can also use a Ziploc bag and snip off the corner for easy piping. Carefully pipe the cheesecake filling into each cup on top of the crumb base. Don’t worry about being too precise—this dessert is all about indulgence, so feel free to get a little messy!
5. Garnish and Final Touches:
To finish off the dessert, melt the remaining Biscoff spread in the microwave for about 20 seconds or until it becomes liquid. Drizzle a thin layer of melted Biscoff spread over the top of each cheesecake cup. This gives the cheesecake that signature cookie butter flavor. Finally, top each cup with half a Biscoff cookie to add a decorative touch and a little extra crunch.
6. Chill the Cheesecake Cups:
Now comes the hardest part—waiting! Place the assembled cheesecake cups in the refrigerator for at least 4 hours to allow the cheesecake filling to firm up. If you can wait longer, even better—the flavors have more time to meld, and the texture becomes even more perfect. Serve chilled and enjoy!
Notes
- Don’t Overmix the Heavy Cream: When whipping the cream, make sure not to overwhip it. If you whip it too long, it can turn into butter, and that’s not what you want for a smooth cheesecake filling. Stop whipping when you see stiff peaks.
- Room Temperature Ingredients: To avoid lumps, make sure the cream cheese is at room temperature before you mix it. If it’s too cold, it won’t incorporate smoothly into the filling.
- Chill the Cheesecake Cups Thoroughly: For the best texture, ensure that the cheesecake cups have time to chill. The longer they set, the firmer they will get, making them easier to serve and eat.
- Using a Piping Bag: If you don’t have a piping bag, you can easily make one by using a Ziploc bag and cutting off a small corner. It works just as well, and cleanup is a breeze!
- Pre-crush the Cookies Ahead of Time: To save some time, you can crush the Biscoff cookies ahead of time and store them in an airtight container until you’re ready to assemble the cheesecake cups. This will cut down on prep time when you’re ready to make the dessert.
Why This Recipe Is Perfect for Beginners
The beauty of this No-Bake Biscoff Cheesecake Cups recipe lies in its simplicity. There’s no oven required, so you can skip the heat and stick to the fun part—assembling a dessert that will wow everyone. What makes this an excellent choice for beginners is the step-by-step process that requires minimal skills, just basic kitchen tools like a whisk, a bowl, and a piping bag (or a Ziploc bag if you don’t have one). Moreover, it’s an incredibly forgiving recipe, so even if you’ve never made cheesecake before, you’ll be able to pull this off with confidence.
The combination of creamy cheesecake filling and the crunchy, spiced Biscoff biscuit base is a flavor explosion that’s perfect for anyone with a sweet tooth. And don’t worry—this dessert doesn’t require any fancy equipment or complicated techniques. If you’re looking for a way to impress guests without spending hours in the kitchen, this recipe is for you!
Ingredients and Preparation
This dessert is all about quality ingredients, and luckily, it’s super simple to gather everything you need. Let’s take a look at the ingredients, and I’ll share some helpful tips for substitutions and flexibility.
For the Crumb Base:
- 30 Lotus Biscoff biscuits
- 2 tablespoons unsalted butter, melted
For the Cheesecake Filling:
- 16 oz (2 cups) heavy cream
- 8 oz cream cheese, at room temperature
- ½ cup powdered sugar
- ½ cup Biscoff spread (this is the magic ingredient that gives the cheesecake its signature flavor!)
- 1 teaspoon vanilla extract
For Garnish:
- ½ cup Biscoff spread
- 8 Biscoff cookies, cut in half
These ingredients are what give the cheesecake its rich, decadent flavor. If you can’t find Biscoff spread, you can substitute with other cookie butter spreads available in most stores, though Biscoff gives the dish its signature taste. You can also substitute the heavy cream with whipped topping if you prefer a lighter texture.
Substitutions and Flexibility:
- Biscoff Cookies: If you’re not able to find Biscoff cookies, you can swap them out for graham crackers or any other spiced biscuit of your choice. The flavor will change a little, but it will still be delicious!
- Cream Cheese: If you prefer a lighter option, you can use low-fat cream cheese, although the texture may vary slightly.
- Biscoff Spread: In a pinch, Nutella or another chocolate spread can work if you’re craving something chocolatey.
Step-by-Step Instructions
Now, let’s break down the process for making these No-Bake Biscoff Cheesecake Cups. This is a straightforward recipe that will make you feel like a pro in the kitchen, even if you’ve never made a dessert from scratch before.
1. Prepare the Crumb Base:
Start by crushing your Biscoff cookies. If you have a food processor, this is the easiest way to do it. Simply pulse the cookies until you have fine crumbs. Don’t worry if the crumbs are a little uneven—this will still work perfectly! If you don’t have a food processor, place the cookies in a ziplock bag and crush them with a rolling pin until you get a fine consistency.
Once the cookies are crushed, transfer the crumbs into a medium-sized bowl. Add the melted butter and stir until the mixture resembles wet sand. You want it to be damp enough to stick together when pressed. Reserve a few tablespoons of the mixture for decorating the tops of your cheesecake cups later.
2. Assemble the Crumb Base:
Now, it’s time to assemble the base of your cheesecake cups. Divide the crumb mixture evenly among your cups. You should have enough to make about 8 regular-sized cups or 16 mini-shot cups, depending on the size of the cups you use. Press the crumbs down firmly using the back of a spoon to create an even layer. This base will add a delicious crunch to each bite of the creamy cheesecake filling. Once all the cups are filled, set them aside.
3. Make the Cheesecake Filling:
In a large bowl, start by whipping the heavy cream. You want to beat it until stiff peaks form. This might take a few minutes with an electric mixer, but it’s a crucial step to getting the right texture for the cheesecake filling.
In another bowl, whisk together the cream cheese, powdered sugar, Biscoff spread, and vanilla extract. You should end up with a smooth and creamy mixture that’s rich and slightly thick. Now, gently fold in the whipped heavy cream with a spatula, being careful not to deflate the cream too much. You want to keep the filling light and airy. Continue folding until the mixture is fully incorporated and smooth.
4. Pipe the Cheesecake Filling:
Once your cheesecake filling is ready, transfer it to a piping bag. If you don’t have a piping bag, you can also use a Ziploc bag and snip off the corner for easy piping. Carefully pipe the cheesecake filling into each cup on top of the crumb base. Don’t worry about being too precise—this dessert is all about indulgence, so feel free to get a little messy!
5. Garnish and Final Touches:
To finish off the dessert, melt the remaining Biscoff spread in the microwave for about 20 seconds or until it becomes liquid. Drizzle a thin layer of melted Biscoff spread over the top of each cheesecake cup. This gives the cheesecake that signature cookie butter flavor. Finally, top each cup with half a Biscoff cookie to add a decorative touch and a little extra crunch.
6. Chill the Cheesecake Cups:
Now comes the hardest part—waiting! Place the assembled cheesecake cups in the refrigerator for at least 4 hours to allow the cheesecake filling to firm up. If you can wait longer, even better—the flavors have more time to meld, and the texture becomes even more perfect. Serve chilled and enjoy!
Beginner Tips and Notes
- Don’t Overmix the Heavy Cream: When whipping the cream, make sure not to overwhip it. If you whip it too long, it can turn into butter, and that’s not what you want for a smooth cheesecake filling. Stop whipping when you see stiff peaks.
- Room Temperature Ingredients: To avoid lumps, make sure the cream cheese is at room temperature before you mix it. If it’s too cold, it won’t incorporate smoothly into the filling.
- Chill the Cheesecake Cups Thoroughly: For the best texture, ensure that the cheesecake cups have time to chill. The longer they set, the firmer they will get, making them easier to serve and eat.
- Using a Piping Bag: If you don’t have a piping bag, you can easily make one by using a Ziploc bag and cutting off a small corner. It works just as well, and cleanup is a breeze!
- Pre-crush the Cookies Ahead of Time: To save some time, you can crush the Biscoff cookies ahead of time and store them in an airtight container until you’re ready to assemble the cheesecake cups. This will cut down on prep time when you’re ready to make the dessert.
Serving Suggestions
These No-Bake Biscoff Cheesecake Cups are delightful on their own, but there are a few ways you can elevate them even further. Consider serving them with a dollop of whipped cream on top or a drizzle of caramel sauce for extra sweetness. If you’re a fan of textures, adding a handful of crushed Biscoff cookies or a few chocolate shavings can add a beautiful visual element to the dessert.
You can also pair these cheesecake cups with a nice cup of coffee or tea, as the rich, spiced flavor of the Biscoff cookies pairs perfectly with a hot beverage. These cheesecake cups are also great to serve at parties or gatherings where guests can grab them and go.
These No-Bake Biscoff Cheesecake Cups can be made in advance for parties or events. Simply store them in the fridge until you’re ready to serve. The longer they set, the more the flavors meld, making them an ideal make-ahead dessert.
Storing Leftovers
If you have any leftovers (which is unlikely, given how delicious these are!), store them in an airtight container in the refrigerator for up to 2 days. While the texture is best fresh, these cheesecake cups will still taste fantastic the next day. Just be sure to enjoy them while they’re still firm and not too soggy! The crumb base may soften slightly as it sits, but the cheesecake filling will still be creamy and flavorful.
Why You’ll Love This No-Bake Biscoff Cheesecake Cups Recipe
This dessert is a true crowd-pleaser. It’s indulgent enough to satisfy even the most serious sweet tooth, yet light and refreshing at the same time. The creamy cheesecake filling combined with the spiced Biscoff flavor is a combination that’s hard to resist. Not to mention, it’s incredibly easy to make and requires minimal kitchen skills—just a few simple steps and you’ve got a show-stopping dessert that will impress your guests.
It’s also incredibly versatile. You can tweak it based on what you have in your pantry—whether it’s swapping out the Biscoff cookies for another type of cookie, or experimenting with different garnishes to give the cheesecake cups a unique twist. You can even add chocolate chips to the filling for extra richness or a fruit topping for a fresh contrast.
If you love making easy, no-bake desserts that look as good as they taste, this recipe is definitely one you’ll want to add to your rotation. It’s perfect for beginners, yet impressive enough for more seasoned bakers. It’s the kind of dessert that will have people asking for the recipe, and with good reason—it’s that delicious.
Whether you’re new to baking or just looking for an easy yet impressive dessert, No-Bake Biscoff Cheesecake Cups are an excellent choice. They’re simple to make, delightfully creamy, and packed with the irresistible flavor of Biscoff cookie butter. With just a few ingredients and a couple of hours in the fridge, you’ll have a dessert that’s perfect for any occasion. So go ahead, grab your ingredients, and whip up a batch of these delightful cheesecake cups—they’ll become your new favorite treat in no time!


