No-Bake Biscoff Cheesecake Cups: The Ultimate Easy Dessert for Beginners
No-bake desserts are a game-changer, especially when you’re looking for something quick, easy, and indulgent. These No-Bake Biscoff Cheesecake Cups are the perfect choice for beginners. With a creamy, dreamy cheesecake filling and a crunchy Biscoff cookie base, they’re simple to make and packed with flavor. Whether you’re a first-time baker or simply craving something sweet without turning on the oven, these cheesecake cups will quickly become your go-to dessert!
- Prep Time: 20 minutes
- Cook Time: 0 minutes
- Total Time: 4 hours 20 minutes
- Yield: 8 cups 1x
- Category: Dessert
- Method: No-bake
- Cuisine: American
- Diet: Vegetarian
Ingredients
For the Crumb Base:
- 30 Lotus Biscoff biscuits
- 2 tablespoons unsalted butter, melted
For the Cheesecake Filling:
- 16 oz (2 cups) heavy cream
- 8 oz cream cheese, at room temperature
- ½ cup powdered sugar
- ½ cup Biscoff spread (this is the magic ingredient that gives the cheesecake its signature flavor!)
- 1 teaspoon vanilla extract
For Garnish:
- ½ cup Biscoff spread
- 8 Biscoff cookies, cut in half
Instructions
1. Prepare the Crumb Base:
Start by crushing your Biscoff cookies. If you have a food processor, this is the easiest way to do it. Simply pulse the cookies until you have fine crumbs. Don’t worry if the crumbs are a little uneven—this will still work perfectly! If you don’t have a food processor, place the cookies in a ziplock bag and crush them with a rolling pin until you get a fine consistency.
Once the cookies are crushed, transfer the crumbs into a medium-sized bowl. Add the melted butter and stir until the mixture resembles wet sand. You want it to be damp enough to stick together when pressed. Reserve a few tablespoons of the mixture for decorating the tops of your cheesecake cups later.
2. Assemble the Crumb Base:
Now, it’s time to assemble the base of your cheesecake cups. Divide the crumb mixture evenly among your cups. You should have enough to make about 8 regular-sized cups or 16 mini-shot cups, depending on the size of the cups you use. Press the crumbs down firmly using the back of a spoon to create an even layer. This base will add a delicious crunch to each bite of the creamy cheesecake filling. Once all the cups are filled, set them aside.
3. Make the Cheesecake Filling:
In a large bowl, start by whipping the heavy cream. You want to beat it until stiff peaks form. This might take a few minutes with an electric mixer, but it’s a crucial step to getting the right texture for the cheesecake filling.
In another bowl, whisk together the cream cheese, powdered sugar, Biscoff spread, and vanilla extract. You should end up with a smooth and creamy mixture that’s rich and slightly thick. Now, gently fold in the whipped heavy cream with a spatula, being careful not to deflate the cream too much. You want to keep the filling light and airy. Continue folding until the mixture is fully incorporated and smooth.
4. Pipe the Cheesecake Filling:
Once your cheesecake filling is ready, transfer it to a piping bag. If you don’t have a piping bag, you can also use a Ziploc bag and snip off the corner for easy piping. Carefully pipe the cheesecake filling into each cup on top of the crumb base. Don’t worry about being too precise—this dessert is all about indulgence, so feel free to get a little messy!
5. Garnish and Final Touches:
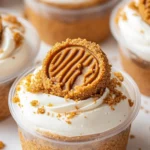
To finish off the dessert, melt the remaining Biscoff spread in the microwave for about 20 seconds or until it becomes liquid. Drizzle a thin layer of melted Biscoff spread over the top of each cheesecake cup. This gives the cheesecake that signature cookie butter flavor. Finally, top each cup with half a Biscoff cookie to add a decorative touch and a little extra crunch.
6. Chill the Cheesecake Cups:
Now comes the hardest part—waiting! Place the assembled cheesecake cups in the refrigerator for at least 4 hours to allow the cheesecake filling to firm up. If you can wait longer, even better—the flavors have more time to meld, and the texture becomes even more perfect. Serve chilled and enjoy!
Notes
- Don’t Overmix the Heavy Cream: When whipping the cream, make sure not to overwhip it. If you whip it too long, it can turn into butter, and that’s not what you want for a smooth cheesecake filling. Stop whipping when you see stiff peaks.
- Room Temperature Ingredients: To avoid lumps, make sure the cream cheese is at room temperature before you mix it. If it’s too cold, it won’t incorporate smoothly into the filling.
- Chill the Cheesecake Cups Thoroughly: For the best texture, ensure that the cheesecake cups have time to chill. The longer they set, the firmer they will get, making them easier to serve and eat.
- Using a Piping Bag: If you don’t have a piping bag, you can easily make one by using a Ziploc bag and cutting off a small corner. It works just as well, and cleanup is a breeze!
- Pre-crush the Cookies Ahead of Time: To save some time, you can crush the Biscoff cookies ahead of time and store them in an airtight container until you’re ready to assemble the cheesecake cups. This will cut down on prep time when you’re ready to make the dessert.