The season of love is upon us, a time for expressing affection, cherishing relationships, and, of course, indulging in delectable treats. What better way to convey your feelings than with homemade goodies that are as visually stunning as they are delicious? These No-Bake Valentine’s Oreo Truffles are the perfect embodiment of sweet sentiments. They’re a delightful blend of crunchy Oreo cookies and smooth cream cheese, all enveloped in a colorful, festive coating – a true symphony of chocolate and cream. I recall the first time I crafted these little treasures. The kitchen transformed into a haven of sweet aromas, and the process of dipping and adorning each truffle felt like creating miniature edible masterpieces. The final result was a platter of breathtaking truffles that vanished in mere moments, leaving behind smiles and happy hearts. This recipe is a beginner baker’s dream: no oven required, straightforward ingredients, and a final product that rivals the creations of a seasoned chocolatier. It’s a quick, effortless, and undeniably impressive way to express your love and craft a memorable celebration of affection.

No-Bake Valentine’s Oreo Truffles: A Sweet Symphony of Chocolate and Cream

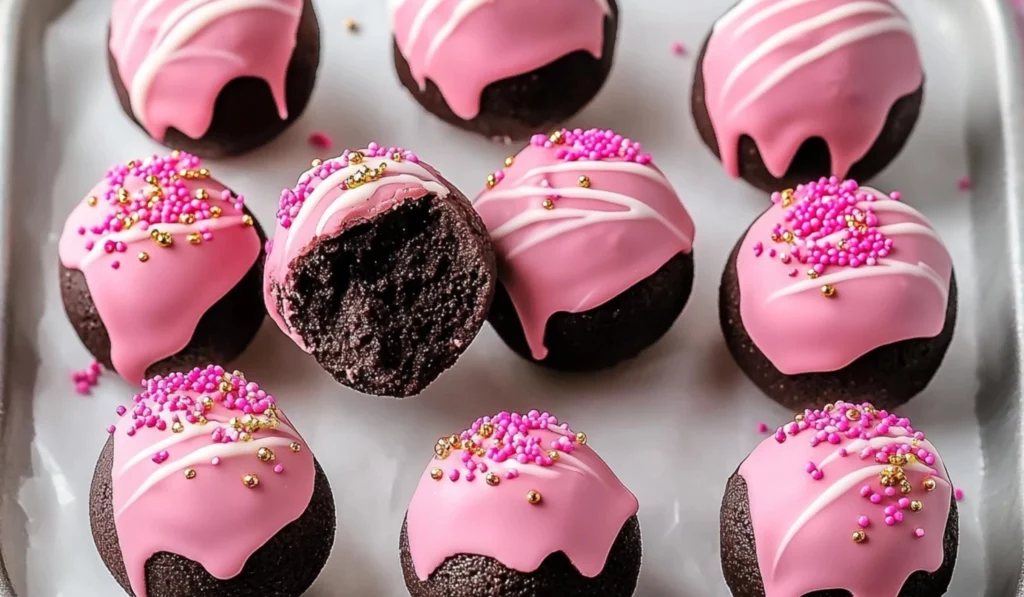
Valentine’s Day deserves a sweet celebration, and these No-Bake Oreo Truffles are the perfect way to share the love. Imagine biting into a rich, chocolatey Oreo truffle with a creamy, dreamy center, all dressed up in festive pink chocolate and adorned with dazzling sprinkles. These delightful treats are not only incredibly easy to make, but they’re also a feast for the eyes, making them a stunning addition to any Valentine’s Day gathering. This simple recipe is perfect for beginner bakers, requiring no oven time and only a handful of readily available ingredients.
- Prep Time: 20 minutes
- Cook Time: 0 minutes
- Total Time: 50 minutes (includes chilling time)
- Yield: Approximately 36 truffles 1x
- Category: Dessert
- Method: No-Bake
- Cuisine: American
- Diet: Vegetarian
Ingredients
- 36 Regular Oreos
- 8 oz Cream Cheese, room temperature
- 1 (12-oz) bag Pink Candy Melts
- ½ cup White Candy Melts
- 1 tbsp + 1 tsp Coconut Oil
- Valentine’s Day Sprinkle Mix
- Gold Sanding Sugar
Instructions
- Prep the Canvas: Line a baking sheet with parchment paper. This will prevent the truffles from sticking and make cleanup a breeze. Tip: If you don’t have parchment paper, you can lightly grease the baking sheet with cooking spray.
- Crush the Oreos: Place the Oreos in a zip-top bag and crush them into fine crumbs using a rolling pin. Alternatively, you can use a food processor for a quicker and more consistent result. The finer the crumbs, the smoother the truffle filling will be. Pro Tip: Remove the cream filling from a few Oreos before crushing them if you want a less intensely creamy truffle.
- Combine and Conquer: In a mixing bowl, combine the crushed Oreos with the room-temperature cream cheese. Use a spatula or your hands to mix until fully combined and the mixture is smooth. The cream cheese acts as a binder, holding the truffles together. Tip: If the mixture seems too dry, you can add a little more cream cheese, a tablespoon at a time.
- Roll into Truffles: Roll the Oreo mixture into 1-inch balls and place them on the prepared baking sheet. Tip: Using a small ice cream scoop or a tablespoon can help ensure consistent sizing. Lightly dampen your hands with water to prevent the mixture from sticking to them.
- Chill Out: Chill the truffles in the refrigerator for about 30 minutes, or until firm. This step is crucial as it helps the truffles maintain their shape when dipped in chocolate. Pro Tip: If you’re short on time, you can chill them in the freezer for about 15 minutes. Just be careful not to freeze them solid.
- Melt the Pink Chocolate: While the truffles are chilling, melt the pink candy melts. Place them in a microwave-safe bowl and heat in 30-second intervals, stirring in between, until smooth. Once melted, add 1 tablespoon of coconut oil to the pink chocolate and mix well. Tip: If the chocolate is too thick, add the remaining teaspoon of coconut oil.
- Dip and Decorate: After the truffles have chilled, use a toothpick or dipping tools to dip each one into the melted pink chocolate, tapping off any excess chocolate before placing them back on the parchment paper. Tip: Work quickly so the chocolate doesn’t set before you add the decorations. You can also use a fork to help dip the truffles.
- Drizzle with White Chocolate: Melt the white candy melts in the same way as the pink. Transfer the melted white chocolate to a piping bag or a plastic bag with the corner snipped off. Drizzle the melted white chocolate over the pink-dipped truffles. Tip: You can also use a squeeze bottle for more precise drizzling.
- Add the Finishing Touches: While the chocolate is still wet, generously sprinkle the Valentine’s Day sprinkle mix and gold sanding sugar on top of the truffles. This will ensure the decorations adhere nicely. Tip: You can also roll the truffles in the sprinkles instead of just sprinkling them on top.
- Set and Serve: Allow the truffles to cool for about 10 minutes, or until the chocolate hardens. Once set, your truffles are ready to be enjoyed! Tip: You can speed up the setting process by placing the truffles in the refrigerator for a few minutes.
Notes
- Softened Cream Cheese is King: This is absolutely essential! Cold cream cheese will result in a lumpy, unappetizing filling. Allow ample time for the cream cheese to soften at room temperature before you begin. You can even cut the cream cheese into smaller cubes to speed up the softening process.
- Don’t Overmix the Chocolate: Overheating or overmixing the candy melts can cause them to seize up and become unusable. Heat in short bursts and stir frequently. If the chocolate becomes too thick, you can add a little more coconut oil, a teaspoon at a time.
- Work Quickly When Dipping: The chocolate sets quickly, so it’s important to dip and decorate the truffles promptly. If the chocolate starts to harden, you can reheat it gently in the microwave.
- Get Creative with Decorations: Feel free to use different sprinkles, candies, or even edible glitter to decorate your truffles. You can also drizzle them with different colored chocolate or add a small candy heart to the top of each truffle.
- Storage: Store leftover truffles in an airtight container in the refrigerator for up to a week. Bring them to room temperature before serving for the best texture.
Ingredients and Preparation: The Building Blocks of Deliciousness
These No-Bake Valentine’s Oreo Truffles are surprisingly simple to create. Here’s a breakdown of what you’ll need to whip up these little bites of heaven:
- The Oreo Heart:
- 36 Regular Oreos – The iconic Oreo cookie takes center stage. You can opt for Double Stuf Oreos for an even more decadent, creamy center, or explore limited-edition flavors if you’re feeling adventurous. Consider using the Valentine’s Day themed Oreos if you can find them for an extra touch of festivity.
- The Creamy Binding Agent:
- 8 oz Cream Cheese, room temperature – Softened cream cheese is the key to a smooth and creamy truffle filling. Avoid using cold cream cheese; it will be lumpy and difficult to work with. Allow ample time for it to soften at room temperature.
- The Colorful Coating:
- 1 (12-oz) bag Pink Candy Melts – These candy melts provide a beautiful, vibrant coating. Feel free to experiment with different colors – red, white, or even a combination of hues would look festive and appealing. You can also use chocolate chips or other melting chocolate, but candy melts tend to set more smoothly.
- ½ cup White Candy Melts – The white chocolate drizzle adds a lovely contrast and a touch of elegance to the finished truffles. It’s like the perfect finishing touch on a work of art.
- 1 tbsp + 1 tsp Coconut Oil – Adding coconut oil to the melted candy melts helps create a smoother, more fluid consistency, making it easier to dip the truffles and preventing the chocolate from seizing up. It also gives the chocolate a nice sheen.
- The Festive Finishing Touches:
- Valentine’s Day Sprinkle Mix – Sprinkles are essential for any festive treat! Choose a mix with hearts, pinks, reds, and other celebratory shapes. Don’t be afraid to get creative with your sprinkle choices!
- Gold Sanding Sugar – Adds a touch of sparkle and sophistication to the truffles, making them look extra special.
Step-by-Step Instructions: From Cookie to Confection
These truffles come together quickly and easily. Here’s a detailed breakdown of the process:
- Prep the Canvas: Line a baking sheet with parchment paper. This will prevent the truffles from sticking and make cleanup a breeze. Tip: If you don’t have parchment paper, you can lightly grease the baking sheet with cooking spray.
- Crush the Oreos: Place the Oreos in a zip-top bag and crush them into fine crumbs using a rolling pin. Alternatively, you can use a food processor for a quicker and more consistent result. The finer the crumbs, the smoother the truffle filling will be. Pro Tip: Remove the cream filling from a few Oreos before crushing them if you want a less intensely creamy truffle.
- Combine and Conquer: In a mixing bowl, combine the crushed Oreos with the room-temperature cream cheese. Use a spatula or your hands to mix until fully combined and the mixture is smooth. The cream cheese acts as a binder, holding the truffles together. Tip: If the mixture seems too dry, you can add a little more cream cheese, a tablespoon at a time.
- Roll into Truffles: Roll the Oreo mixture into 1-inch balls and place them on the prepared baking sheet. Tip: Using a small ice cream scoop or a tablespoon can help ensure consistent sizing. Lightly dampen your hands with water to prevent the mixture from sticking to them.
- Chill Out: Chill the truffles in the refrigerator for about 30 minutes, or until firm. This step is crucial as it helps the truffles maintain their shape when dipped in chocolate. Pro Tip: If you’re short on time, you can chill them in the freezer for about 15 minutes. Just be careful not to freeze them solid.
- Melt the Pink Chocolate: While the truffles are chilling, melt the pink candy melts. Place them in a microwave-safe bowl and heat in 30-second intervals, stirring in between, until smooth. Once melted, add 1 tablespoon of coconut oil to the pink chocolate and mix well. Tip: If the chocolate is too thick, add the remaining teaspoon of coconut oil.
- Dip and Decorate: After the truffles have chilled, use a toothpick or dipping tools to dip each one into the melted pink chocolate, tapping off any excess chocolate before placing them back on the parchment paper. Tip: Work quickly so the chocolate doesn’t set before you add the decorations. You can also use a fork to help dip the truffles.
- Drizzle with White Chocolate: Melt the white candy melts in the same way as the pink. Transfer the melted white chocolate to a piping bag or a plastic bag with the corner snipped off. Drizzle the melted white chocolate over the pink-dipped truffles. Tip: You can also use a squeeze bottle for more precise drizzling.
- Add the Finishing Touches: While the chocolate is still wet, generously sprinkle the Valentine’s Day sprinkle mix and gold sanding sugar on top of the truffles. This will ensure the decorations adhere nicely. Tip: You can also roll the truffles in the sprinkles instead of just sprinkling them on top.
- Set and Serve: Allow the truffles to cool for about 10 minutes, or until the chocolate hardens. Once set, your truffles are ready to be enjoyed! Tip: You can speed up the setting process by placing the truffles in the refrigerator for a few minutes.
Beginner Tips and Notes: Your Culinary Companion
Even the simplest recipes can benefit from a few helpful tips and tricks. Here are some pointers to ensure your No-Bake Valentine’s Oreo Truffles are a resounding success:
- Softened Cream Cheese is King: This is absolutely essential! Cold cream cheese will result in a lumpy, unappetizing filling. Allow ample time for the cream cheese to soften at room temperature before you begin. You can even cut the cream cheese into smaller cubes to speed up the softening process.
- Don’t Overmix the Chocolate: Overheating or overmixing the candy melts can cause them to seize up and become unusable. Heat in short bursts and stir frequently. If the chocolate becomes too thick, you can add a little more coconut oil, a teaspoon at a time.
- Work Quickly When Dipping: The chocolate sets quickly, so it’s important to dip and decorate the truffles promptly. If the chocolate starts to harden, you can reheat it gently in the microwave.
- Get Creative with Decorations: Feel free to use different sprinkles, candies, or even edible glitter to decorate your truffles. You can also drizzle them with different colored chocolate or add a small candy heart to the top of each truffle.
- Storage: Store leftover truffles in an airtight container in the refrigerator for up to a week. Bring them to room temperature before serving for the best texture.
Serving Suggestions: Making it Extra Special
These No-Bake Valentine’s Oreo Truffles are delicious on their own, but here are some serving suggestions to make them even more special:
Gift Giving: Package the truffles in small boxes or bags and give them as gifts to your loved ones. Tie a ribbon around the box or bag and add a personalized tag for a thoughtful touch.
Presentation Matters: Arrange the truffles on a beautiful platter or in a decorative box. You can line the platter or box with parchment paper or tissue paper for a more elegant look.
Pair with a Drink: Serve the truffles with a glass of milk, hot chocolate, or even a cup of coffee. They also pair well with sparkling cider or champagne for a more festive occasion.

Conclusion: A Sweet Ending to a Perfect Celebration of Affection (Continued)
These No-Bake Valentine’s Oreo Truffles are the perfect way to express your love and celebrate the special bonds in your life. They’re easy to make, fun to decorate, and absolutely delicious. I encourage you to try this recipe and make it your own. Experiment with different colors, sprinkles, and even different types of cookies. Don’t be afraid to get creative and put your own personal spin on these delightful treats. Perhaps you’d like to try adding a layer of peanut butter to the center, or dipping them in dark chocolate instead of pink. The possibilities are endless!
So, go ahead, grab your ingredients, put on your apron (or don’t!), and let the sweet celebrations begin! These No-Bake Valentine’s Oreo Truffles are waiting to be created, shared, and enjoyed. We can’t wait to hear about your truffle-making adventures! Share your photos, your variations, and your stories in the comments below. We’d love to see what you create and be inspired by your creativity. Happy baking (and no-baking!), and Happy Valentine’s Day!


