If you are a lover of desserts that delight both the eyes and the palate, look no further than the Pavlova Cheesecake. This showstopper combines the best of two iconic desserts: the crisp, chewy meringue of a pavlova and the smooth, indulgent creaminess of a cheesecake. Both of these desserts have been long-standing favorites in Australian kitchens, but together, they create something truly extraordinary. The Pavlova Cheesecake is the perfect blend of textures and flavors, bringing together the crunch of meringue, the richness of cream cheese, and the freshness of vibrant fruits.
PrintPavlova Cheesecake: The Ultimate Dessert Fusion for Every Occasion
If you are a lover of desserts that delight both the eyes and the palate, look no further than the Pavlova Cheesecake. This showstopper combines the best of two iconic desserts: the crisp, chewy meringue of a pavlova and the smooth, indulgent creaminess of a cheesecake. Both of these desserts have been long-standing favorites in Australian kitchens, but together, they create something truly extraordinary. The Pavlova Cheesecake is the perfect blend of textures and flavors, bringing together the crunch of meringue, the richness of cream cheese, and the freshness of vibrant fruits.
- Prep Time: 25 minutes
- Cook Time: 0 minutes
- Total Time: 2 hours 25 minutes (including chilling time)
- Yield: 10 servings 1x
- Category: Dessert
- Method: No-bake, Chilled
- Cuisine: Australian
- Diet: Vegetarian
Ingredients
For the Base:
- Cooking oil spray, to grease
- 200g Lemon Crisp biscuits
- 50g butter, melted
For the Filling:
- 3 tsp powdered gelatine
- 3 tbsp hot water
- 2 x 250g blocks of cream cheese, chopped and softened
- ½ cup icing sugar mixture
- 1 tsp vanilla extract
- 300ml thickened cream (for the filling)
- 300ml thickened cream (for whipping and topping)
- 5 meringue nests (from an 8-pack), broken into bite-sized pieces
For the Topping:
- 3 meringue nests (from the remaining 8-pack), broken into pieces
- 6 strawberries, hulled and thinly sliced
- ½ x 125g punnet of blueberries
- ½ fresh mango, thinly sliced
- 10 cherries (or raspberries)
- Pulp of 2 passionfruit
- Fresh mint leaves for garnish
Instructions
Step 1: Prepare the Cake Tin
Start by greasing a 20cm round springform cake tin with cooking oil spray. It’s essential to ensure that the cake comes out easily after it has set. Line both the base and the sides of the tin with baking paper, allowing the paper to stick to the edges of the pan. This will prevent any sticking and make the removal process smooth and hassle-free.
Step 2: Make the Biscuit Base
Next, place the Lemon Crisp biscuits into a food processor and blitz them until they form fine crumbs. These biscuits will form the crunchy base of your cheesecake. Once the biscuits are finely crushed, transfer them to a large bowl and stir in the melted butter until the mixture is well combined. The butter will help to bind the biscuit crumbs together and give the base a firm, buttery texture.
Once the biscuit mixture is ready, pour it into your prepared tin and use the bottom of a glass or measuring cup to press it down firmly and evenly. This ensures that the base will set perfectly and be sturdy enough to support the creamy filling. Place the tin in the freezer for 15 minutes to allow the base to firm up before you proceed with the next steps.
Step 3: Prepare the Gelatine Mixture
While the biscuit base is chilling, it’s time to work on the gelatine mixture, which will help the cheesecake filling set perfectly. In a small jug, mix the powdered gelatine with hot water. Stir well and let the mixture sit for about 5 minutes to allow the gelatine to bloom. Once it has bloomed, microwave the mixture on high for 30 seconds or until the gelatine has dissolved completely. Allow the gelatine mixture to cool for 2 minutes before adding it to the cream cheese mixture.
Step 4: Make the Cream Cheese Filling
In a large bowl, combine the softened cream cheese, icing sugar mixture, and vanilla extract. Using an electric mixer, beat the ingredients on low speed until the sugar has dissolved and the mixture is smooth. Once the sugar is fully incorporated, increase the speed to medium and continue beating until the cream cheese is light and smooth. The cream cheese should have a silky texture with no lumps.
Next, add the cooled gelatine mixture to the cream cheese mixture and beat again until it’s fully incorporated. The gelatine ensures that the cheesecake will have the perfect consistency once it sets. Gently fold in the thickened cream, which has been whipped to soft peaks, to give the filling a light, airy texture. Finally, break 5 of the meringue nests into bite-sized pieces and fold them into the mixture for that signature pavlova crunch.
Step 5: Assemble the Cheesecake
Once your cream cheese mixture is ready, carefully spoon it onto the chilled biscuit base in the springform tin. Use the back of a spoon to smooth the top and ensure an even layer. This will form the creamy layer of the cheesecake, which will contrast beautifully with the crunchy meringue and the fresh fruit topping. Place the cheesecake in the refrigerator and let it chill for at least 2 hours, or until it has fully set. The waiting time will allow the flavors to meld together, and the cheesecake will firm up to perfection.
Step 6: Prepare the Topping
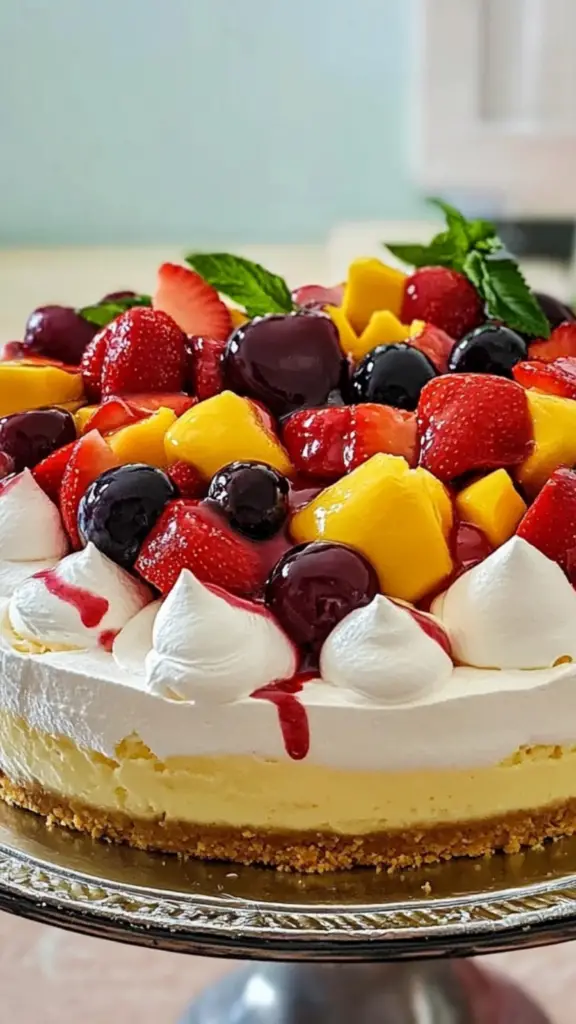
After the cheesecake has set, it’s time to add the finishing touches. Remove the cheesecake from the springform tin and transfer it to a serving plate. In a separate bowl, whip the remaining 300ml of thickened cream until it forms soft peaks. This whipped cream will be dolloped on top of the cheesecake, adding a silky, creamy layer to finish it off. Spread the whipped cream evenly over the surface of the cheesecake, covering it completely.
Step 7: Add the Meringue and Fruit Topping
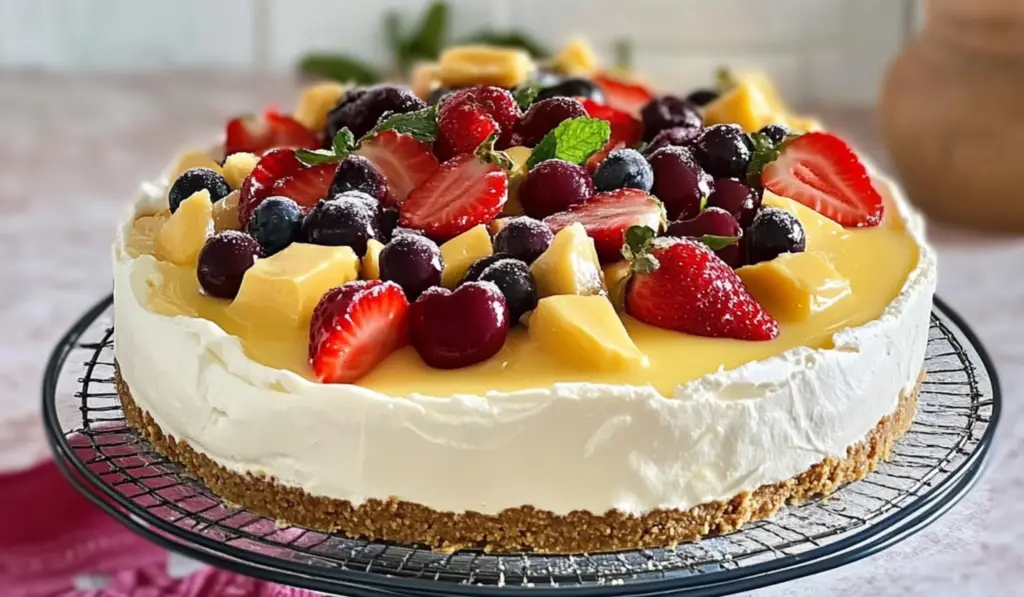
For the final decoration, break the remaining 3 meringue nests into small pieces and scatter them on top of the whipped cream. This adds extra texture and flavor, mimicking the signature pavlova crunch. Next, layer the fresh fruits on top of the whipped cream. Start with the thinly sliced strawberries, followed by blueberries, mango slices, and cherries. These fruits not only look stunning but also offer a sweet and tart contrast to the richness of the cheesecake.
To finish, garnish with fresh mint leaves, which will add a burst of color and a refreshing, aromatic touch. Drizzle the passionfruit pulp over the top, allowing its tangy, exotic flavor to complement the sweetness of the fruit and cream. The combination of the fruit, mint, and passionfruit creates a beautifully balanced topping that’s as delicious as it is visually appealing.
Notes
- Gelatine Substitute: If you prefer not to use gelatine, you can substitute it with agar-agar, which is a vegetarian alternative. Make sure to follow the instructions on the agar-agar package for proper usage.
- Biscuit Base Variation: You can swap the Lemon Crisp biscuits for other biscuit varieties, such as digestive biscuits or even graham crackers, for a different flavor profile. The key is to choose a biscuit that’s buttery and crisp.
- Fruit Variations: Feel free to experiment with different fruits based on what’s in season or your personal preference. Kiwi, raspberries, or blackberries would also make great additions. Just keep in mind the balance of sweetness and tartness to complement the creamy filling.
- Make Ahead: This cheesecake is perfect for making ahead. It can be prepared a day in advance and kept refrigerated until you’re ready to serve, which makes it an excellent option for stress-free entertaining.
- Serving Suggestions: Serve this Pavlova Cheesecake on its own as a stunning centerpiece, or pair it with a chilled glass of dessert wine or champagne for an extra touch of indulgence.
Whether you’re hosting a festive gathering, celebrating a special occasion, or simply treating yourself to something luxurious, this cheesecake is sure to be a crowd-pleaser. It’s beautiful to look at, fun to make, and, most importantly, delicious in every bite. Let’s dive into this delightful dessert that’s a feast for the senses!
The Magic Behind Pavlova Cheesecake
What makes this dessert so special is how it harmoniously blends the characteristics of two beloved treats. Imagine the crispness of the meringue nest in a pavlova, paired with the velvety smooth, tangy cheesecake filling. The meringue nest adds a light, airy crunch, while the cheesecake filling is creamy and luscious. Together, these elements are transformed into a cohesive dessert that’s not only visually stunning but also a pleasure to eat.
But it’s not just about the textures—the Pavlova Cheesecake is loaded with flavor. From the subtle sweetness of the meringue to the tanginess of the cream cheese, and the aromatic freshness of the fruits, every bite offers a unique combination of tastes. The fruits on top—strawberries, blueberries, mango, and cherries—bring a burst of color and freshness, complementing the richness of the cream cheese and the delicate sweetness of the meringue.
Ingredients for Pavlova Cheesecake
This dessert may look impressive, but it’s surprisingly simple to prepare. Here’s what you’ll need to bring the magic of Pavlova Cheesecake to life:
For the Base:
- Cooking oil spray, to grease
- 200g Lemon Crisp biscuits
- 50g butter, melted
For the Filling:
- 3 tsp powdered gelatine
- 3 tbsp hot water
- 2 x 250g blocks of cream cheese, chopped and softened
- ½ cup icing sugar mixture
- 1 tsp vanilla extract
- 300ml thickened cream (for the filling)
- 300ml thickened cream (for whipping and topping)
- 5 meringue nests (from an 8-pack), broken into bite-sized pieces
For the Topping:
- 3 meringue nests (from the remaining 8-pack), broken into pieces
- 6 strawberries, hulled and thinly sliced
- ½ x 125g punnet of blueberries
- ½ fresh mango, thinly sliced
- 10 cherries (or raspberries)
- Pulp of 2 passionfruit
- Fresh mint leaves for garnish
Step-by-Step Instructions for Making Pavlova Cheesecake
The journey to creating this decadent dessert is a rewarding one. With its layers of delicate meringue and velvety cheesecake filling, the Pavlova Cheesecake requires attention to detail, but the process is manageable. Here’s how to make it:
Step 1: Prepare the Cake Tin
Start by greasing a 20cm round springform cake tin with cooking oil spray. It’s essential to ensure that the cake comes out easily after it has set. Line both the base and the sides of the tin with baking paper, allowing the paper to stick to the edges of the pan. This will prevent any sticking and make the removal process smooth and hassle-free.
Step 2: Make the Biscuit Base
Next, place the Lemon Crisp biscuits into a food processor and blitz them until they form fine crumbs. These biscuits will form the crunchy base of your cheesecake. Once the biscuits are finely crushed, transfer them to a large bowl and stir in the melted butter until the mixture is well combined. The butter will help to bind the biscuit crumbs together and give the base a firm, buttery texture.
Once the biscuit mixture is ready, pour it into your prepared tin and use the bottom of a glass or measuring cup to press it down firmly and evenly. This ensures that the base will set perfectly and be sturdy enough to support the creamy filling. Place the tin in the freezer for 15 minutes to allow the base to firm up before you proceed with the next steps.
Step 3: Prepare the Gelatine Mixture
While the biscuit base is chilling, it’s time to work on the gelatine mixture, which will help the cheesecake filling set perfectly. In a small jug, mix the powdered gelatine with hot water. Stir well and let the mixture sit for about 5 minutes to allow the gelatine to bloom. Once it has bloomed, microwave the mixture on high for 30 seconds or until the gelatine has dissolved completely. Allow the gelatine mixture to cool for 2 minutes before adding it to the cream cheese mixture.
Step 4: Make the Cream Cheese Filling
In a large bowl, combine the softened cream cheese, icing sugar mixture, and vanilla extract. Using an electric mixer, beat the ingredients on low speed until the sugar has dissolved and the mixture is smooth. Once the sugar is fully incorporated, increase the speed to medium and continue beating until the cream cheese is light and smooth. The cream cheese should have a silky texture with no lumps.
Next, add the cooled gelatine mixture to the cream cheese mixture and beat again until it’s fully incorporated. The gelatine ensures that the cheesecake will have the perfect consistency once it sets. Gently fold in the thickened cream, which has been whipped to soft peaks, to give the filling a light, airy texture. Finally, break 5 of the meringue nests into bite-sized pieces and fold them into the mixture for that signature pavlova crunch.
Step 5: Assemble the Cheesecake
Once your cream cheese mixture is ready, carefully spoon it onto the chilled biscuit base in the springform tin. Use the back of a spoon to smooth the top and ensure an even layer. This will form the creamy layer of the cheesecake, which will contrast beautifully with the crunchy meringue and the fresh fruit topping. Place the cheesecake in the refrigerator and let it chill for at least 2 hours, or until it has fully set. The waiting time will allow the flavors to meld together, and the cheesecake will firm up to perfection.
Step 6: Prepare the Topping
After the cheesecake has set, it’s time to add the finishing touches. Remove the cheesecake from the springform tin and transfer it to a serving plate. In a separate bowl, whip the remaining 300ml of thickened cream until it forms soft peaks. This whipped cream will be dolloped on top of the cheesecake, adding a silky, creamy layer to finish it off. Spread the whipped cream evenly over the surface of the cheesecake, covering it completely.
Step 7: Add the Meringue and Fruit Topping
For the final decoration, break the remaining 3 meringue nests into small pieces and scatter them on top of the whipped cream. This adds extra texture and flavor, mimicking the signature pavlova crunch. Next, layer the fresh fruits on top of the whipped cream. Start with the thinly sliced strawberries, followed by blueberries, mango slices, and cherries. These fruits not only look stunning but also offer a sweet and tart contrast to the richness of the cheesecake.
To finish, garnish with fresh mint leaves, which will add a burst of color and a refreshing, aromatic touch. Drizzle the passionfruit pulp over the top, allowing its tangy, exotic flavor to complement the sweetness of the fruit and cream. The combination of the fruit, mint, and passionfruit creates a beautifully balanced topping that’s as delicious as it is visually appealing.
Helpful Tips for Making Pavlova Cheesecake
While this recipe is simple, there are a few tips that can help you achieve the best possible results:
- Gelatine Substitute: If you prefer not to use gelatine, you can substitute it with agar-agar, which is a vegetarian alternative. Make sure to follow the instructions on the agar-agar package for proper usage.
- Biscuit Base Variation: You can swap the Lemon Crisp biscuits for other biscuit varieties, such as digestive biscuits or even graham crackers, for a different flavor profile. The key is to choose a biscuit that’s buttery and crisp.
- Fruit Variations: Feel free to experiment with different fruits based on what’s in season or your personal preference. Kiwi, raspberries, or blackberries would also make great additions. Just keep in mind the balance of sweetness and tartness to complement the creamy filling.
- Make Ahead: This cheesecake is perfect for making ahead. It can be prepared a day in advance and kept refrigerated until you’re ready to serve, which makes it an excellent option for stress-free entertaining.
- Serving Suggestions: Serve this Pavlova Cheesecake on its own as a stunning centerpiece, or pair it with a chilled glass of dessert wine or champagne for an extra touch of indulgence.
A Showstopping Dessert You’ll Love
The Pavlova Cheesecake is more than just a dessert; it’s an experience. From the moment you bite into the crispy meringue, followed by the creamy cheesecake and the burst of fresh fruits, this dessert captivates all the senses. It’s a delightful treat that combines two iconic desserts into one unforgettable creation.
Whether you’re a novice home cook or an experienced baker, this dessert is approachable, fun to make, and incredibly satisfying to eat. Your guests will be impressed, and you’ll feel a sense of accomplishment every time you serve it. So, why not treat yourself and your loved ones to this indulgent dessert that brings together the best of pavlova and cheesecake? Enjoy!


