Peanut Butter Snowballs: A Festive Treat for Every Occasion
Peanut Butter Snowballs are a delightful holiday treat that encapsulates the nostalgic flavors of peanut butter, honey, and vanilla. These no-bake truffles are perfect for Christmas gatherings or any time you crave a sweet bite-sized dessert. Coated in smooth white chocolate and optionally adorned with festive sprinkles, they’re as visually appealing as they are delicious. This article dives deep into the charm of this dessert, offering tips, variations, and a detailed guide to making these easy yet stunning treats.
- Prep Time: 30 minutes
- Cook Time: 30 minutes
- Total Time: 1 hour
- Yield: 16 servings
- Category: Dessert
- Method: No-Bake
- Cuisine: American
- Diet: Vegetarian
Ingredients
For the Peanut Butter Filling
- Powdered Sugar (2 ¼ cups): Adds sweetness and helps bind the mixture.
- Crunchy Peanut Butter (¾ cup): Provides texture and a rich, nutty flavor.
- Unsalted Butter, Melted (¼ cup): Adds creaminess and binds the ingredients.
- Honey (1 teaspoon): Enhances the sweetness with a floral touch.
- Vanilla Extract (1 teaspoon): Brings a subtle warmth to the truffles.
- Lemon Juice (½ teaspoon): Balances the sweetness with a hint of tanginess.
- Salt (¼ teaspoon): Intensifies the peanut butter flavor.
For the Coating
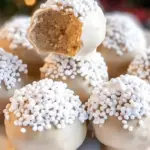
- White Chocolate Candy Melts (1 cup): Creates a smooth, glossy outer layer.
- Christmas Nonpareils (Optional): Adds a festive touch and a pop of color.
Instructions
1. Preparing the Peanut Butter Dough
Start by combining the powdered sugar, crunchy peanut butter, melted butter, honey, vanilla, lemon juice, and salt in a mixing bowl. Stir until well incorporated, forming a smooth dough that’s easy to handle. This mixture serves as the heart of your snowballs, offering a delightful balance of sweetness and nuttiness.
2. Chilling the Dough
To make the dough easier to shape, refrigerate it for 20 minutes or freeze it for 10 minutes. Chilling firms up the mixture, ensuring your snowballs maintain their round shape.
3. Melting the White Chocolate
While the dough chills, prepare the white chocolate coating. Place the candy melts in a microwave-safe bowl and heat in 30-second intervals, stirring after each round. This prevents overheating and keeps the chocolate silky smooth. If the chocolate is too thick, add a small amount of shortening or oil to achieve a pourable consistency.
4. Rolling and Coating the Snowballs
Once the dough is chilled, roll it into 2-inch balls. Dip each ball into the melted white chocolate, ensuring it’s fully coated. Use a fork or dipping tool to lift the snowballs out of the chocolate, letting any excess drip off. Place the coated snowballs on a parchment-lined baking sheet to set.
5. Adding the Finishing Touch
Before the chocolate hardens, sprinkle the snowballs with festive nonpareils for a touch of holiday cheer. If you’re not a fan of sprinkles, consider drizzling melted dark chocolate or topping them with crushed peanuts for added texture and flavor.
6. Setting the Snowballs
Allow the coated snowballs to set at room temperature or speed up the process by refrigerating them. Once the chocolate has hardened, your Peanut Butter Snowballs are ready to enjoy!
Notes
- Choose the Right Peanut Butter
Opt for a crunchy variety for added texture, but ensure it’s not too oily to maintain the dough’s consistency. - Mastering the Chocolate Coating
If the white chocolate is too thick, adding a teaspoon of coconut oil or shortening can help achieve a smooth coating. - Uniform Snowballs
Use a cookie scoop to portion the dough evenly, ensuring your snowballs are uniform in size and bake evenly. - Creative Garnishes
While sprinkles are classic, you can customize your snowballs with crushed nuts, shredded coconut, or even edible glitter for a glamorous touch. - Storage Tips
Store your Peanut Butter Snowballs in an airtight container in the refrigerator for up to a week. If making them ahead for the holidays, freeze them for up to a month and thaw before serving.