There’s something magical about combining the richness of Oreo cookies with the bright tartness of fresh raspberries. When I first stumbled upon this dessert, it felt like a delightful accident—one where every spoonful is a perfect balance of creaminess, crunch, and fruitiness. What makes this Raspberry Oreo Dessert even more delightful is how effortlessly it comes together. Whether you’re a beginner cook or just looking for a quick treat to wow your guests, this dessert is your answer.

Raspberry Oreo Dessert: A Quick, Decadent Treat for Beginners

This Raspberry Oreo Dessert is the perfect combination of creamy, crunchy, and fruity goodness, all wrapped up in one easy, no-bake treat. If you’re a beginner in the kitchen, this recipe is ideal for you—simple ingredients, no baking required, and a crowd-pleasing result. The rich Oreo base, smooth mascarpone cream, and tart raspberries come together in the most delicious way, making it the perfect dessert to whip up for any occasion. Ready to treat yourself to something indulgent yet effortless? Let’s get started!
- Prep Time: 20 minutes
- Cook Time: 0 minutes
- Total Time: 20 minutes
- Yield: 6 servings 1x
- Category: Dessert
- Method: No-bake, Layering
- Cuisine: American
- Diet: Vegetarian
Ingredients
- 250 g mascarpone – This rich, creamy cheese is perfect for giving your dessert a luxurious texture. Mascarpone adds a velvety smoothness to the cream layer that balances out the crunchy texture of the Oreos and the freshness of the raspberries.
- 150 g Greek yogurt – Adds a tangy balance to the mascarpone’s richness and helps lighten the overall dessert. Greek yogurt is thick and creamy, giving the dessert structure without overpowering the delicate flavors.
- 1 dash of lemon juice concentrate – A touch of acidity to bring out the flavors of the cream and fruit. The lemon juice helps balance the sweetness of the other ingredients, keeping the dessert from becoming overly rich or heavy.
- 2 tablespoons powdered sugar – To sweeten the cream base just enough without overpowering the other flavors. You can adjust this to taste, depending on your preferred sweetness level.
- 200 g whipped cream – Light, airy whipped cream adds volume and gives the dessert a soft, pillowy texture. Be sure to use whipped cream that’s thick enough to hold its shape but not too stiff that it loses its lightness.
- 1 pack of chilled Oreo cookies (approx. 154g) – The iconic, crunchy cookies with cream filling make up the heart of this dessert’s base. The Oreos provide the perfect contrast to the smooth cream and the soft raspberries.
- 300 g frozen raspberries – Tangy and slightly sweet, these raspberries add a pop of color and flavor. Raspberries also bring a burst of freshness to balance out the rich creaminess of the dessert.
- Possibly Oreo Crunchis – Mini Oreos are optional, but they make a fun garnish to top off the dessert. These little bites of Oreos add extra crunch and a playful element to the dish.
Instructions
Step 1: Prepare the Oreos
To get started, place your Oreo cookies in the fridge for a few hours, or pop them in the freezer for about 15 minutes before preparing. This step firms up the cream inside the cookies, making them easier to crush and layer. If you’re short on time, you can skip this, but I highly recommend chilling them for better texture.
Freezing the cookies also makes them less messy when breaking them apart. You’ll be able to crumble the cookies without the cream squishing out, ensuring that the cookie pieces stay intact.
Step 2: Thaw the Raspberries
Next, take your frozen raspberries out of the freezer and let them thaw at room temperature for about 10 to 15 minutes. This gives them time to soften and release some of their juice, making them easier to layer in your dessert. Don’t worry if they seem a little mushy; it only adds to the flavor!
If you like a smoother texture, you can even mash the raspberries gently with a fork to release more juice. But if you prefer a chunkier, more rustic look, simply keep the raspberries whole. You can always adjust the texture of the fruit to your liking.
Step 3: Make the Cream
In a mixing bowl, combine the mascarpone, Greek yogurt, powdered sugar, and a dash of lemon juice concentrate. Using a whisk or an electric mixer, blend these ingredients together until smooth and creamy. The mascarpone and yogurt create a thick, velvety base, while the lemon juice adds just enough acidity to balance out the sweetness.
Once your cream mixture is ready, take your whipped cream and beat it until stiff peaks form. Gently fold the whipped cream into the mascarpone mixture using a spoon or spatula. The goal is to keep the whipped cream light and airy while blending it into the creamy base. This creates a fluffy, delicious cream layer that will contrast beautifully with the crunchy Oreos.
If the whipped cream isn’t stiff enough, it may not hold its shape as you layer the dessert, so be sure to beat it until it forms firm peaks.
Step 4: Crush the Oreos
Now it’s time to crush your Oreos. You can use a food processor to pulse them into small chunks, or you can do it by hand for a more rustic look. Either way, the cookies should be broken into big pieces, as this gives your dessert layers a bit of crunch and texture. Set these crushed cookies aside.
If you’re using a food processor, pulse the cookies a few times so they break into coarse crumbs. For larger pieces, use your hands to break them apart. You want a mix of fine crumbs and bigger chunks to give the dessert an interesting texture.
Step 5: Layer the Dessert
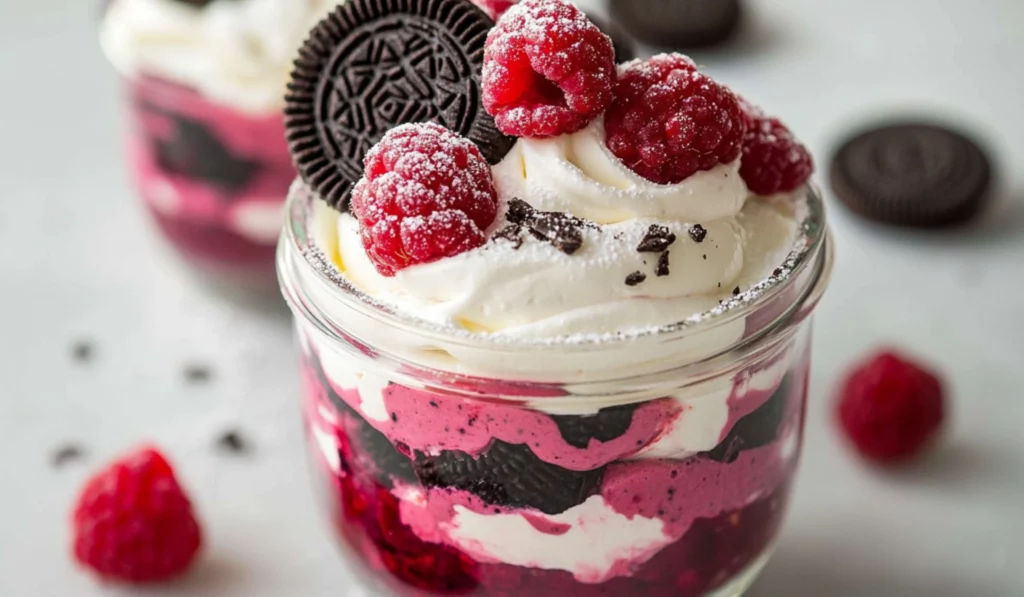
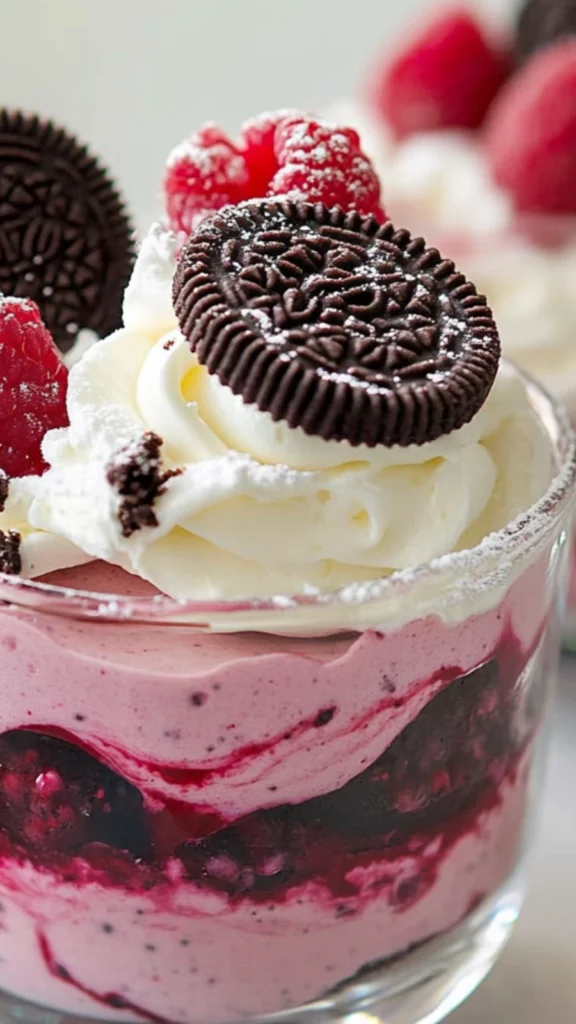
Grab some small dessert glasses or bowls for serving. Start with a layer of crushed Oreos at the bottom of each glass. Then, spoon a generous amount of the mascarpone cream over the Oreos, smoothing it into an even layer. Follow that with a few thawed raspberries scattered on top. Repeat the layers, ending with a layer of cream. Finally, garnish with a few fresh raspberries and mini Oreo Crunchis on top for an extra pop of flavor and visual appeal.
The layering process is the fun part! Feel free to get creative with how you arrange the Oreos and cream. If you’re using smaller cups, you can even create mini versions of the dessert for individual servings.
Step 6: Chill and Serve
Once your dessert glasses are assembled, place them in the fridge for about 1 hour to allow everything to set and chill. The longer it chills, the better the layers meld together. When ready, serve immediately, or keep it chilled until you’re ready to impress your guests!
The chilling process is essential as it helps the cream set and the flavors to marry. If you’re in a rush, even 30 minutes of chilling will help, but for the best results, give it the full hour.
Notes
- Crushing Oreos: Don’t worry about making the cookie pieces uniform. Some large chunks make the dessert feel more homemade and rustic. If you want fine crumbs for a smoother texture, use a food processor.
- Whipping Cream: If you don’t have an electric mixer, you can whisk the cream by hand, but it’ll take a little longer. Make sure your bowl and beaters are cold to help the cream whip faster.
- Raspberries: If you can’t find raspberries or want to try a variation, feel free to use strawberries, blackberries, or even a berry medley. The cream will pair well with any fruit you choose.
In this article, we’ll walk through this super-easy dessert recipe, perfect for beginners. It’s all about minimal preparation, but maximum flavor. Let’s dive in!
Why This Raspberry Oreo Dessert is Perfect for Beginners
If you’re new to cooking or baking, you’ll love this dessert for its simplicity. With only a handful of ingredients and no complicated steps, this recipe offers a quick and satisfying solution when you’re craving something sweet. The beauty of this dessert lies in its layers of texture: the crunchy Oreos, the smooth cream, and the burst of freshness from the raspberries. Plus, there’s no baking involved, so you don’t need to worry about monitoring temperatures or times—just assemble and chill!
What’s also great is how flexible it is. You can easily tweak the ingredients to match what you have in your pantry or to suit dietary preferences. For example, you can use different cookies or swap the Greek yogurt with something like sour cream or whipped ricotta. So, if you’re looking for a no-fuss yet delicious treat, this Raspberry Oreo Dessert is your go-to option.
This dessert is also perfect for beginner cooks because it’s not only simple, but it’s also visually stunning. Anyone who serves this dessert will be met with admiration, and the best part is, they won’t know how easy it was to make! If you’re looking for a no-bake, show-stopping dessert, this is it. It takes only 20 minutes of preparation time, with an additional chill time of one hour, meaning you can prepare it well in advance for a stress-free serving.
Moreover, the ingredients are easily accessible, and the instructions are beginner-friendly. With no need for specialized tools, you can easily put this dessert together in your own kitchen without any complex equipment. All you need is a bowl, a whisk, and some serving glasses, and you’re good to go!
Ingredients and Preparation
Before we get started, let’s gather everything you need. You won’t need to make a special trip to the store since these ingredients are commonly available.
Ingredients:
- 250 g mascarpone – This rich, creamy cheese is perfect for giving your dessert a luxurious texture. Mascarpone adds a velvety smoothness to the cream layer that balances out the crunchy texture of the Oreos and the freshness of the raspberries.
- 150 g Greek yogurt – Adds a tangy balance to the mascarpone’s richness and helps lighten the overall dessert. Greek yogurt is thick and creamy, giving the dessert structure without overpowering the delicate flavors.
- 1 dash of lemon juice concentrate – A touch of acidity to bring out the flavors of the cream and fruit. The lemon juice helps balance the sweetness of the other ingredients, keeping the dessert from becoming overly rich or heavy.
- 2 tablespoons powdered sugar – To sweeten the cream base just enough without overpowering the other flavors. You can adjust this to taste, depending on your preferred sweetness level.
- 200 g whipped cream – Light, airy whipped cream adds volume and gives the dessert a soft, pillowy texture. Be sure to use whipped cream that’s thick enough to hold its shape but not too stiff that it loses its lightness.
- 1 pack of chilled Oreo cookies (approx. 154g) – The iconic, crunchy cookies with cream filling make up the heart of this dessert’s base. The Oreos provide the perfect contrast to the smooth cream and the soft raspberries.
- 300 g frozen raspberries – Tangy and slightly sweet, these raspberries add a pop of color and flavor. Raspberries also bring a burst of freshness to balance out the rich creaminess of the dessert.
- Possibly Oreo Crunchis – Mini Oreos are optional, but they make a fun garnish to top off the dessert. These little bites of Oreos add extra crunch and a playful element to the dish.
Ingredient Substitutions:
- Mascarpone: If you can’t find mascarpone, you can substitute it with cream cheese, though the flavor and texture might be slightly different. If you prefer a lighter option, ricotta cheese can also work as a substitute, but it will give the dessert a different texture.
- Greek yogurt: You could use sour cream or plain yogurt if preferred. If you like a tangier flavor, sour cream will be a great option. You could also opt for non-dairy alternatives like coconut yogurt for a dairy-free option.
- Whipped cream: If you need a dairy-free option, consider using coconut cream or a non-dairy whipped topping. Coconut cream works well to replicate the creamy texture while adding a subtle coconut flavor.
- Frozen raspberries: Fresh raspberries work just as well if you prefer them over frozen ones. In fact, you can use any berries you have on hand—strawberries, blackberries, or even blueberries!
- Oreo cookies: Any cocoa-flavored cookie with a cream filling will do the job—no need to stick to Oreos! You could even try using chocolate chip cookies, or graham crackers for a different twist.
Step-by-Step Instructions
This recipe is a breeze to make, even for beginners. Follow these easy steps, and you’ll be serving up a delicious dessert in no time!
Step 1: Prepare the Oreos
To get started, place your Oreo cookies in the fridge for a few hours, or pop them in the freezer for about 15 minutes before preparing. This step firms up the cream inside the cookies, making them easier to crush and layer. If you’re short on time, you can skip this, but I highly recommend chilling them for better texture.
Freezing the cookies also makes them less messy when breaking them apart. You’ll be able to crumble the cookies without the cream squishing out, ensuring that the cookie pieces stay intact.
Step 2: Thaw the Raspberries
Next, take your frozen raspberries out of the freezer and let them thaw at room temperature for about 10 to 15 minutes. This gives them time to soften and release some of their juice, making them easier to layer in your dessert. Don’t worry if they seem a little mushy; it only adds to the flavor!
If you like a smoother texture, you can even mash the raspberries gently with a fork to release more juice. But if you prefer a chunkier, more rustic look, simply keep the raspberries whole. You can always adjust the texture of the fruit to your liking.
Step 3: Make the Cream
In a mixing bowl, combine the mascarpone, Greek yogurt, powdered sugar, and a dash of lemon juice concentrate. Using a whisk or an electric mixer, blend these ingredients together until smooth and creamy. The mascarpone and yogurt create a thick, velvety base, while the lemon juice adds just enough acidity to balance out the sweetness.
Once your cream mixture is ready, take your whipped cream and beat it until stiff peaks form. Gently fold the whipped cream into the mascarpone mixture using a spoon or spatula. The goal is to keep the whipped cream light and airy while blending it into the creamy base. This creates a fluffy, delicious cream layer that will contrast beautifully with the crunchy Oreos.
If the whipped cream isn’t stiff enough, it may not hold its shape as you layer the dessert, so be sure to beat it until it forms firm peaks.
Step 4: Crush the Oreos
Now it’s time to crush your Oreos. You can use a food processor to pulse them into small chunks, or you can do it by hand for a more rustic look. Either way, the cookies should be broken into big pieces, as this gives your dessert layers a bit of crunch and texture. Set these crushed cookies aside.
If you’re using a food processor, pulse the cookies a few times so they break into coarse crumbs. For larger pieces, use your hands to break them apart. You want a mix of fine crumbs and bigger chunks to give the dessert an interesting texture.
Step 5: Layer the Dessert
Grab some small dessert glasses or bowls for serving. Start with a layer of crushed Oreos at the bottom of each glass. Then, spoon a generous amount of the mascarpone cream over the Oreos, smoothing it into an even layer. Follow that with a few thawed raspberries scattered on top. Repeat the layers, ending with a layer of cream. Finally, garnish with a few fresh raspberries and mini Oreo Crunchis on top for an extra pop of flavor and visual appeal.
The layering process is the fun part! Feel free to get creative with how you arrange the Oreos and cream. If you’re using smaller cups, you can even create mini versions of the dessert for individual servings.
Step 6: Chill and Serve
Once your dessert glasses are assembled, place them in the fridge for about 1 hour to allow everything to set and chill. The longer it chills, the better the layers meld together. When ready, serve immediately, or keep it chilled until you’re ready to impress your guests!
The chilling process is essential as it helps the cream set and the flavors to marry. If you’re in a rush, even 30 minutes of chilling will help, but for the best results, give it the full hour.
Beginner Tips and Notes
- Crushing Oreos: Don’t worry about making the cookie pieces uniform. Some large chunks make the dessert feel more homemade and rustic. If you want fine crumbs for a smoother texture, use a food processor.
- Whipping Cream: If you don’t have an electric mixer, you can whisk the cream by hand, but it’ll take a little longer. Make sure your bowl and beaters are cold to help the cream whip faster.
- Raspberries: If you can’t find raspberries or want to try a variation, feel free to use strawberries, blackberries, or even a berry medley. The cream will pair well with any fruit you choose.
Serving Suggestions
This Raspberry Oreo Dessert is a treat on its own, but here are a few suggestions to elevate your dessert experience:
- Serve with coffee or iced tea: The creaminess of the dessert pairs beautifully with a strong coffee or a refreshing iced tea.
- Add a drizzle of chocolate sauce: For chocolate lovers, a drizzle of melted dark chocolate or chocolate syrup adds a rich touch to each bite.
- Serve with whipped cream: If you want extra indulgence, top the dessert with freshly whipped cream right before serving.
Storage Tips for Leftovers
If you have any leftover Raspberry Oreo Dessert, cover it tightly with plastic wrap or place it in an airtight container and refrigerate. It will stay fresh for up to 2 days. However, the cookies may soften over time, so it’s best enjoyed within the first 24 hours for the ultimate crunchy texture.
Conclusion
There you have it—an easy, no-bake Raspberry Oreo Dessert that’s sure to impress! Whether you’re making it for a casual weeknight treat or bringing it to a family gathering, this dessert is a crowd-pleaser. I hope this recipe inspires you to get creative and experiment with different flavor combinations. Don’t forget to leave a comment below and let me know how your version turned out! Happy baking, and enjoy every bite!


