S’mores Cookie Cups: A Perfect Bite-Sized Treat for Any Occasion
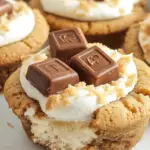
S’mores are one of those nostalgic treats that evoke memories of warm summer nights around a campfire, roasting marshmallows, and indulging in the gooey sweetness of melted chocolate and marshmallows sandwiched between crunchy graham crackers. But what if you could enjoy the same delicious flavors in a more convenient, portable form that doesn’t require an open flame? Enter S’mores Cookie Cups – a perfect combination of all the components of a classic s’more, baked into bite-sized cookie cups that are just as fun to make as they are to eat!
- Prep Time: 10 minutes
- Cook Time: 8 minutes
- Total Time: 18 minutes
- Yield: 24 cookie cups
- Category: Dessert
- Method: Baking
- Cuisine: American
- Diet: Vegetarian
Ingredients
For the Cookie Base:
- Graham cracker crumbs: The star of the cookie base. Graham crackers give the cookie that signature flavor that makes it instantly recognizable as part of a s’more.
- Flour: The all-purpose flour adds structure and helps the cookie cups hold their shape while baking.
- Baking soda: A leavening agent that gives the cookie its soft texture, making it melt in your mouth.
- Salt: A pinch of salt helps balance the sweetness and enhances all the flavors in the cookie.
- Butter (softened): For that rich, creamy texture, butter is essential for the perfect s’mores cookie base. It also helps bind the ingredients together.
- Brown sugar: Brown sugar brings moisture and a hint of caramel flavor that pairs beautifully with the graham cracker crumbs.
- Sugar: The white sugar helps to sweeten the cookies, balancing the slightly savory flavor of the graham crackers.
- Egg: The egg helps bind the dough and adds richness to the texture of the cookie.
- Vanilla extract: Vanilla provides a warm, aromatic note that enhances the other ingredients.
For the Topping:
- Marshmallows: You’ll need large marshmallows, cut in half, to create that perfect toasted marshmallow effect.
- Hershey’s chocolate bars: A classic choice for s’mores, the chocolate melts beautifully and completes the flavor profile of each cookie cup.
Instructions
- Preheat and Prepare the Pan:
Start by preheating your oven to 350°F (175°C) and spraying a mini muffin tin with non-stick cooking spray. This is a crucial step, as it ensures that the cookie cups will come out easily once they are baked. - Mix the Dry Ingredients:
In a small mixing bowl, combine the graham cracker crumbs, flour, baking soda, and salt. Whisk these together until they’re well combined and set them aside. - Cream the Butter and Sugars:
In a larger bowl, use a handheld electric mixer to cream the softened butter, brown sugar, and white sugar until the mixture is light and fluffy. This step helps to aerate the butter and ensures a smooth, creamy texture in your dough. - Add the Wet Ingredients:
To the butter and sugar mixture, add the egg and vanilla extract. Mix well to combine. The egg helps the dough come together and provides moisture, while the vanilla enhances the overall flavor profile. - Combine the Dry and Wet Ingredients:
Gradually add the dry ingredient mixture into the wet ingredients, mixing on low speed until just combined. The dough should be a bit crumbly at this stage, but that’s okay – you want it to hold together but not be too soft. - Form the Cookie Cups:
Scoop out the dough into the mini muffin tin, filling each cup generously. Press down slightly to even out the dough so that it bakes evenly. - Bake:
Place the muffin tin into the preheated oven and bake for 8 minutes. The cookie cups may look a little underdone, but don’t worry – they’ll firm up as they cool. - Make the Marshmallow Indentations:
As soon as the cookie cups come out of the oven, use a teaspoon to press down the center of each one, creating a small indentation for the marshmallow to sit in. Be gentle but firm, so you don’t break the cookie base. - Add the Marshmallows:
Place half of a marshmallow, sticky side down, into the indentations in each cookie cup. The marshmallow will soften and melt while the cookie cools. - Broil to Toast the Marshmallows:
Set your oven broiler to high and place the muffin tin under the broiler for 1-2 minutes. Watch carefully to ensure the marshmallows don’t burn. You want them to be golden brown and lightly toasted for that perfect s’more effect. - Add the Chocolate:
After broiling, remove the muffin tin from the oven and immediately place one square of Hershey’s chocolate on top of each toasted marshmallow. The heat from the marshmallow will help the chocolate melt, creating that irresistible gooeyness. - Let Cool and Serve:
Let the cookie cups cool for about 10 minutes before enjoying them warm and gooey. If you prefer, you can let them cool completely, but they are best served when the marshmallow is still soft and the chocolate is melty.
Notes
- Don’t Overbake: It’s tempting to leave the cookie cups in the oven for a few extra minutes, but be careful not to overbake them. You want them to stay soft and chewy, so remove them as soon as the edges are golden and a toothpick inserted into the center comes out clean.
- Customize Your Toppings: While Hershey’s chocolate bars are a classic choice, you can experiment with other types of chocolate or even add a drizzle of caramel sauce for extra indulgence. You could also try different types of marshmallows, such as flavored ones, for a unique twist.
- Make-Ahead Option: You can prepare the cookie cups ahead of time and freeze them before adding the marshmallows and chocolate. When you’re ready to serve, just bake the cookies, toast the marshmallows, and add the chocolate. This makes for a quick and easy dessert when you’re short on time.
- Gluten-Free Option: If you’re looking to make these gluten-free, you can substitute the all-purpose flour with a gluten-free flour blend. Just make sure it’s one that works as a 1:1 substitution for regular flour.