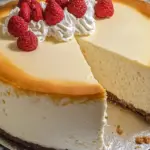
Ultimate Tall and Creamy New York-Style Cheesecake
Cheesecake—there’s something universally irresistible about it. With its creamy, velvety texture and rich, indulgent flavor, cheesecake is one of those desserts that immediately transports you to a place of comfort and contentment. Among the many variations of this beloved dessert, New York-style cheesecake stands out for its tall, dense, and smooth texture. This “Tall and Creamy New York Cheesecake” recipe takes all the classic elements of the famous dessert and elevates them, creating a cheesecake so rich and velvety that every bite feels like a luxurious treat.
- Prep Time: 20 minutes
- Cook Time: 2 hours
- Total Time: 2 hours 20 minutes
- Yield: 12 servings 1x
- Category: Dessert
- Method: Baking
- Cuisine: American
- Diet: Gluten Free
Ingredients
Scale
- 32 ounces cream cheese (4 packages), room temperature
- 5 large eggs, room temperature
- 2 cups sour cream, room temperature
- 8 tablespoons butter, room temperature
- 1 ½ cups sugar
- 2 tablespoons cornstarch
- 2 vanilla beans (or substitute with 1 ½ teaspoons pure vanilla extract)
- 1 teaspoon fresh lemon juice
Instructions
- Prepare the Springform Pan
Start by preparing your 10-inch springform pan. To ensure the cheesecake doesn’t leak and stays moist, tightly wrap two layers of aluminum foil around the outside of the pan, covering both the bottom and sides. This prevents any water from getting into the pan during the water bath baking process, a key technique for achieving that perfect smooth texture. After wrapping the pan, generously coat the inside with butter. This ensures that the cheesecake will come out of the pan with ease once it’s fully baked and chilled. - Preheat the Oven
Preheat your oven to 300º F (150º C). This lower temperature ensures that the cheesecake cooks slowly and evenly, giving it that iconic dense yet creamy texture that New York cheesecakes are known for. - Mix the Cream Cheese and Butter
Using an electric mixer with the paddle attachment, beat the room temperature cream cheese and butter together until smooth. This step is crucial because it helps create the foundation of your cheesecake’s creamy filling. Beat the mixture on medium speed for about 1–2 minutes, or until it’s completely smooth with no lumps. The texture at this point should be soft and fluffy, setting the stage for the next ingredients. - Add the Eggs
Next, add the eggs one at a time, mixing after each addition. It’s important to add the eggs slowly to ensure that they are fully incorporated into the mixture without over-mixing. Over-beating the eggs can introduce air into the batter, which could cause cracks on the surface of your cheesecake. After each egg, continue mixing until fully blended, but be careful not to overwork the batter. - Incorporate Sour Cream
Add the sour cream to the mixture, mixing until smooth. Sour cream adds a touch of tang to the cheesecake that balances the richness of the cream cheese, giving it a luxurious flavor and a slight depth of taste. The creaminess of the sour cream contributes to the smooth texture, making it an essential ingredient in this cheesecake. - Add Sugar, Cornstarch, Vanilla, and Lemon Juice
Now it’s time to add the sugar, cornstarch, vanilla beans (or vanilla extract), and fresh lemon juice. Mix the batter until smooth for about 2 minutes. The cornstarch helps prevent cracking and provides a more stable texture by reducing the cheesecake’s tendency to shrink. The vanilla and lemon juice work together to enhance the flavor of the cheesecake, adding a touch of sweetness and brightness that perfectly complements the richness of the cream cheese. - Pour and Prepare for the Water Bath
Once your cheesecake batter is smooth and well-combined, pour it into the prepared springform pan. Smooth the top with a spatula to ensure an even layer. Now, take a roasting pan that is large enough to hold the springform pan without touching the sides. Place the filled springform pan into the roasting pan. Carefully pour boiling water into the roasting pan, ensuring the water comes up about halfway up the sides of the springform pan. Be cautious not to splash any water into the cheesecake batter itself. - Bake the Cheesecake
Place the cheesecake in the preheated oven and bake for 2 hours. Your cheesecake is done when it is lightly browned on top, and the center is just set. The baking time may vary depending on the type of oven you have. If you’re using a convection oven, the baking time could be shorter, so keep an eye on it towards the end. Don’t worry if the cheesecake wobbles a little in the center—it will set properly as it cools. - Cool and Refrigerate
Once the cheesecake has finished baking, remove it from the water bath and carefully remove the foil. Allow the cheesecake to cool completely at room temperature. This cooling period is essential for preventing cracks from forming as the cheesecake settles. Once cooled, cover the cheesecake and place it in the refrigerator. Let it chill for at least 4 hours, but ideally overnight. The cheesecake needs to be well-chilled for the perfect texture—firm, creamy, and smooth. - Serve and Enjoy
Once your cheesecake is chilled and fully set, it’s ready to be served. The cheesecake can be enjoyed plain, showcasing its rich, creamy flavor. However, you can elevate the experience by topping it with fresh berries, a dollop of whipped cream, or even a drizzle of caramel sauce. The combination of the rich, dense cheesecake with the fresh and sweet toppings creates a perfect balance of flavors and textures.
Notes
- Vanilla: If you don’t have vanilla beans, pure vanilla extract is a suitable substitute. For an even richer vanilla flavor, you could also use vanilla bean paste.
- Sour Cream: While sour cream is an essential ingredient for the tangy undertone of this cheesecake, you can also substitute it with Greek yogurt for a similar tanginess and added protein.
- Flavor Variations: Feel free to experiment with different flavors by adding a swirl of fruit puree (such as raspberry or blueberry) into the batter before baking. You could also top the cheesecake with caramelized nuts or a drizzle of chocolate ganache for a different twist.
- Gluten-Free: Since this cheesecake doesn’t require a crust, it’s naturally gluten-free. However, if you prefer a crust, use gluten-free graham crackers or almond flour for a low-carb option.