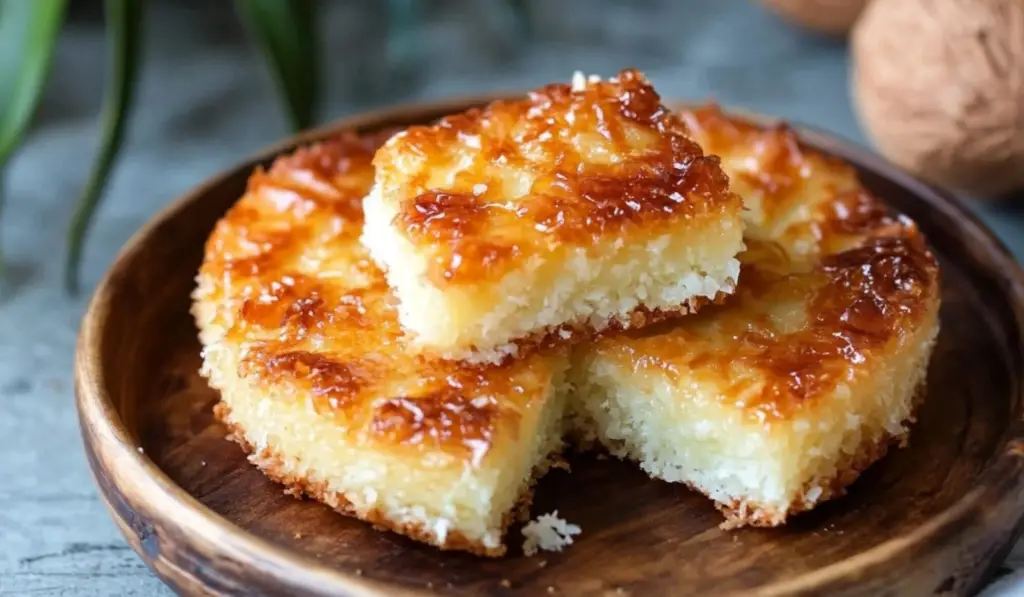
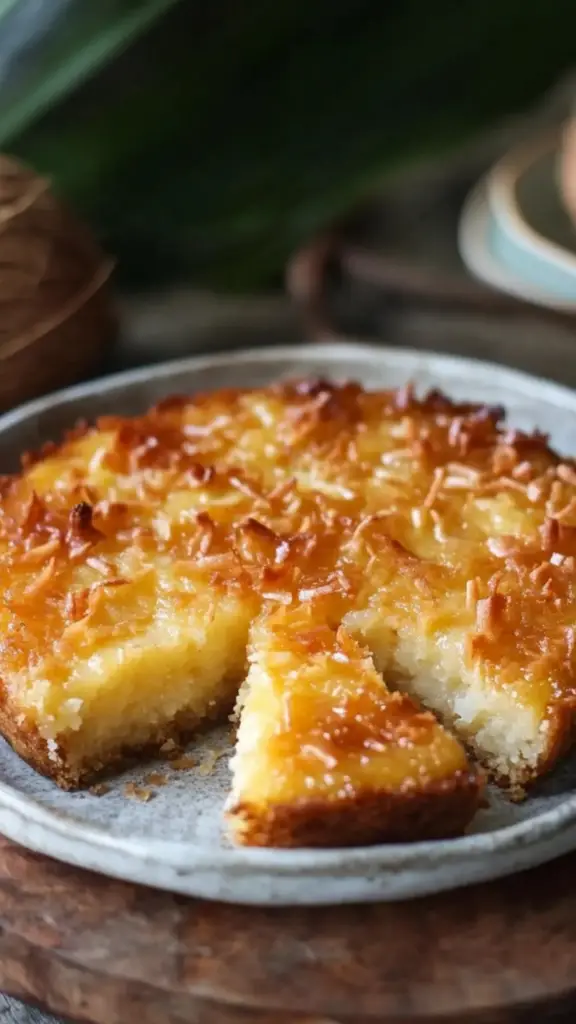
There’s something truly special about Bibingka, the Filipino coconut cake that has been a beloved treat for generations. Whether served during Christmas celebrations or enjoyed as a regular snack, Bibingka holds a special place in Filipino hearts. This dessert is a testament to the rich culinary traditions of the Philippines, where sweet rice flour, coconut cream, and pineapple combine in a delightfully soft, moist cake with a delicate coconut flavor.
PrintBibingka – Filipino Coconut Cake: A Sweet Taste of Tradition
There’s something truly special about Bibingka, the Filipino coconut cake that has been a beloved treat for generations. Whether served during Christmas celebrations or enjoyed as a regular snack, Bibingka holds a special place in Filipino hearts. This dessert is a testament to the rich culinary traditions of the Philippines, where sweet rice flour, coconut cream, and pineapple combine in a delightfully soft, moist cake with a delicate coconut flavor.
- Prep Time: 15 minutes
- Cook Time: 1 hour
- Total Time: 1 hour 15 minutes
- Yield: 20 servings 1x
- Category: Dessert
- Method: Baking
- Cuisine: Filipino
- Diet: Vegetarian
Ingredients
Cake Ingredients:
- 8 oz cream cheese
- 2 cups granulated sugar
- 3 eggs
- 3 1/2 cups sweet rice flour (about 1 lb)
- 1 tbsp baking powder
- 1/2 cup butter, melted
- 1 tbsp vanilla extract
- 15 oz can cream of coconut
- 1 cup milk
- 8 oz can crushed pineapple, drained
Topping:
- 1/4 cup brown sugar
- 2 tbsp granulated sugar
Instructions
Step 1: Preheat the Oven
Start by preheating your oven to 350°F (175°C). This ensures that your oven is at the right temperature when you’re ready to bake your cake.
Step 2: Cream the Cream Cheese and Sugar
In a large bowl, begin by creaming together the cream cheese and granulated sugar. This step is crucial as it helps create a smooth batter that will ensure the cake is light and airy. Beat the mixture until it’s fluffy and well combined, which usually takes about 2-3 minutes.
Step 3: Add the Eggs
Next, add the eggs, one at a time, beating well after each addition. This allows the eggs to fully incorporate into the mixture and helps create a stable structure for the cake.
Step 4: Mix the Wet Ingredients
Now, stir in the melted butter, vanilla extract, and cream of coconut. The cream of coconut is what gives Bibingka its signature coconut flavor, so make sure to mix it in thoroughly. Follow up by adding the milk to this wet mixture, creating a creamy base that will give your cake the perfect texture.
Step 5: Combine Dry Ingredients
In a separate bowl, whisk together the sweet rice flour and baking powder. Sweet rice flour is the key ingredient in Bibingka, giving it its unique texture. Unlike regular all-purpose flour, sweet rice flour is glutinous, which makes the cake moist and chewy. Once the dry ingredients are well combined, gradually fold them into the wet ingredients, stirring until the batter is smooth and lump-free.
Step 6: Add the Pineapple
Drain the crushed pineapple to remove any excess juice. Gently fold the pineapple into the batter. The pineapple adds a subtle, tangy sweetness that complements the rich coconut flavor. It’s the perfect touch to make this cake even more delicious!
Step 7: Pour the Batter Into the Pan
Grease a 13×9-inch baking pan with butter or cooking spray. Pour the batter into the prepared pan, spreading it out evenly with a spatula.
Step 8: Add the Sugar Topping
Before baking, sprinkle the top of the batter with a combination of brown sugar and granulated sugar. The brown sugar will caramelize during baking, creating a beautiful golden crust, while the granulated sugar adds an extra touch of sweetness.
Step 9: Bake the Cake
Place the pan in the preheated oven and bake for about 1 hour. Check the cake by inserting a toothpick into the center. If it comes out clean or with just a few moist crumbs, the cake is done. If the cake is not yet set, continue baking for another 10-15 minutes, checking every few minutes to avoid overbaking.
Step 10: Cool and Serve
Once the cake is done, allow it to cool for at least 15 minutes. Once it has cooled slightly, cut the cake into squares or diamond shapes. The cake will firm up as it cools, making it easier to slice. Serve warm or at room temperature, and enjoy!
Notes
- Gluten-Free Version: The beauty of Bibingka lies in its use of sweet rice flour, which is naturally gluten-free. If you want to make this cake even more gluten-free, ensure that your cream of coconut and other ingredients are certified gluten-free.
- Tropical Twist: For an even more tropical flavor, consider adding diced mango or shredded coconut to the batter. Both will enhance the coconut theme and add a delightful texture to the cake.
- Dairy-Free Version: You can easily make this cake dairy-free by swapping the cream cheese with a dairy-free alternative and using coconut oil instead of butter. Opt for a plant-based milk like almond milk to replace the regular milk.
- Add Nuts: For added crunch, sprinkle some chopped cashews or almonds into the batter before baking. This adds texture and a nutty flavor that pairs beautifully with the tropical elements.
What makes Bibingka unique is not just its flavor but its cultural significance. Traditionally cooked in clay pots lined with banana leaves, Bibingka has evolved in various ways, but its essence remains the same—simple, comforting, and utterly delicious. Whether you’re a Filipino reminiscing about home or someone curious to explore a new flavor, Bibingka is sure to captivate your taste buds.
Why You’ll Love This Recipe:
Bibingka is not your typical cake. It’s light, airy, and has just the right balance of sweetness with a touch of savory richness from the cream cheese. The pineapple adds a subtle tartness that cuts through the richness of the coconut, and the topping of brown and granulated sugar gives a caramelized finish that makes each bite irresistible. The best part? It’s incredibly easy to make, requiring only a handful of ingredients and minimal time in the kitchen.
Whether you’re new to Filipino cuisine or simply looking for something different to bake, Bibingka will undoubtedly impress. Let’s break down the ingredients and walk through the steps to make this delightful treat!
Ingredients for Bibingka – Filipino Coconut Cake
Cake Ingredients:
- 8 oz cream cheese
- 2 cups granulated sugar
- 3 eggs
- 3 1/2 cups sweet rice flour (about 1 lb)
- 1 tbsp baking powder
- 1/2 cup butter, melted
- 1 tbsp vanilla extract
- 15 oz can cream of coconut
- 1 cup milk
- 8 oz can crushed pineapple, drained
Topping:
- 1/4 cup brown sugar
- 2 tbsp granulated sugar
Step-by-Step Instructions for Making Bibingka
Step 1: Preheat the Oven
Start by preheating your oven to 350°F (175°C). This ensures that your oven is at the right temperature when you’re ready to bake your cake.
Step 2: Cream the Cream Cheese and Sugar
In a large bowl, begin by creaming together the cream cheese and granulated sugar. This step is crucial as it helps create a smooth batter that will ensure the cake is light and airy. Beat the mixture until it’s fluffy and well combined, which usually takes about 2-3 minutes.
Step 3: Add the Eggs
Next, add the eggs, one at a time, beating well after each addition. This allows the eggs to fully incorporate into the mixture and helps create a stable structure for the cake.
Step 4: Mix the Wet Ingredients
Now, stir in the melted butter, vanilla extract, and cream of coconut. The cream of coconut is what gives Bibingka its signature coconut flavor, so make sure to mix it in thoroughly. Follow up by adding the milk to this wet mixture, creating a creamy base that will give your cake the perfect texture.
Step 5: Combine Dry Ingredients
In a separate bowl, whisk together the sweet rice flour and baking powder. Sweet rice flour is the key ingredient in Bibingka, giving it its unique texture. Unlike regular all-purpose flour, sweet rice flour is glutinous, which makes the cake moist and chewy. Once the dry ingredients are well combined, gradually fold them into the wet ingredients, stirring until the batter is smooth and lump-free.
Step 6: Add the Pineapple
Drain the crushed pineapple to remove any excess juice. Gently fold the pineapple into the batter. The pineapple adds a subtle, tangy sweetness that complements the rich coconut flavor. It’s the perfect touch to make this cake even more delicious!
Step 7: Pour the Batter Into the Pan
Grease a 13×9-inch baking pan with butter or cooking spray. Pour the batter into the prepared pan, spreading it out evenly with a spatula.
Step 8: Add the Sugar Topping
Before baking, sprinkle the top of the batter with a combination of brown sugar and granulated sugar. The brown sugar will caramelize during baking, creating a beautiful golden crust, while the granulated sugar adds an extra touch of sweetness.
Step 9: Bake the Cake
Place the pan in the preheated oven and bake for about 1 hour. Check the cake by inserting a toothpick into the center. If it comes out clean or with just a few moist crumbs, the cake is done. If the cake is not yet set, continue baking for another 10-15 minutes, checking every few minutes to avoid overbaking.
Step 10: Cool and Serve
Once the cake is done, allow it to cool for at least 15 minutes. Once it has cooled slightly, cut the cake into squares or diamond shapes. The cake will firm up as it cools, making it easier to slice. Serve warm or at room temperature, and enjoy!
Serving Suggestions for Bibingka
Bibingka is best enjoyed fresh from the oven, but it also keeps well for a couple of days when stored in an airtight container. Serve it with a hot cup of coffee or a refreshing glass of iced tea for a perfect afternoon snack.
For added indulgence, you can serve Bibingka with a scoop of vanilla ice cream or a dollop of whipped cream on top. For a traditional Filipino twist, pair it with a cup of sago’t gulaman, a sweet Filipino drink made with tapioca pearls and coconut syrup.
Ingredient Substitutions and Variations
- Gluten-Free Version: The beauty of Bibingka lies in its use of sweet rice flour, which is naturally gluten-free. If you want to make this cake even more gluten-free, ensure that your cream of coconut and other ingredients are certified gluten-free.
- Tropical Twist: For an even more tropical flavor, consider adding diced mango or shredded coconut to the batter. Both will enhance the coconut theme and add a delightful texture to the cake.
- Dairy-Free Version: You can easily make this cake dairy-free by swapping the cream cheese with a dairy-free alternative and using coconut oil instead of butter. Opt for a plant-based milk like almond milk to replace the regular milk.
- Add Nuts: For added crunch, sprinkle some chopped cashews or almonds into the batter before baking. This adds texture and a nutty flavor that pairs beautifully with the tropical elements.
Why Bibingka Is So Special
Bibingka is not just a cake; it’s a piece of Filipino heritage. Its ingredients reflect the tropical flavors of the Philippines, where coconut is a staple in many dishes. The soft, cake-like texture combined with the sweetness of the coconut and pineapple creates a dessert that’s both light and satisfying. The brown sugar topping adds a touch of caramelized richness, making each bite a delightful experience.
Whether you’re enjoying it on a special occasion or simply treating yourself to something delicious, Bibingka offers a taste of Filipino warmth and hospitality. The simplicity of the ingredients allows the natural flavors to shine, making this dessert a true comfort food for those who love both tradition and flavor.
Final Thoughts
Bibingka is a must-try for anyone who loves coconut, tropical flavors, or Filipino cuisine in general. Its ease of preparation, coupled with its rich flavor profile, makes it a fantastic addition to any dessert table. From the first bite to the last, it’s a cake that brings comfort and joy, reminding us of the beauty in simplicity and tradition.
Now that you have the recipe and all the tips, it’s time to try making Bibingka in your own kitchen. Whether for a holiday gathering or a cozy weekend treat, this Filipino coconut cake is sure to bring smiles to your table. Enjoy baking, and more importantly, enjoy eating!


