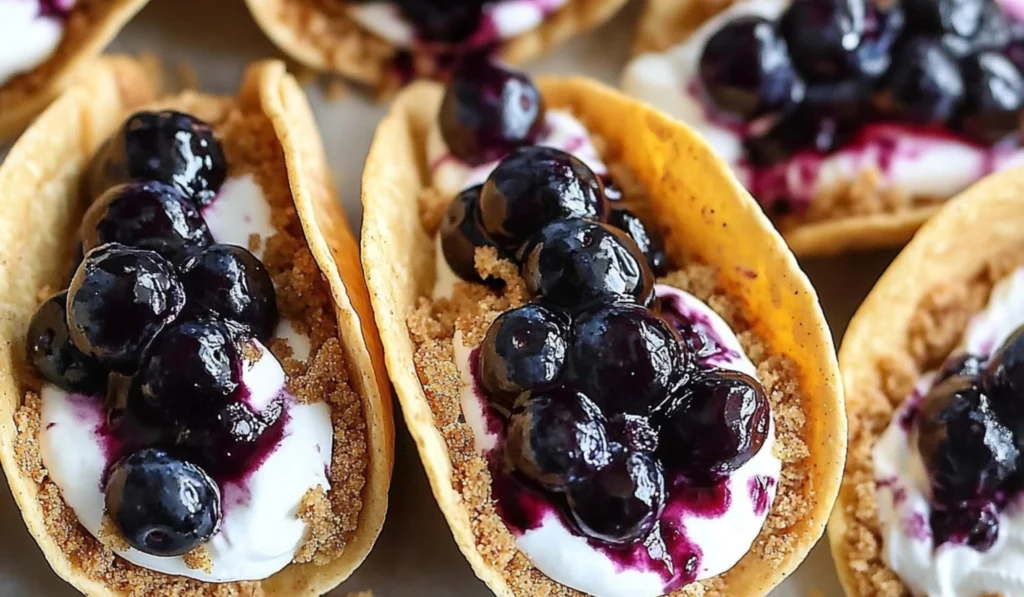
Sometimes, the best desserts are the ones that surprise you with their simplicity, yet deliver big on flavor. That’s exactly what these Blueberry Cheesecake Tacos do. Picture this: a crunchy, golden tortilla shell filled with a creamy cheesecake filling and topped with a tangy, homemade blueberry sauce. These tacos are a twist on a classic cheesecake, offering a fun and bite-sized way to enjoy your favorite flavors. Whether you’re hosting a party, bringing a dish to a potluck, or simply indulging in a sweet treat, these Blueberry Cheesecake Tacos will quickly become your go-to dessert.

Blueberry Cheesecake Tacos: The Ultimate Easy Dessert for Beginners

Desserts don’t have to be complicated to be delicious—sometimes, the best ones are the easiest to make. These Blueberry Cheesecake Tacos are the perfect example. With a crunchy, golden tortilla shell, a smooth and creamy cheesecake filling, and a burst of sweet blueberry sauce, this dessert is a crowd-pleaser that looks as impressive as it tastes. What makes this recipe even better? It’s incredibly easy to make, even for beginners, and comes together in just 30 minutes. Perfect for anyone who loves tasty, no-fuss desserts, these Blueberry Cheesecake Tacos are sure to be a hit at your next gathering or family meal. Let’s dive into the ingredients and instructions to get you started on making this tasty treat!
- Prep Time: 20 minutes
- Cook Time: 10 minutes
- Total Time: 30 minutes
- Yield: 24–30 tacos (depending on the size of the tortilla rounds) 1x
- Category: Dessert, Tacos, Easy Dessert, Party Treat, No-Bake Desserts
- Method: Baking, Stovetop, No-Bake
- Cuisine: American, Mexican
- Diet: Vegetarian
Ingredients
For the Taco Shells:
- 6 to 8-inch flour tortillas (about 6–8 tortillas, which will make 24–30 taco shells)
- 1 cup graham cracker crumbs
- 1/2 teaspoon cinnamon
- 1/4 cup butter, melted
For the Cheesecake Filling:
- 1 cup heavy cream
- 1 cup cream cheese, softened
- 1 teaspoon lemon zest
- 1 teaspoon vanilla extract
- 1/4 cup powdered sugar
For the Homemade Blueberry Sauce (makes about 1 cup):
- 1/2 cup granulated sugar
- 2 cups fresh or frozen blueberries (about 8 oz)
- 5 tablespoons warm water
- 1 tablespoon lemon juice (optional, but recommended for the best flavor)
- 3 tablespoons cornstarch
For the Canned Blueberry Pie Filling Option:
- 1 can blueberry pie filling (if you prefer a quicker option instead of making your own blueberry sauce)
Instructions
1. Preheat the Oven and Prepare the Taco Shells
Start by preheating your oven to 400°F (200°C). While the oven is heating, grab a bowl and combine the graham cracker crumbs and cinnamon. Set this mixture aside for now.
Next, take your tortillas and cut 4-5 rounds out of each tortilla using a cookie cutter. This will make about 24-30 taco shells, depending on the size of your cutter. Once you’ve got your rounds, dip each one into the melted butter and then coat them with the graham cracker mixture, ensuring each tortilla is evenly covered.
If you’re wondering why we use graham cracker crumbs in the taco shell, it’s because it adds a lovely, sweet crunch that complements the creamy cheesecake filling. The cinnamon adds an extra layer of warmth and depth of flavor, making these tacos even more irresistible. The butter helps everything stick together, ensuring the graham cracker mixture stays in place while the shells bake.
2. Bake the Taco Shells
Flip a muffin tin upside down and arrange the coated tortilla rounds between the muffin cups to form taco shells. This will allow them to hold their shape while baking. Place the muffin tin in the oven and bake for about 10 minutes or until the shells are golden brown and crispy. Let the taco shells cool in the tin as you prepare the other components.
By flipping the muffin tin upside down, you create the perfect shape for your taco shells without needing a special mold. If you don’t have a muffin tin, you can also use an oven-safe dish or a rimmed baking sheet to create the taco shells. Just make sure the tortillas are securely shaped while baking to avoid them becoming misshapen.
3. Make the Homemade Blueberry Sauce
While the shells are cooling, let’s work on the blueberry sauce. In a small bowl, whisk together the warm water, lemon juice, and cornstarch. This will help the sauce thicken later.
In a small saucepan, combine the blueberries and granulated sugar. Heat the mixture over low to medium heat for 4-5 minutes, stirring occasionally. As the blueberries begin to break apart, mix in the cornstarch mixture. Let the sauce simmer for another 3 minutes until it thickens. Set the sauce aside and allow it to cool to room temperature before using it on the tacos.
The key to making the blueberry sauce is patience. Allowing the blueberries to cook slowly ensures that they break down beautifully, releasing their natural sweetness and flavor. The cornstarch is the magic ingredient here—it thickens the sauce just enough to make it perfect for topping the cheesecake-filled tacos.
If you’re in a rush or don’t have fresh blueberries on hand, you can substitute store-bought blueberry pie filling. It’s a quick and convenient option that still adds the perfect burst of blueberry flavor.
4. Prepare the Cheesecake Filling
For the cheesecake filling, beat the softened cream cheese with the heavy cream, powdered sugar, lemon zest, and vanilla extract. Use medium speed to beat the mixture for about 2 minutes, or until it thickens and becomes creamy. Transfer the filling to a piping bag and refrigerate it for 30 minutes to allow it to firm up.
The beauty of this cheesecake filling is how light and creamy it is. The heavy cream gives it that luscious, velvety texture, while the cream cheese provides the rich, tangy base that makes cheesecake so irresistible. The lemon zest adds a fresh, citrusy kick, balancing out the sweetness from the powdered sugar and vanilla.
Chilling the cheesecake filling in the fridge helps it firm up a bit, making it easier to pipe into the taco shells. If you don’t have a piping bag, you can also use a plastic sandwich bag with the tip of one corner cut off—this works just as well and still looks beautiful when piped.
5. Assemble the Blueberry Cheesecake Tacos
Once the taco shells have cooled and the cheesecake filling has chilled, it’s time to assemble your tacos. Pipe the cheesecake filling into each taco shell. Top with a half teaspoon of blueberry sauce (or canned blueberry pie filling if you’re using that option). For an added touch of texture and flavor, you can sprinkle extra graham cracker crumbs on top.
The fun part about making these tacos is that you get to assemble them however you like! Don’t worry about making them perfect—just pipe the filling and add the topping in a way that feels right. The graham cracker crumbs add an extra crunch that pairs so beautifully with the creamy filling and sweet blueberry topping.
6. Serve and Enjoy!
Your Blueberry Cheesecake Tacos are now ready to enjoy! Serve them as a party dessert, an afternoon snack, or as a sweet finish to a family meal. They’re easy to make, but they’ll impress everyone who tries them!
As you plate your Blueberry Cheesecake Tacos, you can add a few more sprinkles of graham cracker crumbs for a bit of extra texture. If you’d like, add a few fresh blueberries on top or even a dusting of powdered sugar for that “wow” factor.
Notes
- Taco Shells: If your taco shells start to lose their shape or become too soft after cooling, you can crisp them up again in the oven for a few minutes. Just be sure to watch them carefully so they don’t burn.
- Blueberry Sauce: The blueberry sauce can sometimes take a bit longer to thicken. If it’s not thick enough after simmering, add a little more cornstarch mixed with water and cook for a couple more minutes until it reaches your desired consistency.
- Cheesecake Filling: If the cheesecake filling isn’t thickening as much as you’d like, chill it a bit longer before piping it into the taco shells. The longer it chills, the firmer it will become.
For beginners, this recipe is a dream come true. It requires minimal effort, yet the result looks like something you’d see in a fancy bakery. The best part? You can whip up these tacos in just about 30 minutes. The crunchy taco shell, smooth cheesecake filling, and sweet blueberry topping come together so effortlessly, even a novice cook can feel confident in the kitchen. Not only are these tacos easy to make, but they’re also a healthier alternative to traditional pies and cakes, with a lighter, fresh filling. Let’s dive into the details of how to make these delightful Blueberry Cheesecake Tacos!
This recipe is perfect for beginners because of its straightforward steps and flexibility in ingredients. You don’t need to be a professional chef to pull this off—these tacos are forgiving, fun to make, and customizable. If you’re new to cooking and need something that doesn’t require a lot of technical skills but still looks beautiful on the plate, then these Blueberry Cheesecake Tacos are a great place to start. Whether you’re looking to impress guests, make something fun for the family, or treat yourself to a special dessert, this recipe is sure to become a favorite.
Ingredients and Preparation
Before we start, gather your ingredients. Don’t worry; there are no complicated or hard-to-find items on this list. Everything you need is simple and easy to find at your local grocery store.
For the Taco Shells:
- 6 to 8-inch flour tortillas (about 6-8 tortillas, which will make 24-30 taco shells)
- 1 cup graham cracker crumbs
- 1/2 teaspoon cinnamon
- 1/4 cup butter, melted
For the Cheesecake Filling:
- 1 cup heavy cream
- 1 cup cream cheese, softened
- 1 teaspoon lemon zest
- 1 teaspoon vanilla extract
- 1/4 cup powdered sugar
For the Homemade Blueberry Sauce (makes about 1 cup):
- 1/2 cup granulated sugar
- 2 cups fresh or frozen blueberries (about 8 oz)
- 5 tablespoons warm water
- 1 tablespoon lemon juice (optional, but recommended for the best flavor)
- 3 tablespoons cornstarch
For the Canned Blueberry Pie Filling Option:
- 1 can blueberry pie filling (if you prefer a quicker option instead of making your own blueberry sauce)
Alternative Ingredient Suggestions:
- You can swap the flour tortillas for whole wheat tortillas for a slightly healthier version.
- If you’re not a fan of graham cracker crumbs, you can use crushed animal crackers or vanilla wafer cookies for the taco shell coating.
- Use any fruit topping you prefer instead of blueberries—raspberries or strawberries work beautifully with the cheesecake filling.
- If you don’t have cornstarch, arrowroot powder can be used as a substitute to thicken the blueberry sauce.
Step-by-Step Instructions
Now, let’s break down the recipe into manageable steps. If you’re a beginner, no need to stress—each step is simple, and I’ve included tips along the way to make the process even easier.
1. Preheat the Oven and Prepare the Taco Shells
Start by preheating your oven to 400°F (200°C). While the oven is heating, grab a bowl and combine the graham cracker crumbs and cinnamon. Set this mixture aside for now.
Next, take your tortillas and cut 4-5 rounds out of each tortilla using a cookie cutter. This will make about 24-30 taco shells, depending on the size of your cutter. Once you’ve got your rounds, dip each one into the melted butter and then coat them with the graham cracker mixture, ensuring each tortilla is evenly covered.
If you’re wondering why we use graham cracker crumbs in the taco shell, it’s because it adds a lovely, sweet crunch that complements the creamy cheesecake filling. The cinnamon adds an extra layer of warmth and depth of flavor, making these tacos even more irresistible. The butter helps everything stick together, ensuring the graham cracker mixture stays in place while the shells bake.
2. Bake the Taco Shells
Flip a muffin tin upside down and arrange the coated tortilla rounds between the muffin cups to form taco shells. This will allow them to hold their shape while baking. Place the muffin tin in the oven and bake for about 10 minutes or until the shells are golden brown and crispy. Let the taco shells cool in the tin as you prepare the other components.
By flipping the muffin tin upside down, you create the perfect shape for your taco shells without needing a special mold. If you don’t have a muffin tin, you can also use an oven-safe dish or a rimmed baking sheet to create the taco shells. Just make sure the tortillas are securely shaped while baking to avoid them becoming misshapen.
3. Make the Homemade Blueberry Sauce
While the shells are cooling, let’s work on the blueberry sauce. In a small bowl, whisk together the warm water, lemon juice, and cornstarch. This will help the sauce thicken later.
In a small saucepan, combine the blueberries and granulated sugar. Heat the mixture over low to medium heat for 4-5 minutes, stirring occasionally. As the blueberries begin to break apart, mix in the cornstarch mixture. Let the sauce simmer for another 3 minutes until it thickens. Set the sauce aside and allow it to cool to room temperature before using it on the tacos.
The key to making the blueberry sauce is patience. Allowing the blueberries to cook slowly ensures that they break down beautifully, releasing their natural sweetness and flavor. The cornstarch is the magic ingredient here—it thickens the sauce just enough to make it perfect for topping the cheesecake-filled tacos.
If you’re in a rush or don’t have fresh blueberries on hand, you can substitute store-bought blueberry pie filling. It’s a quick and convenient option that still adds the perfect burst of blueberry flavor.
4. Prepare the Cheesecake Filling
For the cheesecake filling, beat the softened cream cheese with the heavy cream, powdered sugar, lemon zest, and vanilla extract. Use medium speed to beat the mixture for about 2 minutes, or until it thickens and becomes creamy. Transfer the filling to a piping bag and refrigerate it for 30 minutes to allow it to firm up.
The beauty of this cheesecake filling is how light and creamy it is. The heavy cream gives it that luscious, velvety texture, while the cream cheese provides the rich, tangy base that makes cheesecake so irresistible. The lemon zest adds a fresh, citrusy kick, balancing out the sweetness from the powdered sugar and vanilla.
Chilling the cheesecake filling in the fridge helps it firm up a bit, making it easier to pipe into the taco shells. If you don’t have a piping bag, you can also use a plastic sandwich bag with the tip of one corner cut off—this works just as well and still looks beautiful when piped.
5. Assemble the Blueberry Cheesecake Tacos
Once the taco shells have cooled and the cheesecake filling has chilled, it’s time to assemble your tacos. Pipe the cheesecake filling into each taco shell. Top with a half teaspoon of blueberry sauce (or canned blueberry pie filling if you’re using that option). For an added touch of texture and flavor, you can sprinkle extra graham cracker crumbs on top.
The fun part about making these tacos is that you get to assemble them however you like! Don’t worry about making them perfect—just pipe the filling and add the topping in a way that feels right. The graham cracker crumbs add an extra crunch that pairs so beautifully with the creamy filling and sweet blueberry topping.
6. Serve and Enjoy!
Your Blueberry Cheesecake Tacos are now ready to enjoy! Serve them as a party dessert, an afternoon snack, or as a sweet finish to a family meal. They’re easy to make, but they’ll impress everyone who tries them!
As you plate your Blueberry Cheesecake Tacos, you can add a few more sprinkles of graham cracker crumbs for a bit of extra texture. If you’d like, add a few fresh blueberries on top or even a dusting of powdered sugar for that “wow” factor.
Beginner Tips and Notes
As you make these Blueberry Cheesecake Tacos, here are a few tips to keep in mind to help you achieve the best results:
- Taco Shells: If your taco shells start to lose their shape or become too soft after cooling, you can crisp them up again in the oven for a few minutes. Just be sure to watch them carefully so they don’t burn.
- Blueberry Sauce: The blueberry sauce can sometimes take a bit longer to thicken. If it’s not thick enough after simmering, add a little more cornstarch mixed with water and cook for a couple more minutes until it reaches your desired consistency.
- Cheesecake Filling: If the cheesecake filling isn’t thickening as much as you’d like, chill it a bit longer before piping it into the taco shells. The longer it chills, the firmer it will become.
Serving Suggestions
These Blueberry Cheesecake Tacos are delicious on their own, but you can elevate the dish by pairing them with a few complementary sides or sauces. Consider serving them with:
- A scoop of vanilla ice cream or a dollop of whipped cream to add richness to the dessert.
- Fresh fruit, like raspberries or strawberries, to balance out the sweetness of the cheesecake filling and blueberry topping.
- A drizzle of chocolate sauce or caramel sauce for a decadent touch.
Storage Tips: If you have leftovers (which is unlikely!), you can store the taco shells and cheesecake filling separately in airtight containers in the fridge for up to 2 days. Assemble the tacos just before serving to ensure they stay crunchy.

Conclusion
These Blueberry Cheesecake Tacos are the perfect beginner-friendly dessert to add to your recipe collection. Whether you’re hosting a party or simply looking for a sweet treat to indulge in, this recipe will quickly become a favorite. It’s easy to make, filled with delicious flavors, and looks impressive to boot.
Give this recipe a try, and don’t forget to share your experience in the comments below! I’d love to hear how it turned out for you—whether you followed the recipe exactly or put your own spin on it. Get creative, enjoy the process, and most importantly, have fun making these delightful Blueberry Cheesecake Tacos!


