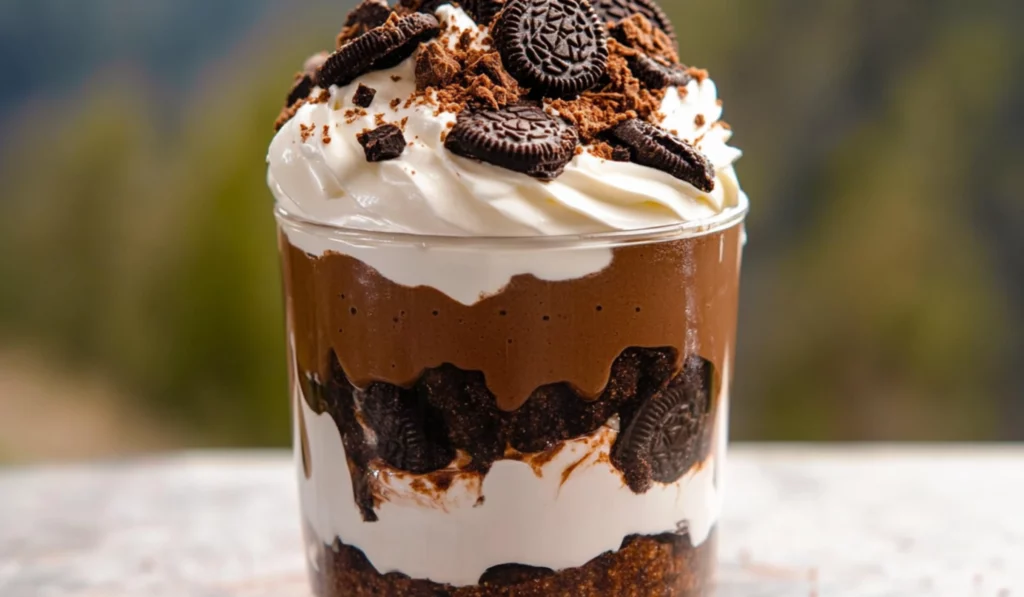
If you’re someone who loves indulgent desserts but doesn’t have the time or energy for complicated baking, this creamy chocolate parfait is the answer you’ve been looking for. Combining layers of rich chocolate mousse, velvety whipped cream, and crunchy Oreo cookie crumbs, this dessert is a no-bake wonder that’s sure to satisfy any sweet tooth. The best part? It’s incredibly easy to make and perfect for beginner cooks who are just getting started in the kitchen. Whether you’re preparing it for a family dinner, a gathering with friends, or simply to treat yourself, this parfait will impress with its smooth texture and rich flavor. Plus, it comes together in just 30 minutes with minimal effort, making it an ideal choice for anyone short on time but still craving something decadent. Not all desserts need to be complex to be impressive. This creamy chocolate parfait is a great introduction to no-bake desserts. The layers of chocolate mousse, whipped cream, and Oreo crumbs are easy to assemble, and there’s no oven required! For beginner cooks, this recipe provides a wonderful opportunity to practice whipping cream, melting chocolate, and layering ingredients — all simple skills that will serve you well in future recipes. The hands-on steps are forgiving, meaning there’s no pressure to get everything perfect, and the end result is always delicious. Plus, with its rich, satisfying flavor, it’s bound to be a hit with both adults and kids alike.

Creamy Chocolate Parfait (No-Bake): A Deliciously Decadent Dessert for Beginners
Craving a rich and easy dessert? This no-bake chocolate parfait, made with layers of chocolate mousse, whipped cream, and Oreo crumbs, is perfect for beginners. You don’t need an oven—just whip, melt, and layer! With its smooth textures and chocolatey goodness, this treat is quick, indulgent, and sure to impress at any occasion.
- Prep Time: 30 minutes
- Cook Time: 0 minutes
- Total Time: 3 hours 30 minutes
- Yield: 10 servings 1x
- Category: Dessert
- Method: No-Bake
- Cuisine: American
- Diet: Vegetarian
Ingredients
For the Oreo Crust:
- 25 Oreos, crushed (about 1 ½ cups)
For the Chocolate Mousse: - 7 oz dark chocolate (preferably 60-70% cocoa)
- ½ cup heavy cream
- 1 ½ cups heavy cream (cold)
- ¼ cup cocoa powder
- 2 tablespoons powdered sugar
- 1 teaspoon vanilla extract
For the Whipped Cream:
- 1 ⅓ cups heavy cream (cold)
- 1 teaspoon vanilla extract
- ¼ cup powdered sugar
Instructions
1. Crush the Oreo Cookies:
Start by crushing the Oreos into fine crumbs. You can use a food processor for a smooth texture, or place the cookies in a plastic bag and crush them with a rolling pin for a more rustic look. Be sure to crush the cookies finely enough to create an even base for your parfait. If you prefer a chunkier texture, feel free to leave some larger pieces, but a finer crumb works best for a consistent crust. This step is quick and easy, and it’s an excellent task for beginners to practice controlling the consistency of ingredients.
2. Make the Chocolate Mousse:
To make the chocolate mousse, begin by melting the dark chocolate with the ½ cup of heavy cream. You can do this using two methods: the microwave or a double boiler (bain-marie). If you use the microwave, heat the mixture in 20-30 second intervals, stirring after each, until smooth. If you prefer the stovetop, melt the chocolate and cream together in a heatproof bowl over simmering water, stirring occasionally. Melting chocolate may seem intimidating, but it’s actually quite simple — just make sure not to overheat it, as this can cause the chocolate to seize. Once the chocolate is melted, set it aside to cool slightly.
In a large mixing bowl, whip the remaining 1 ½ cups of cold heavy cream, cocoa powder, powdered sugar, and vanilla extract using an electric hand mixer. Whip until stiff peaks form. This means the cream should hold its shape when you pull the mixer out of the bowl. Be careful not to over-whip the cream, as it can turn into butter if whipped too long.
Next, gently fold the melted chocolate mixture into the whipped cream until fully combined. Use a spatula to fold the ingredients together carefully. The key here is to maintain the light and airy texture of the whipped cream while incorporating the chocolate, so fold gently and be patient. This step creates the rich chocolate mousse layer that’s the heart of the parfait.
3. Make the Whipped Cream:
To prepare the whipped cream topping, beat together the remaining 1 ⅓ cups of cold heavy cream, vanilla extract, and powdered sugar in a separate bowl. Again, use an electric hand mixer and whip until stiff peaks form. You can also make whipped cream by hand if you’re looking for a little extra arm workout, but an electric mixer makes the process quicker and easier. Once the whipped cream is ready, set it aside in the refrigerator until you’re ready to assemble the parfaits. The whipped cream should be light, fluffy, and able to hold its shape when spooned onto the parfaits.
4. Assemble the Parfaits:
In each serving glass, add about one tablespoon of the crushed Oreo crumbs to form the base layer. Then, pipe or spoon a layer of the chocolate mousse over the crumbs. Top the mousse with a layer of freshly whipped cream. Repeat the layers: another layer of Oreo crumbs, followed by more chocolate mousse and whipped cream. Finish by topping each parfait with a final sprinkle of crushed Oreo crumbs for decoration. You can be creative with the presentation — for example, you could pipe the mousse and whipped cream to create a more elegant look, or simply spoon it in for a more rustic approach. If you don’t have piping bags, you can simply use a spoon to layer the mousse and whipped cream. If you’re going for a more decorative look, piping the layers can create a more polished, professional presentation. Make sure to leave enough room in each glass for the layers to stand out visually.
5. Chill and Serve:
Once all the parfaits are assembled, cover each glass with plastic wrap and refrigerate them for at least 3 hours, or overnight if you have the time. This chilling process allows the flavors to meld together and the mousse to set to the perfect consistency. Once chilled, the parfaits are ready to serve! The dessert will firm up in the fridge, but the texture will remain creamy and smooth. The layers will hold their shape, giving you a beautiful and indulgent treat.
Notes
- Whipping the Cream: When whipping heavy cream, it’s important that the cream is cold for the best results. Also, ensure your mixing bowl and beaters are clean and dry. This will help the cream whip up faster and achieve stiff peaks.
- Melting Chocolate: If you overheat the chocolate, it can seize up and become grainy. If this happens, you can gently reheat it and add a little extra cream to smooth it out.
- Layering Tips: If you don’t have piping bags, you can simply use a spoon to layer the mousse and whipped cream. If you’re going for a more decorative look, piping the layers can create a more polished, professional presentation.
In the world of desserts, there’s something magical about the combination of chocolate and cream. These two ingredients, when layered together, create an indulgent treat that’s nearly impossible to resist. The addition of crunchy Oreo cookie crumbs adds a delightful texture contrast to the smooth mousse and whipped cream layers. This parfait not only satisfies your sweet cravings but also gives you the satisfaction of knowing that you’ve made something incredibly delicious with minimal effort. Whether you’re hosting a dinner party, preparing a special treat for family, or looking for a simple yet indulgent dessert for yourself, this no-bake chocolate parfait is the perfect choice. One of the reasons this recipe is so beginner-friendly is that it doesn’t require any complicated techniques or tools. You don’t need to worry about perfecting a cake batter, measuring out precise oven temperatures, or timing your baking perfectly. Instead, this dessert is all about assembling layers, whipping cream, and melting chocolate — basic steps that any beginner cook can easily master. The result is a decadent dessert that looks as impressive as it tastes. This recipe also gives you the flexibility to customize the flavors and textures to suit your preferences, making it a great base recipe that you can experiment with over time.
Ingredients and Preparation
Before you get started, gather the following ingredients. These simple items create a dessert that looks and tastes like it came from a high-end restaurant!
For the Oreo Crust:
- 25 Oreos, crushed (about 1 ½ cups)
For the Chocolate Mousse: - 7 oz dark chocolate (preferably 60-70% cocoa)
- ½ cup heavy cream
- 1 ½ cups heavy cream (cold)
- ¼ cup cocoa powder
- 2 tablespoons powdered sugar
- 1 teaspoon vanilla extract
For the Whipped Cream:
- 1 ⅓ cups heavy cream (cold)
- 1 teaspoon vanilla extract
- ¼ cup powdered sugar
These ingredients come together in a few simple steps and offer a combination of creamy, chocolatey, and crunchy layers that make for an indulgent treat. If you’re ready to dive into making this dessert, let’s break down how to prepare these ingredients. While this recipe is fairly straightforward, it’s important to make sure you have the right tools and ingredients to ensure success. You’ll need a few essential kitchen items, including a mixing bowl, an electric hand mixer (or stand mixer), a food processor or rolling pin (for crushing Oreos), and some serving glasses or bowls to assemble the parfaits. You’ll also want to have a spatula for folding ingredients together and a whisk for whipping the cream. Once you have everything prepped and ready, you’ll be able to move through the steps efficiently.
Step-by-Step Instructions
This recipe is as simple as layering, whipping, and assembling. Here’s a beginner-friendly guide to making your creamy chocolate parfait:
1. Crush the Oreo Cookies:
Start by crushing the Oreos into fine crumbs. You can use a food processor for a smooth texture, or place the cookies in a plastic bag and crush them with a rolling pin for a more rustic look. Be sure to crush the cookies finely enough to create an even base for your parfait. If you prefer a chunkier texture, feel free to leave some larger pieces, but a finer crumb works best for a consistent crust. This step is quick and easy, and it’s an excellent task for beginners to practice controlling the consistency of ingredients.
2. Make the Chocolate Mousse:
To make the chocolate mousse, begin by melting the dark chocolate with the ½ cup of heavy cream. You can do this using two methods: the microwave or a double boiler (bain-marie). If you use the microwave, heat the mixture in 20-30 second intervals, stirring after each, until smooth. If you prefer the stovetop, melt the chocolate and cream together in a heatproof bowl over simmering water, stirring occasionally. Melting chocolate may seem intimidating, but it’s actually quite simple — just make sure not to overheat it, as this can cause the chocolate to seize. Once the chocolate is melted, set it aside to cool slightly.
In a large mixing bowl, whip the remaining 1 ½ cups of cold heavy cream, cocoa powder, powdered sugar, and vanilla extract using an electric hand mixer. Whip until stiff peaks form. This means the cream should hold its shape when you pull the mixer out of the bowl. Be careful not to over-whip the cream, as it can turn into butter if whipped too long.
Next, gently fold the melted chocolate mixture into the whipped cream until fully combined. Use a spatula to fold the ingredients together carefully. The key here is to maintain the light and airy texture of the whipped cream while incorporating the chocolate, so fold gently and be patient. This step creates the rich chocolate mousse layer that’s the heart of the parfait.
3. Make the Whipped Cream:
To prepare the whipped cream topping, beat together the remaining 1 ⅓ cups of cold heavy cream, vanilla extract, and powdered sugar in a separate bowl. Again, use an electric hand mixer and whip until stiff peaks form. You can also make whipped cream by hand if you’re looking for a little extra arm workout, but an electric mixer makes the process quicker and easier. Once the whipped cream is ready, set it aside in the refrigerator until you’re ready to assemble the parfaits. The whipped cream should be light, fluffy, and able to hold its shape when spooned onto the parfaits.
4. Assemble the Parfaits:
In each serving glass, add about one tablespoon of the crushed Oreo crumbs to form the base layer. Then, pipe or spoon a layer of the chocolate mousse over the crumbs. Top the mousse with a layer of freshly whipped cream. Repeat the layers: another layer of Oreo crumbs, followed by more chocolate mousse and whipped cream. Finish by topping each parfait with a final sprinkle of crushed Oreo crumbs for decoration. You can be creative with the presentation — for example, you could pipe the mousse and whipped cream to create a more elegant look, or simply spoon it in for a more rustic approach. If you don’t have piping bags, you can simply use a spoon to layer the mousse and whipped cream. If you’re going for a more decorative look, piping the layers can create a more polished, professional presentation. Make sure to leave enough room in each glass for the layers to stand out visually.
5. Chill and Serve:
Once all the parfaits are assembled, cover each glass with plastic wrap and refrigerate them for at least 3 hours, or overnight if you have the time. This chilling process allows the flavors to meld together and the mousse to set to the perfect consistency. Once chilled, the parfaits are ready to serve! The dessert will firm up in the fridge, but the texture will remain creamy and smooth. The layers will hold their shape, giving you a beautiful and indulgent treat.
Beginner Tips and Notes
- Whipping the Cream: When whipping heavy cream, it’s important that the cream is cold for the best results. Also, ensure your mixing bowl and beaters are clean and dry. This will help the cream whip up faster and achieve stiff peaks.
- Melting Chocolate: If you overheat the chocolate, it can seize up and become grainy. If this happens, you can gently reheat it and add a little extra cream to smooth it out.
- Layering Tips: If you don’t have piping bags, you can simply use a spoon to layer the mousse and whipped cream. If you’re going for a more decorative look, piping the layers can create a more polished, professional presentation.
Serving Suggestions
This creamy chocolate parfait is a showstopper on its own, but you can elevate it even further by pairing it with a few simple additions. Consider serving it with a side of fresh berries like raspberries or strawberries, which provide a nice contrast to the richness of the chocolate. For extra crunch, you can sprinkle some chopped nuts or even caramelized pecans over the top of the parfait before serving. If you like a little more chocolate flavor, drizzle some chocolate syrup or ganache over the whipped cream. The addition of fresh fruit or a drizzle of syrup can add variety and depth to the flavors. For a more indulgent touch, serve the parfaits with a scoop of vanilla ice cream on the side or a hot cup of coffee to balance out the sweetness. This dessert is perfect for any occasion, from casual gatherings to more formal celebrations.

Conclusion
This creamy chocolate parfait is a beginner-friendly dessert that will make you feel like a pro in the kitchen. With its rich, chocolatey mousse, whipped cream layers, and crunchy Oreo crust, it’s a treat that’s sure to please both kids and adults. The best part is that it’s a no-bake recipe, so you don’t need to worry about any tricky baking techniques or complicated steps. By following this simple recipe, you’ll create a dessert that looks and tastes like a masterpiece, perfect for impressing guests or treating yourself to something special. Don’t forget to experiment with different flavors and toppings to make this recipe your own. Enjoy!
