When it comes to indulgent desserts, few things compare to a chocolate cheesecake. The rich, velvety texture of the filling, paired with a crunchy, buttery crust, is the ultimate treat for any sweet tooth. But what if I told you there’s a way to enjoy all of that decadent goodness without ever turning on the oven? Yes, you read that right—a No-Bake Chocolate Cheesecake that’s easy, quick, and oh-so-delicious.

Easy No-Bake Chocolate Cheesecake: A Beginner-Friendly Dessert

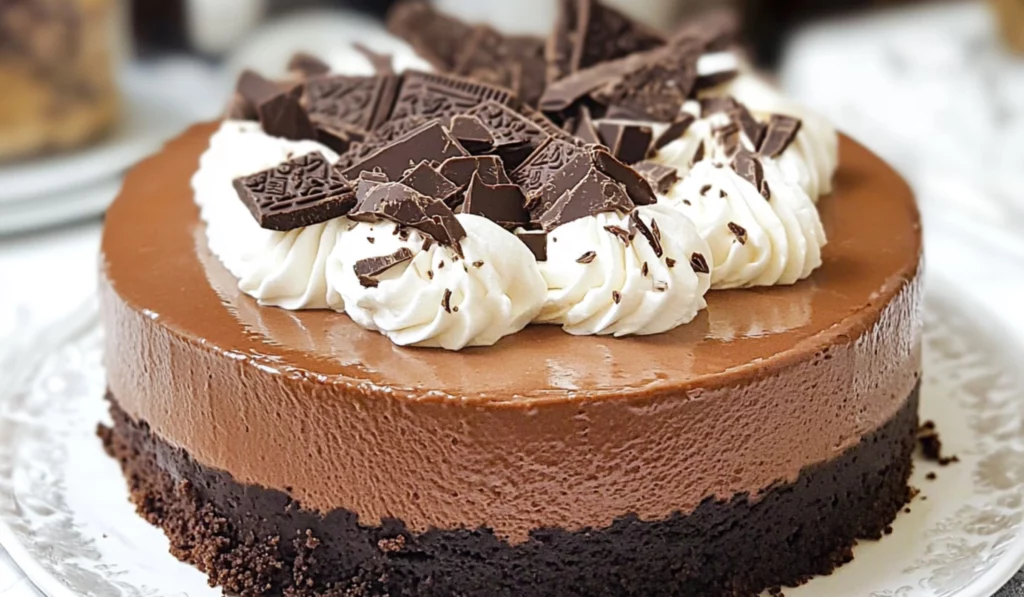
This No-Bake Chocolate Cheesecake is the perfect dessert for beginners. With a rich, creamy filling and a simple cookie crust, it requires no baking and is ready to impress in just a few hours. It’s an easy, delicious treat that satisfies any chocolate lover’s cravings!
- Prep Time: 45 minutes
- Cook Time: 0 minutes (No baking required)
- Total Time: 5 hours 45 minutes (including chilling time)
- Yield: 12–14 slices 1x
- Category: Dessert
- Method: No-Bake
- Cuisine: American
- Diet: Vegetarian
Ingredients
For the Oreo Crust:
- 2 3/4 cups (369g) Oreo cookie crumbs: About 31 Oreos, crushed into fine crumbs. You can easily crush the cookies by placing them in a zip-top bag and using a rolling pin, or you can pulse them in a food processor.
- 5 tbsp (70g) butter, melted: You can use either salted or unsalted butter, depending on your preference. If you’re using salted butter, just be mindful of the extra salt in the crust.
For the Chocolate Cheesecake Filling:
- 24 oz (678g) cream cheese, softened to room temperature: Make sure your cream cheese is at room temperature before mixing. This ensures a smooth, lump-free filling.
- 1/2 cup (104g) granulated sugar: This adds the right amount of sweetness to the cheesecake without overpowering the chocolate flavor.
- 3 tbsp (21g) natural unsweetened cocoa powder: This provides a rich chocolate flavor. You can use any brand of cocoa powder you like, but natural cocoa powder is typically preferred for its pure, bold taste.
- 8 oz semi-sweet chocolate, melted: Use high-quality semi-sweet chocolate for the best flavor. You can melt it in a microwave-safe bowl in 30-second intervals, stirring in between, or you can melt it over a double boiler.
- 1 1/4 cups (300ml) heavy whipping cream, cold: This is what will give your cheesecake its creamy texture. Make sure the cream is cold to help it whip up to stiff peaks.
- 3/4 cup (86g) powdered sugar: This sweetens the whipped cream and helps it hold its shape when folded into the cream cheese mixture.
- 1 tsp vanilla extract: Adds a lovely, aromatic flavor that complements the chocolate perfectly.
For the Whipped Cream Topping:
- 1 cup (240ml) heavy whipping cream, cold: Same as the cream used for the filling, cold whipping cream is essential for a fluffy and stable topping.
- 1/2 cup (58g) powdered sugar: Sweetens the whipped cream and helps it firm up.
- 1 tsp vanilla extract: Adds depth of flavor to the whipped cream and enhances the overall taste.
Instructions
1. Prepare the Oreo Crust:
- Begin by lining a 9-inch springform pan with parchment paper at the bottom. This will make it easier to remove the cheesecake once it’s set.
- Grease the sides of the pan lightly with butter or cooking spray to prevent the cheesecake from sticking.
- In a small bowl, combine the Oreo cookie crumbs with the melted butter. Stir until the crumbs are evenly coated with butter.
- Press the crumb mixture into the bottom of the prepared pan. Use the back of a spoon or a flat-bottomed glass to press the mixture firmly. Don’t press too hard, as this could make the crust too dense.
- Once the crust is evenly pressed, place the pan in the fridge while you prepare the filling. This will help the crust set.
2. Make the Chocolate Cheesecake Filling:
- In a large mixing bowl, beat the softened cream cheese, granulated sugar, and cocoa powder together until smooth and creamy. Use an electric mixer on medium speed for about 2 minutes.
- Add the melted semi-sweet chocolate to the cream cheese mixture and beat until well incorporated and smooth.
- In a separate bowl, whip the cold heavy whipping cream, powdered sugar, and vanilla extract on high speed until stiff peaks form. This can take about 3-4 minutes.
- Gently fold the whipped cream into the cream cheese mixture in two parts. Be careful not to deflate the whipped cream; fold it in gently to maintain the airy texture.
- Once the filling is fully combined and smooth, pour it into the prepared Oreo crust. Spread the mixture evenly using a spatula or the back of a spoon.
- Refrigerate the cheesecake for at least 5-6 hours or, for best results, overnight. This gives the cheesecake plenty of time to firm up and set properly.
3. Make the Whipped Cream Topping:
- For the whipped cream topping, whip the cold heavy whipping cream, powdered sugar, and vanilla extract on high speed until stiff peaks form. This should take around 3-4 minutes, depending on the speed of your mixer.
- Once the cheesecake has chilled and firmed up, remove it from the springform pan and place it on a serving platter or plate.
- Pipe or spread the whipped cream over the top of the cheesecake, creating a decorative border around the edges.
4. Add Your Toppings:
- Now it’s time for the fun part! Top your cheesecake with any combination of chocolate shavings, fresh fruit, mini chocolate chips, or sprinkles.
- Be as creative as you like! Whether you choose a simple topping or go all out with a decadent array of garnishes, this is your chance to make the dessert uniquely yours.
Notes
- Room temperature cream cheese: Make sure your cream cheese is softened to room temperature before mixing. This ensures a smooth filling without lumps.
- Whipping cream: Cold heavy cream whips better than warm cream, so refrigerate your whipping cream for at least an hour before using it.
- Chill time: Be patient! The cheesecake needs time to set in the fridge. Don’t rush the chilling process; it’s what gives the dessert its perfect texture.
- Topping ideas: While chocolate and whipped cream are always a win, consider adding a fruity element like fresh berries for a burst of freshness.
I remember the first time I made this No-Bake Chocolate Cheesecake. It was a hot summer day, and the last thing I wanted was to heat up the kitchen with an oven. But I was craving something sweet, and this recipe immediately caught my eye. The promise of chocolate, cream cheese, and an Oreo crust with minimal effort was all I needed. Once I took that first bite, I knew it was a keeper. Since then, this No-Bake Chocolate Cheesecake has become my go-to dessert for everything from family gatherings to casual nights in. Whether you’re a beginner baker or a seasoned pro, this recipe is bound to become one of your favorites.
Why This Recipe is Perfect for Beginners
If you’re new to the world of baking—or if you just want a quick and easy dessert that doesn’t require any special skills—this No-Bake Chocolate Cheesecake is the perfect place to start. Here’s why:
1. No Oven Required
One of the best things about this recipe is that you don’t need to worry about preheating the oven or checking the temperature constantly. No-bake desserts like this one are perfect for beginners because they are virtually foolproof. The hardest part is waiting for the cheesecake to chill in the fridge, but that’s just passive time—so you can relax or focus on other things while the dessert sets.
2. Simple Ingredients
The ingredients for this cheesecake are common kitchen staples, many of which you probably already have in your pantry or fridge. There’s no need for exotic or hard-to-find items, making it ideal for those who are just starting their baking journey. The recipe calls for ingredients like cream cheese, heavy whipping cream, and Oreo cookies, which are all easy to find and affordable.
3. Minimal Equipment
Unlike other desserts that may require specialized baking pans, mixers, or complicated gadgets, this No-Bake Chocolate Cheesecake only requires a few basic tools: a springform pan, mixing bowls, an electric mixer (for whipping the cream), and a spatula. You don’t need to worry about having a kitchen full of appliances or worrying about complex techniques. This recipe is straightforward and accessible to anyone, regardless of experience.
4. Impressive Results
Even though this cheesecake is easy to make, the result is always impressive. The combination of a silky smooth chocolate filling and a crunchy, buttery Oreo crust creates a dessert that feels indulgent and sophisticated. Whether you’re serving it at a dinner party, holiday gathering, or just enjoying it on a weekend, this cheesecake will wow your guests and make you look like a pro—without all the stress.
5. Customizable Toppings
One of the most fun aspects of this dessert is how customizable it is. You can top your cheesecake with anything you like—chocolate shavings, fresh fruit, mini chocolate chips, or whipped cream. You can even experiment with different flavored cookies for the crust. The possibilities are endless, and that flexibility is perfect for beginner bakers who want to personalize their desserts.
Ingredients and Preparation
Now that you know why this No-Bake Chocolate Cheesecake is the perfect recipe for beginners, let’s dive into the ingredients and preparation. The recipe is simple, and each step is easy to follow. You’ll love how quickly you can throw it together.
For the Oreo Crust:
- 2 3/4 cups (369g) Oreo cookie crumbs: About 31 Oreos, crushed into fine crumbs. You can easily crush the cookies by placing them in a zip-top bag and using a rolling pin, or you can pulse them in a food processor.
- 5 tbsp (70g) butter, melted: You can use either salted or unsalted butter, depending on your preference. If you’re using salted butter, just be mindful of the extra salt in the crust.
For the Chocolate Cheesecake Filling:
- 24 oz (678g) cream cheese, softened to room temperature: Make sure your cream cheese is at room temperature before mixing. This ensures a smooth, lump-free filling.
- 1/2 cup (104g) granulated sugar: This adds the right amount of sweetness to the cheesecake without overpowering the chocolate flavor.
- 3 tbsp (21g) natural unsweetened cocoa powder: This provides a rich chocolate flavor. You can use any brand of cocoa powder you like, but natural cocoa powder is typically preferred for its pure, bold taste.
- 8 oz semi-sweet chocolate, melted: Use high-quality semi-sweet chocolate for the best flavor. You can melt it in a microwave-safe bowl in 30-second intervals, stirring in between, or you can melt it over a double boiler.
- 1 1/4 cups (300ml) heavy whipping cream, cold: This is what will give your cheesecake its creamy texture. Make sure the cream is cold to help it whip up to stiff peaks.
- 3/4 cup (86g) powdered sugar: This sweetens the whipped cream and helps it hold its shape when folded into the cream cheese mixture.
- 1 tsp vanilla extract: Adds a lovely, aromatic flavor that complements the chocolate perfectly.
For the Whipped Cream Topping:
- 1 cup (240ml) heavy whipping cream, cold: Same as the cream used for the filling, cold whipping cream is essential for a fluffy and stable topping.
- 1/2 cup (58g) powdered sugar: Sweetens the whipped cream and helps it firm up.
- 1 tsp vanilla extract: Adds depth of flavor to the whipped cream and enhances the overall taste.
Optional Toppings:
- Chocolate shavings: Adds a bit of elegance and extra chocolate flavor.
- Fresh fruit: Sliced strawberries, raspberries, or even bananas work wonderfully with the chocolate cheesecake.
- Mini chocolate chips or sprinkles: Perfect for a fun, festive touch.
Step-by-Step Instructions
Here’s the step-by-step guide to making your No-Bake Chocolate Cheesecake:
1. Prepare the Oreo Crust:
- Begin by lining a 9-inch springform pan with parchment paper at the bottom. This will make it easier to remove the cheesecake once it’s set.
- Grease the sides of the pan lightly with butter or cooking spray to prevent the cheesecake from sticking.
- In a small bowl, combine the Oreo cookie crumbs with the melted butter. Stir until the crumbs are evenly coated with butter.
- Press the crumb mixture into the bottom of the prepared pan. Use the back of a spoon or a flat-bottomed glass to press the mixture firmly. Don’t press too hard, as this could make the crust too dense.
- Once the crust is evenly pressed, place the pan in the fridge while you prepare the filling. This will help the crust set.
2. Make the Chocolate Cheesecake Filling:
- In a large mixing bowl, beat the softened cream cheese, granulated sugar, and cocoa powder together until smooth and creamy. Use an electric mixer on medium speed for about 2 minutes.
- Add the melted semi-sweet chocolate to the cream cheese mixture and beat until well incorporated and smooth.
- In a separate bowl, whip the cold heavy whipping cream, powdered sugar, and vanilla extract on high speed until stiff peaks form. This can take about 3-4 minutes.
- Gently fold the whipped cream into the cream cheese mixture in two parts. Be careful not to deflate the whipped cream; fold it in gently to maintain the airy texture.
- Once the filling is fully combined and smooth, pour it into the prepared Oreo crust. Spread the mixture evenly using a spatula or the back of a spoon.
- Refrigerate the cheesecake for at least 5-6 hours or, for best results, overnight. This gives the cheesecake plenty of time to firm up and set properly.
3. Make the Whipped Cream Topping:
- For the whipped cream topping, whip the cold heavy whipping cream, powdered sugar, and vanilla extract on high speed until stiff peaks form. This should take around 3-4 minutes, depending on the speed of your mixer.
- Once the cheesecake has chilled and firmed up, remove it from the springform pan and place it on a serving platter or plate.
- Pipe or spread the whipped cream over the top of the cheesecake, creating a decorative border around the edges.
4. Add Your Toppings:
- Now it’s time for the fun part! Top your cheesecake with any combination of chocolate shavings, fresh fruit, mini chocolate chips, or sprinkles.
- Be as creative as you like! Whether you choose a simple topping or go all out with a decadent array of garnishes, this is your chance to make the dessert uniquely yours.
Beginner Tips and Notes
- Room temperature cream cheese: Make sure your cream cheese is softened to room temperature before mixing. This ensures a smooth filling without lumps.
- Whipping cream: Cold heavy cream whips better than warm cream, so refrigerate your whipping cream for at least an hour before using it.
- Chill time: Be patient! The cheesecake needs time to set in the fridge. Don’t rush the chilling process; it’s what gives the dessert its perfect texture.
- Topping ideas: While chocolate and whipped cream are always a win, consider adding a fruity element like fresh berries for a burst of freshness.
Serving Suggestions
This No-Bake Chocolate Cheesecake is a dessert that can stand on its own, but you can always pair it with complementary flavors. Here are some serving suggestions:
- Berries: Fresh strawberries, raspberries, or blueberries add a nice tart contrast to the rich chocolate cheesecake.
- Vanilla ice cream: A scoop of vanilla ice cream provides a smooth, creamy contrast.
- Chocolate sauce: Drizzle some chocolate sauce over the top for a double dose of chocolate indulgence.
- Coffee or tea: Pairing this cheesecake with a hot beverage like coffee or a sweet cup of tea can create the perfect dessert experience.

Conclusion: A Must-Try Recipe for Chocolate Lovers
This No-Bake Chocolate Cheesecake is one of the easiest yet most impressive desserts you can make. The combination of a crunchy Oreo crust, creamy chocolate filling, and fluffy whipped topping makes it a dessert that everyone will love. Plus, it’s an excellent choice for beginner bakers who want a quick, simple recipe that still delivers show-stopping results.


