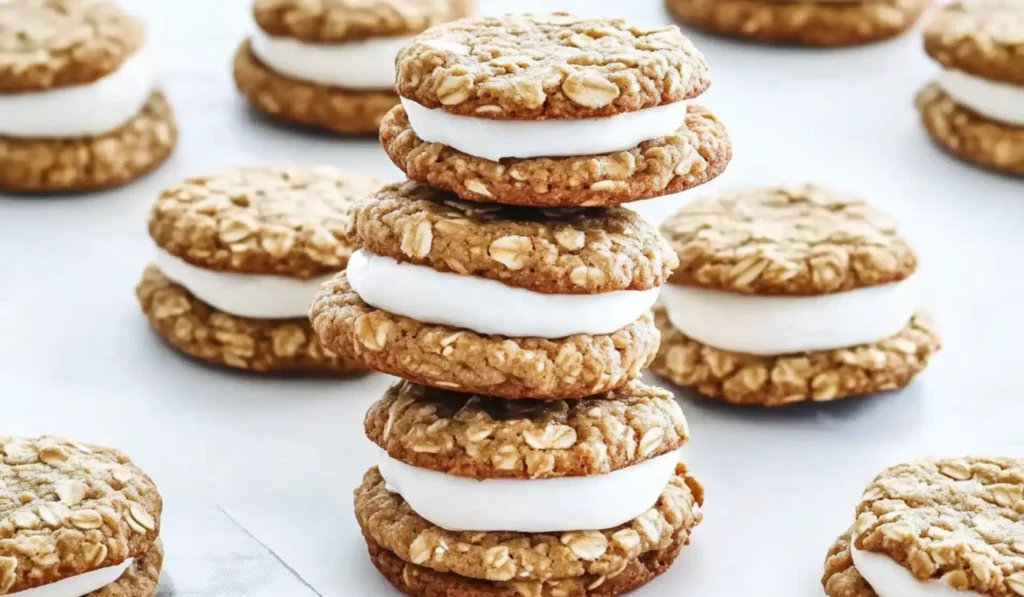
Sometimes, the simplest things in life can bring the most joy, and that’s exactly what these Gluten-Free Oatmeal Cream Pies offer. If you’re craving a comforting treat but need a gluten-free option, this recipe is the perfect solution. With soft, chewy oatmeal cookies and a creamy marshmallow frosting, these cookies are a delightful combination of flavors and textures that everyone will love. They’re not just for those who follow a gluten-free diet—these oatmeal cream pies are delicious enough to satisfy anyone’s sweet tooth.

Gluten-Free Oatmeal Cream Pies: A Delicious Twist on a Classic Favorite
Oatmeal cream pies have always been a nostalgic favorite for me, reminding me of after-school snacks and sweet moments. I wanted to recreate this classic in a gluten-free version, and the result is even better than I remembered! These Gluten-Free Oatmeal Cream Pies are soft, chewy, and easy to make—perfect for beginners. Whether you’re avoiding gluten or just craving something new, these cookies will satisfy your sweet tooth without compromising on taste or texture.
- Prep Time: 20 minutes
- Cook Time: 10 minutes
- Total Time: 30 minutes
- Yield: 18 sandwich cookies 1x
- Category: Dessert
- Method: Baking
- Cuisine: American
- Diet: Gluten Free
Ingredients
For the Cookies:
- 1 1/2 cups Bob’s Red Mill Gluten-Free 1:1 Baking Flour
- 1 teaspoon baking soda
- 1/2 teaspoon fine sea salt
- 1 teaspoon ground cinnamon
- 3 cups Bob’s Red Mill Gluten-Free Old-Fashioned Oats
- 3/4 cup butter, melted (12 tablespoons)
- 1/2 cup granulated sugar
- 3/4 cup light brown sugar, packed
- 1 teaspoon pure vanilla extract
- 2 large eggs
For the Frosting:
- 1 cup butter (2 sticks or 8 oz.), softened
- 1/3 cup marshmallow fluff
- 3 cups powdered sugar
- 1 teaspoon pure vanilla extract
- 2–3 tablespoons heavy whipping cream or milk (adjust for desired consistency)
Instructions
Step 1: Preheat the Oven and Prepare Baking Sheets Before you start making the dough, preheat your oven to 350°F (175°C). This ensures that your oven is hot and ready when the cookies are shaped. Line two baking sheets with parchment paper or silicone baking mats. These will help the cookies bake evenly and prevent them from sticking to the sheets.
Step 2: Prepare the Dry Ingredients In a medium-sized bowl, whisk together the gluten-free 1:1 baking flour, baking soda, fine sea salt, and ground cinnamon. This step ensures that the dry ingredients are evenly distributed throughout the dough. Once the dry ingredients are mixed, stir in the gluten-free oats until everything is combined. Set the bowl aside while you prepare the wet ingredients.
Step 3: Mix the Wet Ingredients In the bowl of a stand mixer (or using a hand mixer), combine the melted butter, granulated sugar, and light brown sugar. Mix on medium-low speed until the ingredients are fully combined. Add the vanilla extract and eggs, then beat the mixture on medium speed for about 1 minute. This step adds air to the batter, making it light and fluffy.
Step 4: Combine the Wet and Dry Ingredients Once the wet ingredients are mixed, gradually add the dry ingredients to the wet mixture, mixing on medium-low speed. Be careful not to overmix, as this can result in dense cookies. Once everything is well combined, the dough should be thick and slightly sticky.
Step 5: Shape the Dough Use a tablespoon or a cookie scoop to portion out the dough into small balls, about 1 tablespoon each. Drop the dough onto the prepared baking sheets, spacing the cookies about 2 inches apart. You may need to bake in batches if your baking sheets can’t hold all the cookies at once.
Step 6: Bake the Cookies Place the baking sheets in the preheated oven and bake the cookies for 8-10 minutes, or until the edges are golden brown. The center of the cookies should still be soft. Remove the cookies from the oven and allow them to cool on the baking sheets for 5 minutes before transferring them to a wire rack to cool completely.
Step 7: Make the Frosting While the cookies are cooling, make the frosting. In the bowl of a stand mixer, combine the softened butter, marshmallow fluff, and powdered sugar. Mix on medium-low speed until everything is incorporated. Add the vanilla extract and heavy cream or milk and continue mixing until the frosting is light and fluffy. If the frosting is too thick, add more cream or milk a tablespoon at a time until it reaches the desired consistency.
Step 8: Assemble the Cookies Once the cookies are completely cooled, spread a generous amount of frosting onto the flat side of one cookie. Place another cookie on top to form a sandwich. Repeat this process for the remaining cookies. You can adjust the amount of frosting based on your preference for how thick you want the filling to be.
Step 9: Store and Serve These cookies are best served immediately, but you can store them in an airtight container at room temperature for up to 3-4 days. If you need to keep them longer, store them in the refrigerator for up to a week. For the best texture, let the cookies come to room temperature before serving. You can also freeze these oatmeal cream pies by wrapping each one individually in plastic wrap and storing them in a freezer-safe container for up to 2 months. To thaw, simply let the cookies sit at room temperature for about an hour.
Notes
- Don’t Overmix the Dough: Overmixing can result in dense cookies. Once the flour is incorporated, stop mixing.
- Chill the Dough: If the dough feels too soft to scoop, chill it for 10-15 minutes to make it easier to handle.
- Use a Cookie Scoop: A cookie scoop ensures that all of your cookies are the same size, which helps them bake evenly.
- Keep an Eye on the Baking Time: Because ovens vary, start checking your cookies at 8 minutes to ensure they don’t overbake. They should be golden around the edges but still soft in the center.
- Adjust Frosting Consistency: If the frosting is too thick, add more cream or milk, a tablespoon at a time, until you reach the desired spreadability. If it’s too thin, add more powdered sugar to thicken it.
Growing up, I always loved the nostalgic taste of oatmeal cream pies. The chewy texture of the oats, paired with the creamy filling, made for a perfect after-school snack. As I became more interested in gluten-free baking, I couldn’t resist recreating this classic treat with a gluten-free twist. And let me tell you, these Gluten-Free Oatmeal Cream Pies taste even better than I remembered. With a few simple ingredient swaps, I was able to create a dessert that’s just as delicious as the original—and it’s incredibly easy to make. Whether you’re new to gluten-free baking or an experienced baker looking for a fun twist on a classic, this recipe is the perfect place to start.
Why This Recipe is Perfect for Beginners
This Gluten-Free Oatmeal Cream Pies recipe is not only delicious but also perfect for beginners. There’s no need to worry about complicated techniques or specialized equipment—this recipe uses basic ingredients and straightforward steps. You don’t have to be an expert to make these cookies. In fact, the simplicity of this recipe is part of what makes it so beginner-friendly. If you’re someone who is just starting to experiment with gluten-free baking, this is an excellent choice.
What’s even better is that these cookies are pretty forgiving. As long as you follow the steps and measure your ingredients correctly, you can’t go wrong. The dough is easy to handle, and the cookies bake up perfectly every time. Plus, the frosting is a simple, no-fuss recipe that comes together quickly in just a few minutes. If you’re new to making sandwiches cookies, these Gluten-Free Oatmeal Cream Pies are a great introduction to the world of cookie sandwiches without overwhelming you with complexity.
Ingredients and Preparation
The first step to making these Gluten-Free Oatmeal Cream Pies is gathering your ingredients. These are the ingredients you’ll need:
For the Cookies:
- 1 1/2 cups Bob’s Red Mill Gluten-Free 1:1 Baking Flour
- 1 teaspoon baking soda
- 1/2 teaspoon fine sea salt
- 1 teaspoon ground cinnamon
- 3 cups Bob’s Red Mill Gluten-Free Old-Fashioned Oats
- 3/4 cup butter, melted (12 tablespoons)
- 1/2 cup granulated sugar
- 3/4 cup light brown sugar, packed
- 1 teaspoon pure vanilla extract
- 2 large eggs
For the Frosting:
- 1 cup butter (2 sticks or 8 oz.), softened
- 1/3 cup marshmallow fluff
- 3 cups powdered sugar
- 1 teaspoon pure vanilla extract
- 2-3 tablespoons heavy whipping cream or milk (adjust for desired consistency)
Alternative Ingredients Suggestions: If you don’t have the exact ingredients listed, here are some alternatives you can use without sacrificing flavor or texture:
- For the Flour: If Bob’s Red Mill Gluten-Free 1:1 Baking Flour isn’t available, you can use another 1:1 gluten-free flour blend. Make sure it contains xanthan gum or guar gum to help bind the ingredients together.
- For the Oats: If you prefer a different brand of gluten-free oats, feel free to use them. Make sure the oats are certified gluten-free to avoid cross-contamination. If you can’t find rolled oats, quick oats should also work, though they may yield a slightly different texture.
- For the Butter: If you want to make this recipe dairy-free, you can swap out the butter for a plant-based butter substitute or even coconut oil. This will slightly change the flavor but still produce a delicious result.
- For the Frosting: If marshmallow fluff is hard to find, you can substitute it with a combination of butter and corn syrup or honey. This will give the frosting a different texture but will still provide a smooth, creamy filling.
Step-by-Step Instructions
Now that we’ve gathered all the ingredients, let’s walk through the process of making these Gluten-Free Oatmeal Cream Pies. Follow these steps for a delicious treat!
Step 1: Preheat the Oven and Prepare Baking Sheets Before you start making the dough, preheat your oven to 350°F (175°C). This ensures that your oven is hot and ready when the cookies are shaped. Line two baking sheets with parchment paper or silicone baking mats. These will help the cookies bake evenly and prevent them from sticking to the sheets.
Step 2: Prepare the Dry Ingredients In a medium-sized bowl, whisk together the gluten-free 1:1 baking flour, baking soda, fine sea salt, and ground cinnamon. This step ensures that the dry ingredients are evenly distributed throughout the dough. Once the dry ingredients are mixed, stir in the gluten-free oats until everything is combined. Set the bowl aside while you prepare the wet ingredients.
Step 3: Mix the Wet Ingredients In the bowl of a stand mixer (or using a hand mixer), combine the melted butter, granulated sugar, and light brown sugar. Mix on medium-low speed until the ingredients are fully combined. Add the vanilla extract and eggs, then beat the mixture on medium speed for about 1 minute. This step adds air to the batter, making it light and fluffy.
Step 4: Combine the Wet and Dry Ingredients Once the wet ingredients are mixed, gradually add the dry ingredients to the wet mixture, mixing on medium-low speed. Be careful not to overmix, as this can result in dense cookies. Once everything is well combined, the dough should be thick and slightly sticky.
Step 5: Shape the Dough Use a tablespoon or a cookie scoop to portion out the dough into small balls, about 1 tablespoon each. Drop the dough onto the prepared baking sheets, spacing the cookies about 2 inches apart. You may need to bake in batches if your baking sheets can’t hold all the cookies at once.
Step 6: Bake the Cookies Place the baking sheets in the preheated oven and bake the cookies for 8-10 minutes, or until the edges are golden brown. The center of the cookies should still be soft. Remove the cookies from the oven and allow them to cool on the baking sheets for 5 minutes before transferring them to a wire rack to cool completely.
Step 7: Make the Frosting While the cookies are cooling, make the frosting. In the bowl of a stand mixer, combine the softened butter, marshmallow fluff, and powdered sugar. Mix on medium-low speed until everything is incorporated. Add the vanilla extract and heavy cream or milk and continue mixing until the frosting is light and fluffy. If the frosting is too thick, add more cream or milk a tablespoon at a time until it reaches the desired consistency.
Step 8: Assemble the Cookies Once the cookies are completely cooled, spread a generous amount of frosting onto the flat side of one cookie. Place another cookie on top to form a sandwich. Repeat this process for the remaining cookies. You can adjust the amount of frosting based on your preference for how thick you want the filling to be.
Step 9: Store and Serve These cookies are best served immediately, but you can store them in an airtight container at room temperature for up to 3-4 days. If you need to keep them longer, store them in the refrigerator for up to a week. For the best texture, let the cookies come to room temperature before serving. You can also freeze these oatmeal cream pies by wrapping each one individually in plastic wrap and storing them in a freezer-safe container for up to 2 months. To thaw, simply let the cookies sit at room temperature for about an hour.
Beginner Tips and Notes
Here are some helpful tips to ensure your Gluten-Free Oatmeal Cream Pies turn out perfectly:
- Don’t Overmix the Dough: Overmixing can result in dense cookies. Once the flour is incorporated, stop mixing.
- Chill the Dough: If the dough feels too soft to scoop, chill it for 10-15 minutes to make it easier to handle.
- Use a Cookie Scoop: A cookie scoop ensures that all of your cookies are the same size, which helps them bake evenly.
- Keep an Eye on the Baking Time: Because ovens vary, start checking your cookies at 8 minutes to ensure they don’t overbake. They should be golden around the edges but still soft in the center.
- Adjust Frosting Consistency: If the frosting is too thick, add more cream or milk, a tablespoon at a time, until you reach the desired spreadability. If it’s too thin, add more powdered sugar to thicken it.
Serving Suggestions
These oatmeal cream pies are delicious on their own, but you can serve them with a variety of drinks to complement their flavor. Try pairing them with a cup of coffee, hot tea, or a glass of milk for a classic snack. If you’re looking for a fun twist, serve them with a scoop of vanilla ice cream to create an indulgent ice cream sandwich. For a festive touch, serve them on a dessert platter with other gluten-free treats at your next gathering or holiday celebration.
Storage Tips
These cookies can be stored at room temperature for up to 3-4 days, but they’ll stay freshest if you keep them in an airtight container. If you want to store them for longer, refrigerate them or freeze them for up to 2 months. When you’re ready to eat them, let them thaw at room temperature for the best texture.

Conclusion
These Gluten-Free Oatmeal Cream Pies are the perfect balance of chewy cookies and creamy frosting. Whether you’re making them for a special occasion or just for yourself, they’re sure to satisfy any sweet tooth. With simple ingredients and easy-to-follow steps, this recipe is perfect for beginners who are just starting to explore the world of gluten-free baking. I encourage you to give it a try, and I’d love to hear how it turns out for you! Don’t forget to share your thoughts in the comments below and let me know if you make any delicious variations.


