Gluten-Free Oatmeal Cream Pies: A Delicious Twist on a Classic Favorite
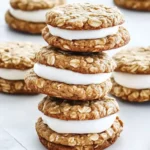
Oatmeal cream pies have always been a nostalgic favorite for me, reminding me of after-school snacks and sweet moments. I wanted to recreate this classic in a gluten-free version, and the result is even better than I remembered! These Gluten-Free Oatmeal Cream Pies are soft, chewy, and easy to make—perfect for beginners. Whether you’re avoiding gluten or just craving something new, these cookies will satisfy your sweet tooth without compromising on taste or texture.
- Prep Time: 20 minutes
- Cook Time: 10 minutes
- Total Time: 30 minutes
- Yield: 18 sandwich cookies 1x
- Category: Dessert
- Method: Baking
- Cuisine: American
- Diet: Gluten Free
Ingredients
For the Cookies:
- 1 1/2 cups Bob’s Red Mill Gluten-Free 1:1 Baking Flour
- 1 teaspoon baking soda
- 1/2 teaspoon fine sea salt
- 1 teaspoon ground cinnamon
- 3 cups Bob’s Red Mill Gluten-Free Old-Fashioned Oats
- 3/4 cup butter, melted (12 tablespoons)
- 1/2 cup granulated sugar
- 3/4 cup light brown sugar, packed
- 1 teaspoon pure vanilla extract
- 2 large eggs
For the Frosting:
- 1 cup butter (2 sticks or 8 oz.), softened
- 1/3 cup marshmallow fluff
- 3 cups powdered sugar
- 1 teaspoon pure vanilla extract
- 2–3 tablespoons heavy whipping cream or milk (adjust for desired consistency)
Instructions
Step 1: Preheat the Oven and Prepare Baking Sheets Before you start making the dough, preheat your oven to 350°F (175°C). This ensures that your oven is hot and ready when the cookies are shaped. Line two baking sheets with parchment paper or silicone baking mats. These will help the cookies bake evenly and prevent them from sticking to the sheets.
Step 2: Prepare the Dry Ingredients In a medium-sized bowl, whisk together the gluten-free 1:1 baking flour, baking soda, fine sea salt, and ground cinnamon. This step ensures that the dry ingredients are evenly distributed throughout the dough. Once the dry ingredients are mixed, stir in the gluten-free oats until everything is combined. Set the bowl aside while you prepare the wet ingredients.
Step 3: Mix the Wet Ingredients In the bowl of a stand mixer (or using a hand mixer), combine the melted butter, granulated sugar, and light brown sugar. Mix on medium-low speed until the ingredients are fully combined. Add the vanilla extract and eggs, then beat the mixture on medium speed for about 1 minute. This step adds air to the batter, making it light and fluffy.
Step 4: Combine the Wet and Dry Ingredients Once the wet ingredients are mixed, gradually add the dry ingredients to the wet mixture, mixing on medium-low speed. Be careful not to overmix, as this can result in dense cookies. Once everything is well combined, the dough should be thick and slightly sticky.
Step 5: Shape the Dough Use a tablespoon or a cookie scoop to portion out the dough into small balls, about 1 tablespoon each. Drop the dough onto the prepared baking sheets, spacing the cookies about 2 inches apart. You may need to bake in batches if your baking sheets can’t hold all the cookies at once.
Step 6: Bake the Cookies Place the baking sheets in the preheated oven and bake the cookies for 8-10 minutes, or until the edges are golden brown. The center of the cookies should still be soft. Remove the cookies from the oven and allow them to cool on the baking sheets for 5 minutes before transferring them to a wire rack to cool completely.
Step 7: Make the Frosting While the cookies are cooling, make the frosting. In the bowl of a stand mixer, combine the softened butter, marshmallow fluff, and powdered sugar. Mix on medium-low speed until everything is incorporated. Add the vanilla extract and heavy cream or milk and continue mixing until the frosting is light and fluffy. If the frosting is too thick, add more cream or milk a tablespoon at a time until it reaches the desired consistency.
Step 8: Assemble the Cookies Once the cookies are completely cooled, spread a generous amount of frosting onto the flat side of one cookie. Place another cookie on top to form a sandwich. Repeat this process for the remaining cookies. You can adjust the amount of frosting based on your preference for how thick you want the filling to be.
Step 9: Store and Serve These cookies are best served immediately, but you can store them in an airtight container at room temperature for up to 3-4 days. If you need to keep them longer, store them in the refrigerator for up to a week. For the best texture, let the cookies come to room temperature before serving. You can also freeze these oatmeal cream pies by wrapping each one individually in plastic wrap and storing them in a freezer-safe container for up to 2 months. To thaw, simply let the cookies sit at room temperature for about an hour.
Notes
- Don’t Overmix the Dough: Overmixing can result in dense cookies. Once the flour is incorporated, stop mixing.
- Chill the Dough: If the dough feels too soft to scoop, chill it for 10-15 minutes to make it easier to handle.
- Use a Cookie Scoop: A cookie scoop ensures that all of your cookies are the same size, which helps them bake evenly.
- Keep an Eye on the Baking Time: Because ovens vary, start checking your cookies at 8 minutes to ensure they don’t overbake. They should be golden around the edges but still soft in the center.
- Adjust Frosting Consistency: If the frosting is too thick, add more cream or milk, a tablespoon at a time, until you reach the desired spreadability. If it’s too thin, add more powdered sugar to thicken it.