The Japanese cheesecake, also known as cotton cheesecake, has gained a devoted following for its impossibly light, airy texture that contrasts with the richness of classic cheesecakes. With its soft, jiggly consistency and delicate sweetness, this dessert offers a unique twist on the traditional, making it perfect for anyone looking to try something new. Unlike the dense, creamy cheesecakes typically seen in Western cuisine, the Japanese version is far lighter and fluffier—almost like a souffle.
PrintJapanese Cheesecake: A Fluffy Delight for All Occasions

The Japanese cheesecake, also known as cotton cheesecake, has gained a devoted following for its impossibly light, airy texture that contrasts with the richness of classic cheesecakes. With its soft, jiggly consistency and delicate sweetness, this dessert offers a unique twist on the traditional, making it perfect for anyone looking to try something new. Unlike the dense, creamy cheesecakes typically seen in Western cuisine, the Japanese version is far lighter and fluffier—almost like a souffle.
- Prep Time: 15 minutes
- Cook Time: 1 hour 20 minutes
- Total Time: 1 hour 35 minutes
- Yield: 8 servings (one 8-inch cheesecake) 1x
- Category: Dessert
- Method: Baking
- Cuisine: Japanese
- Diet: Vegetarian
Ingredients
For the Cheesecake:
- 6 large eggs: Eggs form the base of the meringue that gives the cheesecake its signature lightness. Make sure to separate the whites and yolks, as each part will serve a different purpose in the batter.
- 8 ounces of cream cheese: Use full-fat cream cheese for the best richness. It’s important that the cream cheese is softened to room temperature for smooth incorporation into the batter.
- ¼ cup heavy cream or full-fat milk: This adds richness and creaminess to the batter.
- 4 tablespoons unsalted butter: Butter contributes to the silky texture of the cheesecake. Cutting it into smaller pieces helps it melt evenly when combined with the cream cheese.
- ½ cup cake flour: Cake flour is essential for creating the tender, delicate crumb that Japanese cheesecake is known for. It’s much finer than all-purpose flour, leading to a smoother texture.
- 1 tablespoon lemon zest: Optional, but lemon zest adds a fresh, citrusy note that brightens the flavor of the cheesecake.
- 1½ teaspoons vanilla extract: Adds a hint of sweetness and enhances the flavor profile of the dessert.
- ⅓ cup granulated sugar: The sugar sweetens the batter while also helping to stabilize the meringue.
- 2 teaspoons lemon juice: A small amount of lemon juice helps to stabilize the egg whites and adds a subtle tanginess to the final dessert.
Optional Toppings:
- Powdered sugar: For a simple yet elegant dusting on top of the cheesecake.
- Apricot jam: A light glaze of apricot jam gives the cheesecake a subtle sheen and a fruity layer of sweetness.
- Berries: Fresh berries such as strawberries, blueberries, or raspberries pair wonderfully with the lightness of the cheesecake, adding a fresh contrast.
- Sweetened whipped cream: If you like extra creaminess, a dollop of whipped cream makes a perfect finishing touch.
Instructions
1. Preheat the Oven
Start by preheating your oven to 300°F (150°C). This is a relatively low temperature, which is key to ensuring that the cheesecake bakes evenly without over-browning. Line the bottom of an 8-inch cake pan with parchment paper, and prepare a 9-inch by 9-inch baking pan for the water bath. The larger pan should be able to hold the 8-inch cake pan comfortably.
2. Prepare the Water Bath
Fill the 9-inch pan with a few inches of water and place it in the oven as it preheats. This water bath creates a gentle steaming effect that helps prevent cracking and ensures that the cheesecake remains moist throughout the baking process.
3. Make the Base Batter
In a large heatproof bowl, combine the cream cheese, butter, and heavy cream. Place this bowl over a pot of simmering water, ensuring the bowl doesn’t touch the water. Gently whisk the mixture until it becomes smooth and fully incorporated. Once smooth, turn off the heat. Next, add the egg yolks to the mixture and stir until well combined. Quickly sift the cake flour into the bowl to prevent any lumps from forming. Whisk until all the dry ingredients are completely incorporated and no clumps remain. Remove the bowl from the heat and stir in the lemon zest and vanilla extract. Let the mixture cool for a few minutes before moving on.
4. Prepare the Meringue
In a clean mixing bowl, add the egg whites and lemon juice. Using an electric mixer, whip the egg whites on medium-high speed until they form frothy peaks. Slowly add the granulated sugar, one-third at a time, continuing to whip until the egg whites reach medium-soft peaks. Be sure not to overwhip the egg whites, as this can cause the meringue to break.
5. Combine the Meringue and the Batter
Carefully fold one-third of the meringue into the cream cheese mixture, making sure to mix gently to avoid deflating the meringue. Continue folding in the remaining meringue in two more additions. Be patient and gentle during this step to maintain the lightness and airiness of the batter.
6. Bake the Cheesecake
Pour the prepared batter into the 8-inch cake pan and tap the pan on the counter a few times to remove any large air bubbles. Carefully place the cake pan into the preheated water bath. Bake the cheesecake for about 80 to 90 minutes, or until the top is golden brown and a skewer inserted into the center comes out clean. The cheesecake should still be slightly jiggly but firm to the touch.
7. Cool the Cheesecake
Once the cheesecake is done, carefully remove it from the oven. Let it cool for about 10 minutes in the pan, then rotate the pan every 20-30 seconds to help release the cheesecake from the sides. Once it has cooled slightly, remove the cheesecake from the pan by flipping it onto a plate. Gently peel away the parchment paper and flip the cheesecake back onto a second plate. Allow the cheesecake to cool completely.
8. Serve
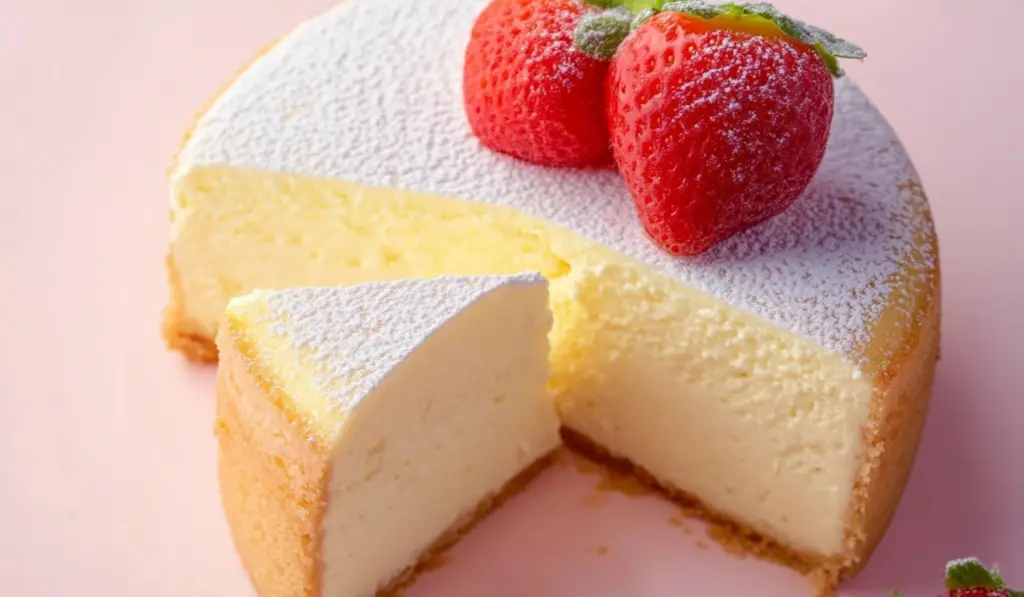
Japanese cheesecake can be served warm, at room temperature, or chilled. If you prefer, dust the top with powdered sugar, glaze it with apricot jam, or top it with fresh berries and whipped cream. The cheesecake has a soft, delicate texture, and its subtly tangy flavor pairs wonderfully with the sweetness of the toppings.
Notes
- Sifting the flour: This step is crucial for a smooth and light texture. It helps to incorporate air into the batter, which contributes to the cheesecake’s fluffiness.
- Egg whites: Make sure the egg whites are free of any yolk. Even a small amount of yolk can prevent the egg whites from whipping properly. For best results, separate the eggs when they’re cold, then bring them to room temperature before whipping.
- Water bath: The water bath is essential for ensuring that the cheesecake doesn’t dry out and bakes evenly. If you’re using a springform pan, make sure to wrap the outside with foil to prevent water from seeping in and making the cheesecake soggy.
- Storage: The cheesecake can be stored in the fridge for up to 3 days. It may also be frozen, but it’s best enjoyed fresh for the best texture.
What makes it even more enticing is its mildly tangy, subtly sweet flavor that leaves you craving more with every bite. Japanese cheesecake has its origins in Japan, but it has captured the hearts and taste buds of dessert lovers worldwide. With the ability to melt in your mouth, this treat offers the satisfaction of cheesecake without the heaviness. The following recipe will guide you step-by-step through the process of making this magical dessert at home, and with the right tools, ingredients, and techniques, you’ll create a dessert that rivals any Japanese patisserie.
Ingredients Breakdown
Creating the perfect Japanese cheesecake requires attention to detail and the right balance of ingredients. Here’s what you’ll need to bring this dessert to life:
For the Cheesecake:
- 6 large eggs: Eggs form the base of the meringue that gives the cheesecake its signature lightness. Make sure to separate the whites and yolks, as each part will serve a different purpose in the batter.
- 8 ounces of cream cheese: Use full-fat cream cheese for the best richness. It’s important that the cream cheese is softened to room temperature for smooth incorporation into the batter.
- ¼ cup heavy cream or full-fat milk: This adds richness and creaminess to the batter.
- 4 tablespoons unsalted butter: Butter contributes to the silky texture of the cheesecake. Cutting it into smaller pieces helps it melt evenly when combined with the cream cheese.
- ½ cup cake flour: Cake flour is essential for creating the tender, delicate crumb that Japanese cheesecake is known for. It’s much finer than all-purpose flour, leading to a smoother texture.
- 1 tablespoon lemon zest: Optional, but lemon zest adds a fresh, citrusy note that brightens the flavor of the cheesecake.
- 1½ teaspoons vanilla extract: Adds a hint of sweetness and enhances the flavor profile of the dessert.
- ⅓ cup granulated sugar: The sugar sweetens the batter while also helping to stabilize the meringue.
- 2 teaspoons lemon juice: A small amount of lemon juice helps to stabilize the egg whites and adds a subtle tanginess to the final dessert.
Optional Toppings:
- Powdered sugar: For a simple yet elegant dusting on top of the cheesecake.
- Apricot jam: A light glaze of apricot jam gives the cheesecake a subtle sheen and a fruity layer of sweetness.
- Berries: Fresh berries such as strawberries, blueberries, or raspberries pair wonderfully with the lightness of the cheesecake, adding a fresh contrast.
- Sweetened whipped cream: If you like extra creaminess, a dollop of whipped cream makes a perfect finishing touch.
Step-by-Step Instructions
Making a Japanese cheesecake requires patience and precision, but the process is straightforward once you get the hang of it. Follow these detailed instructions to make a perfect cheesecake every time:
1. Preheat the Oven
Start by preheating your oven to 300°F (150°C). This is a relatively low temperature, which is key to ensuring that the cheesecake bakes evenly without over-browning. Line the bottom of an 8-inch cake pan with parchment paper, and prepare a 9-inch by 9-inch baking pan for the water bath. The larger pan should be able to hold the 8-inch cake pan comfortably.
2. Prepare the Water Bath
Fill the 9-inch pan with a few inches of water and place it in the oven as it preheats. This water bath creates a gentle steaming effect that helps prevent cracking and ensures that the cheesecake remains moist throughout the baking process.
3. Make the Base Batter
In a large heatproof bowl, combine the cream cheese, butter, and heavy cream. Place this bowl over a pot of simmering water, ensuring the bowl doesn’t touch the water. Gently whisk the mixture until it becomes smooth and fully incorporated. Once smooth, turn off the heat. Next, add the egg yolks to the mixture and stir until well combined. Quickly sift the cake flour into the bowl to prevent any lumps from forming. Whisk until all the dry ingredients are completely incorporated and no clumps remain. Remove the bowl from the heat and stir in the lemon zest and vanilla extract. Let the mixture cool for a few minutes before moving on.
4. Prepare the Meringue
In a clean mixing bowl, add the egg whites and lemon juice. Using an electric mixer, whip the egg whites on medium-high speed until they form frothy peaks. Slowly add the granulated sugar, one-third at a time, continuing to whip until the egg whites reach medium-soft peaks. Be sure not to overwhip the egg whites, as this can cause the meringue to break.
5. Combine the Meringue and the Batter
Carefully fold one-third of the meringue into the cream cheese mixture, making sure to mix gently to avoid deflating the meringue. Continue folding in the remaining meringue in two more additions. Be patient and gentle during this step to maintain the lightness and airiness of the batter.
6. Bake the Cheesecake
Pour the prepared batter into the 8-inch cake pan and tap the pan on the counter a few times to remove any large air bubbles. Carefully place the cake pan into the preheated water bath. Bake the cheesecake for about 80 to 90 minutes, or until the top is golden brown and a skewer inserted into the center comes out clean. The cheesecake should still be slightly jiggly but firm to the touch.
7. Cool the Cheesecake
Once the cheesecake is done, carefully remove it from the oven. Let it cool for about 10 minutes in the pan, then rotate the pan every 20-30 seconds to help release the cheesecake from the sides. Once it has cooled slightly, remove the cheesecake from the pan by flipping it onto a plate. Gently peel away the parchment paper and flip the cheesecake back onto a second plate. Allow the cheesecake to cool completely.
8. Serve
Japanese cheesecake can be served warm, at room temperature, or chilled. If you prefer, dust the top with powdered sugar, glaze it with apricot jam, or top it with fresh berries and whipped cream. The cheesecake has a soft, delicate texture, and its subtly tangy flavor pairs wonderfully with the sweetness of the toppings.
Tips and Tricks
- Sifting the flour: This step is crucial for a smooth and light texture. It helps to incorporate air into the batter, which contributes to the cheesecake’s fluffiness.
- Egg whites: Make sure the egg whites are free of any yolk. Even a small amount of yolk can prevent the egg whites from whipping properly. For best results, separate the eggs when they’re cold, then bring them to room temperature before whipping.
- Water bath: The water bath is essential for ensuring that the cheesecake doesn’t dry out and bakes evenly. If you’re using a springform pan, make sure to wrap the outside with foil to prevent water from seeping in and making the cheesecake soggy.
- Storage: The cheesecake can be stored in the fridge for up to 3 days. It may also be frozen, but it’s best enjoyed fresh for the best texture.
Variations and Substitutions
While this Japanese cheesecake recipe is delicious as is, there are many ways to experiment with flavors and textures.
- Ube Japanese Cheesecake: Add a vibrant twist to your cheesecake by incorporating ube (purple yam) puree into the batter. Ube gives the cheesecake a beautiful color and a unique flavor that pairs well with the creamy base.
- Fruit Add-ins: Try folding in a handful of fresh berries, such as blueberries or raspberries, into the batter for added flavor and texture.
- Citrus Variations: Swap the lemon zest for orange or lime zest to give the cheesecake a different citrusy note.

Final Thoughts
Japanese cheesecake is a delightful dessert that offers a perfect balance of sweetness, tanginess, and fluffiness. The combination of creamy cheesecake and airy texture is what sets it apart from traditional cheesecakes. While the recipe requires patience and attention to detail, the result is well worth the effort. Whether you’re serving it at a family gathering, dinner party, or just enjoying it with a cup of tea, this cheesecake is sure to impress. So, gather your ingredients and enjoy making this delightful dessert that’s as fun to prepare as it is to eat!


