Let’s talk brownies. For years, they were my baking nemesis. I envisioned complicated recipes, precise measurements, and a high risk of culinary disaster. My attempts usually resulted in either dry, cakey squares that crumbled at the touch or something so gooey it resembled molten chocolate lava (delicious, but not quite brownie-like). Then, I discovered the magic of M&M’s Brownies. This recipe was a revelation! It was surprisingly simple, unbelievably quick, and delivered the fudgy, chocolatey goodness I had always craved. Plus, the M&M’s add a festive touch that makes them perfect for any occasion, from a casual weeknight treat to a holiday celebration. If you’re a beginner baker looking for an easy, foolproof recipe that will impress everyone, these M&M’s Brownies are your answer. They’re quick, relatively healthy-ish (hey, it’s chocolate!), and so delicious you’ll wonder why you ever bought boxed brownies.

M&M’s Brownies: A Beginner Baker’s Dream (Fudgy, Festive, and Fun!) – The Ultimate Guide

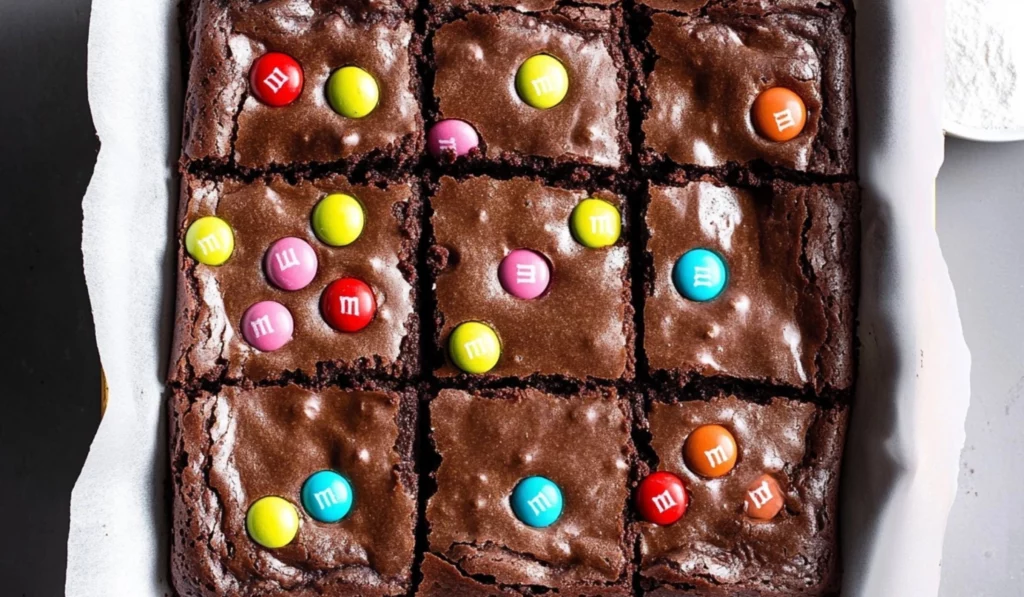
Brownies are a classic for a reason – they’re delicious! And these M&M’s Brownies take them to the next level. Fudgy, chocolatey, and bursting with colorful M&M’s, they’re the perfect treat for any occasion, from a casual weeknight dessert to a festive celebration. Imagine biting into a rich, chewy brownie, the M&M’s adding a delightful crunch and a pop of color. This easy recipe is ideal for beginner bakers, requiring minimal fuss and delivering maximum flavor.
- Prep Time: 15 minutes
- Cook Time: 45-50 minutes
- Total Time: 1 hour – 1 hour 5 minutes
- Yield: 16 brownies 1x
- Category: Dessert
- Method: Baking
- Cuisine: American
Ingredients
- 1 1/4 cups (285g) unsalted butter
- 2 ounces semi-sweet chocolate, chopped
- 1 1/2 cups (300g) light brown sugar, packed
- 3/4 cup (150g) granulated sugar
- 4 large eggs, room temperature
- 1 cup (100g) Dutch process cocoa powder
- 1/2 teaspoon salt
- 3 teaspoons vanilla extract
- 3/4 cup (95g) all-purpose flour, spooned and leveled
- 2/3 cup M&M chocolate candies
Instructions
-
Prep the Pan: The First Step to Success: Preheat your oven to 350°F (175°C). Spray the bottom and sides of an 8×8 inch baking pan with non-stick baking spray and line with parchment paper. Allow the sides of the parchment to hang over the sides of the pan for easy removal of the brownies once baked. This step is crucial for preventing the brownies from sticking to the pan and making them easy to slice and serve. Trust me, future you will thank you.
-
Melt the Chocolate and Butter: The Meltdown: Melt the butter, chocolate, and sugars in a heat-safe bowl over a double boiler. To create a double boiler, fill a medium saucepan with 2 inches of water and place over medium-low heat. Place the heat-safe bowl over the pan, being careful not to let the bowl touch the water below. Stirring frequently, heat the ingredients until melted. The mixture will be grainy but glossy. Remove the bowl from the heat and set aside to cool slightly. Pro Tip for the Microwave-Inclined: If you don’t have a double boiler, you can melt the ingredients in the microwave in 30-second intervals, stirring in between, until melted and smooth. Be careful not to overheat the chocolate, as it can burn.
-
Add the Eggs: The Emulsification Station: Add the eggs, one at a time, whisking well between each addition. Continue to whisk until the mixture lightens in color and is smooth and shiny. This step is essential for creating a fudgy texture. The eggs act as an emulsifier, binding the fat and liquids together.
-
Incorporate the Dry Ingredients: The Fold-In Frenzy: Add the cocoa powder, salt, and vanilla. Stir to combine well. Then, add in the flour, folding into the mixture with a large spatula until just a few streaks of flour remain. Do not overmix! Overmixing will develop the gluten in the flour and result in cakey brownies instead of fudgy ones. Pro Tip for Clump-Free Cocoa: Sifting the cocoa powder before adding it to the batter can prevent clumps and ensure it incorporates smoothly.
-
Transfer and Bake: The Brownie Countdown: Transfer the batter to the prepared pan and level the top with an offset spatula. Sprinkle the M&M’s over the top of the brownies. Bake for 45 to 50 minutes, or until the edges are set and a toothpick inserted two inches from the side of the pan comes out with just a few moist crumbs remaining. Do not overbake, or the brownies will be cake-like and dry instead of fudgy. Pro Tip for Doneness: The center of the brownies might still look slightly soft, but they will continue to set as they cool. This is what gives them that desirable fudgy texture.
-
Cool and Slice: The Patience Game: Remove the pan from the oven and set on a wire rack to cool completely. Cooling completely before slicing is crucial. This allows the brownies to set properly and prevents them from being too gooey. Once cooled, use the parchment paper overhang to lift the brownies out of the pan and slice them into squares. Pro Tip for Clean Cuts: For cleaner slices, let the brownies cool completely, or even chill them slightly in the refrigerator, before cutting.
Notes
- Troubleshooting: Brownie Blues Be Gone: If your brownies are too cakey, you likely overmixed the batter or overbaked them. If they are too fudgy, they might be slightly underbaked. Adjust the baking time and mixing next time. Baking is a science, but it’s also an art!
- Prep Efficiency: Time-Saving Tips: You can measure out all the dry ingredients ahead of time and store them in an airtight container. You can also melt the butter and chocolate mixture in advance and store it at room temperature. This will save you time when you’re ready to bake.
- Tool Substitutions: Improvise and Overcome: If you don’t have an offset spatula, you can use a regular spatula or even a knife to level the batter. If you don’t have parchment paper, you can grease the pan thoroughly with butter and flour. Don’t let a lack of specific tools hold you back from baking!
- M&M’s Placement: A Sprinkle Strategy: For a more even distribution of M&M’s, you can gently press them into the batter after sprinkling them on top. This will also prevent them from falling off when you slice the brownies.
Ingredients and Preparation: Your Baker’s Toolkit – Everything You Need
This M&M’s Brownies recipe is wonderfully straightforward. The key to baking success is having all your ingredients prepped and ready to go before you start mixing. This is called “mise en place” in the culinary world, and it’s a game-changer, especially for beginner bakers. Here’s what you’ll need:
- The Chocolate Symphony:
- 1 1/4 cups (285g) unsalted butter – Alternative: For a slightly different flavor profile, you can use salted butter, but reduce the added salt in the recipe to 1/4 teaspoon. Make sure the butter is softened to room temperature for easier mixing.
- 2 ounces semi-sweet chocolate, chopped – Alternative: You can use milk chocolate, dark chocolate, or even bittersweet chocolate, depending on your preference. Chocolate chips can also be substituted, but chopped chocolate melts more smoothly and evenly.
- Sweetness and Structure: The Dynamic Duo:
- 1 1/2 cups (300g) light brown sugar, packed – Alternative: Dark brown sugar will create a richer, more molasses-like flavor. Packing the brown sugar ensures you have the correct amount, as it tends to clump.
- 3/4 cup (150g) granulated sugar – Alternative: You can reduce the granulated sugar slightly if you prefer less sweetness, but be aware that this can affect the texture of the brownies.
- Binding and Richness: The Egg Factor:
- 4 large eggs, room temperature – Important: Room temperature eggs emulsify better with the melted butter and sugar, creating a smoother batter and a fudgier texture. If you forget to take your eggs out of the fridge ahead of time, you can place them in a bowl of warm water for about 10 minutes.
- Chocolate Intensity: The Cocoa Power:
- 1 cup (100g) Dutch process cocoa powder – Alternative: Regular unsweetened cocoa powder can be used, but Dutch process cocoa powder will give your brownies a deeper, richer, more intense chocolate flavor. It’s less acidic and blends beautifully into the batter.
- Flavor Enhancers: The Supporting Cast:
- 1/2 teaspoon salt – Essential: Salt balances the sweetness and enhances the chocolate flavor. It’s a small amount, but it makes a big difference.
- 3 teaspoons vanilla extract – Alternative: You can use other extracts, like almond or peppermint, for a different flavor profile. Vanilla adds a warm, comforting note to the brownies.
- The Foundation: Flour Power:
- 3/4 cup (95g) all-purpose flour, spooned and leveled – Important: Spooning and leveling the flour ensures you don’t add too much, which can make the brownies cakey instead of fudgy. Too much flour absorbs moisture and can lead to a dry, crumbly texture.
- The Festive Touch: M&M Mania:
- 2/3 cup M&M chocolate candies – Alternative: You can use other candies, like chocolate chips, chopped nuts (walnuts, pecans, or even macadamia nuts), chopped pretzels for a salty crunch, or even sprinkles for a colorful celebration.
Step-by-Step Instructions: Your Path to Brownie Bliss – A Beginner-Friendly Guide
- Prep the Pan: The First Step to Success: Preheat your oven to 350°F (175°C). Spray the bottom and sides of an 8×8 inch baking pan with non-stick baking spray and line with parchment paper. Allow the sides of the parchment to hang over the sides of the pan for easy removal of the brownies once baked. This step is crucial for preventing the brownies from sticking to the pan and making them easy to slice and serve. Trust me, future you will thank you.
- Melt the Chocolate and Butter: The Meltdown: Melt the butter, chocolate, and sugars in a heat-safe bowl over a double boiler. To create a double boiler, fill a medium saucepan with 2 inches of water and place over medium-low heat. Place the heat-safe bowl over the pan, being careful not to let the bowl touch the water below. Stirring frequently, heat the ingredients until melted. The mixture will be grainy but glossy. Remove the bowl from the heat and set aside to cool slightly. Pro Tip for the Microwave-Inclined: If you don’t have a double boiler, you can melt the ingredients in the microwave in 30-second intervals, stirring in between, until melted and smooth. Be careful not to overheat the chocolate, as it can burn.
- Add the Eggs: The Emulsification Station: Add the eggs, one at a time, whisking well between each addition. Continue to whisk until the mixture lightens in color and is smooth and shiny. This step is essential for creating a fudgy texture. The eggs act as an emulsifier, binding the fat and liquids together.
- Incorporate the Dry Ingredients: The Fold-In Frenzy: Add the cocoa powder, salt, and vanilla. Stir to combine well. Then, add in the flour, folding into the mixture with a large spatula until just a few streaks of flour remain. Do not overmix! Overmixing will develop the gluten in the flour and result in cakey brownies instead of fudgy ones. Pro Tip for Clump-Free Cocoa: Sifting the cocoa powder before adding it to the batter can prevent clumps and ensure it incorporates smoothly.
- Transfer and Bake: The Brownie Countdown: Transfer the batter to the prepared pan and level the top with an offset spatula. Sprinkle the M&M’s over the top of the brownies. Bake for 45 to 50 minutes, or until the edges are set and a toothpick inserted two inches from the side of the pan comes out with just a few moist crumbs remaining. Do not overbake, or the brownies will be cake-like and dry instead of fudgy. Pro Tip for Doneness: The center of the brownies might still look slightly soft, but they will continue to set as they cool. This is what gives them that desirable fudgy texture.
- Cool and Slice: The Patience Game: Remove the pan from the oven and set on a wire rack to cool completely. Cooling completely before slicing is crucial. This allows the brownies to set properly and prevents them from being too gooey. Once cooled, use the parchment paper overhang to lift the brownies out of the pan and slice them into squares. Pro Tip for Clean Cuts: For cleaner slices, let the brownies cool completely, or even chill them slightly in the refrigerator, before cutting.
Beginner Tips and Notes: Your Baking Buddy – Advice from a Fellow Baker
- Troubleshooting: Brownie Blues Be Gone: If your brownies are too cakey, you likely overmixed the batter or overbaked them. If they are too fudgy, they might be slightly underbaked. Adjust the baking time and mixing next time. Baking is a science, but it’s also an art!
- Prep Efficiency: Time-Saving Tips: You can measure out all the dry ingredients ahead of time and store them in an airtight container. You can also melt the butter and chocolate mixture in advance and store it at room temperature. This will save you time when you’re ready to bake.
- Tool Substitutions: Improvise and Overcome: If you don’t have an offset spatula, you can use a regular spatula or even a knife to level the batter. If you don’t have parchment paper, you can grease the pan thoroughly with butter and flour. Don’t let a lack of specific tools hold you back from baking!
- M&M’s Placement: A Sprinkle Strategy: For a more even distribution of M&M’s, you can gently press them into the batter after sprinkling them on top. This will also prevent them from falling off when you slice the brownies.
Serving Suggestions: Enhancing the Brownie Experience – From Simple to Spectacular
Drinks: The Perfect Pairing: Pair the brownies with a glass of cold milk, a cup of hot coffee, or even a milkshake for a decadent treat. A rich, dark stout or a sweet dessert wine also complements the chocolate flavors beautifully.
Toppings: The Cherry on Top (or M&M’s on Brownies): Serve the brownies with a scoop of vanilla ice cream, a drizzle of chocolate sauce, or a sprinkle of powdered sugar. Whipped cream, caramel sauce, or even a dollop of peanut butter are also delicious options.

Conclusion: Your Brownie Triumph – A Culinary Milestone
These M&M’s Brownies are a perfect example of how easy and delicious baking can be. They’re a guaranteed crowd-pleaser and a great way to impress your friends and family (and yourself!). So, gather your ingredients, follow the instructions, and get ready to enjoy the fudgy, chocolatey goodness of homemade brownies. Don’t forget to share your creations and any variations you try in the comments below! We’d love to see your brownie masterpieces! Happy baking! What other easy baking recipes would you like to see us explore? Are you interested in learning more about different types of chocolate, or perhaps mastering other baking techniques? Let us know in the comments! We’re here to support you on your baking journey.


