
If you’re a fan of the sweet and irresistible combination of chocolate and coconut, then this Mounds Poke Cake is about to become your new go-to dessert! Bursting with layers of moist cake, creamy coconut, and rich chocolate frosting, this cake is a celebration of flavors that perfectly mimic the beloved Mounds candy bar. Plus, it’s so easy to make and can be prepared ahead of time, making it a perfect choice for gatherings or simply satisfying your sweet tooth.
PrintMounds Poke Cake: A Coconut Lover’s Dream Dessert

If you’re a fan of the sweet and irresistible combination of chocolate and coconut, then this Mounds Poke Cake is about to become your new go-to dessert! Bursting with layers of moist cake, creamy coconut, and rich chocolate frosting, this cake is a celebration of flavors that perfectly mimic the beloved Mounds candy bar. Plus, it’s so easy to make and can be prepared ahead of time, making it a perfect choice for gatherings or simply satisfying your sweet tooth.
- Prep Time: 20 minutes
- Cook Time: 30 minutes
- Total Time: 1 hour 50 minutes
- Yield: 12 servings 1x
- Category: Dessert
- Method: Baking
- Cuisine: American
- Diet: Vegetarian
Ingredients
- 1 box chocolate cake mix (plus the ingredients called for on the box, usually eggs, oil, and water)
- 14 oz can sweetened condensed milk
- 15 oz can coconut cream
- 7 oz package sweetened shredded coconut
- 12 oz container chocolate frosting
- Toasted coconut or almond slivers for garnish (optional)
Instructions
1. Prepare the Chocolate Cake
Begin by preparing the chocolate cake according to the instructions on the box. This typically involves mixing the cake mix with the required eggs, oil, and water, then beating the ingredients until smooth. Once your batter is ready, pour it into a greased 9×13-inch baking pan.
Bake the cake according to the package’s recommended baking time. You’ll know it’s done when a toothpick inserted into the center comes out clean. Keep an eye on it as it bakes, but the sweet aroma of chocolate filling your kitchen will be a telltale sign that your cake is close to perfection.
2. Poke Holes in the Warm Cake
While the cake is still warm, it’s time to give it a little attention. Using the end of a wooden spoon (or any other handle with a rounded edge), poke holes all over the top of the cake. Space the holes about 1 inch apart to ensure that the coconut milk soak will spread evenly throughout the cake.
This step is essential for allowing the coconut milk mixture to penetrate the cake, ensuring each bite is bursting with flavor.
3. Make the Coconut Mixture
In a medium-sized bowl, whisk together the sweetened condensed milk and coconut cream until they’re fully combined. This is where the magic happens—these two ingredients create the rich, sweet coconut base that will soak into the cake and give it that mouthwatering tropical flavor.
4. Pour the Coconut Mixture Over the Cake
Once the cake has been poked, pour the coconut milk mixture evenly over the warm cake, making sure to let it seep into all the holes you’ve created. The cake will begin to absorb the mixture, and you’ll notice it becoming even more moist as the soak is absorbed.
Allow the cake to cool completely at room temperature—this will take about 1-2 hours. During this time, the cake will continue to soak up the coconut mixture, making it extra moist and flavorful.
5. Add the Shredded Coconut
Once your cake has cooled, it’s time to add the shredded coconut on top. Sprinkle the sweetened shredded coconut evenly over the surface of the cake. This will give your cake that classic coconut texture and a bit of crunch that contrasts perfectly with the creamy coconut soak.
6. Frost the Cake
Now, it’s time to bring out the chocolate frosting! Heat the chocolate frosting in the microwave for 20-30 seconds, just until it’s soft enough to pour over the cake. Be sure to stir the frosting after microwaving to ensure it’s smooth and pourable.
Pour the frosting over the coconut layer, and then use a spatula to spread it evenly across the surface of the cake. The rich, glossy chocolate will add a velvety finish to the top of the cake, making it as decadent as it is delicious.
7. Garnish (Optional)
If you want to add a little extra flair, consider garnishing the cake with toasted coconut or almond slivers. Toasted coconut will add a bit of crunch and an extra layer of flavor, while almond slivers give the cake a nice contrast in texture.
8. Chill the Cake
Refrigerate the cake for at least 1 hour before slicing. This will allow the frosting to set and give the coconut milk soak time to fully permeate the cake, creating the perfect balance of flavors and textures.
Notes
- Let the cake cool completely: While it might be tempting to dig in right away, it’s essential to let the cake cool to room temperature. This ensures the coconut milk soak has time to properly absorb and doesn’t make the cake soggy.
- Use a spatula to spread the frosting: After microwaving the frosting, use a spatula to spread it smoothly over the cake. This ensures that every bite has a layer of frosting, without it running off the sides.
- Make it ahead: This cake is a great make-ahead dessert. Prepare it the night before and refrigerate it overnight. It will allow the flavors to develop, and the cake will be even more flavorful the next day.
Why You’ll Love This Cake
What makes this Mounds Poke Cake so special is the rich combination of moist chocolate cake, creamy coconut filling, and luscious chocolate frosting. Each bite is an explosion of flavor, with the sweetness of the coconut complementing the decadence of the chocolate. The moistness of the cake, enhanced by the coconut soak, makes it incredibly satisfying, while the frosting adds a smooth, melt-in-your-mouth finish. Whether you’re making it for a family dinner or a holiday gathering, this cake is guaranteed to wow your guests.
Now, let’s dive into the details of how to make this coconut-chocolate marvel, step by step!
Ingredients
- 1 box chocolate cake mix (plus the ingredients called for on the box, usually eggs, oil, and water)
- 14 oz can sweetened condensed milk
- 15 oz can coconut cream
- 7 oz package sweetened shredded coconut
- 12 oz container chocolate frosting
- Toasted coconut or almond slivers for garnish (optional)
Instructions
1. Prepare the Chocolate Cake
Begin by preparing the chocolate cake according to the instructions on the box. This typically involves mixing the cake mix with the required eggs, oil, and water, then beating the ingredients until smooth. Once your batter is ready, pour it into a greased 9×13-inch baking pan.
Bake the cake according to the package’s recommended baking time. You’ll know it’s done when a toothpick inserted into the center comes out clean. Keep an eye on it as it bakes, but the sweet aroma of chocolate filling your kitchen will be a telltale sign that your cake is close to perfection.
2. Poke Holes in the Warm Cake
While the cake is still warm, it’s time to give it a little attention. Using the end of a wooden spoon (or any other handle with a rounded edge), poke holes all over the top of the cake. Space the holes about 1 inch apart to ensure that the coconut milk soak will spread evenly throughout the cake.
This step is essential for allowing the coconut milk mixture to penetrate the cake, ensuring each bite is bursting with flavor.
3. Make the Coconut Mixture
In a medium-sized bowl, whisk together the sweetened condensed milk and coconut cream until they’re fully combined. This is where the magic happens—these two ingredients create the rich, sweet coconut base that will soak into the cake and give it that mouthwatering tropical flavor.
4. Pour the Coconut Mixture Over the Cake
Once the cake has been poked, pour the coconut milk mixture evenly over the warm cake, making sure to let it seep into all the holes you’ve created. The cake will begin to absorb the mixture, and you’ll notice it becoming even more moist as the soak is absorbed.
Allow the cake to cool completely at room temperature—this will take about 1-2 hours. During this time, the cake will continue to soak up the coconut mixture, making it extra moist and flavorful.
5. Add the Shredded Coconut
Once your cake has cooled, it’s time to add the shredded coconut on top. Sprinkle the sweetened shredded coconut evenly over the surface of the cake. This will give your cake that classic coconut texture and a bit of crunch that contrasts perfectly with the creamy coconut soak.
6. Frost the Cake
Now, it’s time to bring out the chocolate frosting! Heat the chocolate frosting in the microwave for 20-30 seconds, just until it’s soft enough to pour over the cake. Be sure to stir the frosting after microwaving to ensure it’s smooth and pourable.
Pour the frosting over the coconut layer, and then use a spatula to spread it evenly across the surface of the cake. The rich, glossy chocolate will add a velvety finish to the top of the cake, making it as decadent as it is delicious.
7. Garnish (Optional)
If you want to add a little extra flair, consider garnishing the cake with toasted coconut or almond slivers. Toasted coconut will add a bit of crunch and an extra layer of flavor, while almond slivers give the cake a nice contrast in texture.
8. Chill the Cake
Refrigerate the cake for at least 1 hour before slicing. This will allow the frosting to set and give the coconut milk soak time to fully permeate the cake, creating the perfect balance of flavors and textures.
The Final Touch: Serving Suggestions
Once the cake has chilled and set, it’s time to serve and enjoy! The cake can be served on its own or paired with a dollop of whipped cream or a scoop of vanilla ice cream. The creaminess of the ice cream or the lightness of the whipped cream complements the richness of the cake, elevating the whole dessert experience.
Flavor Profile and Texture
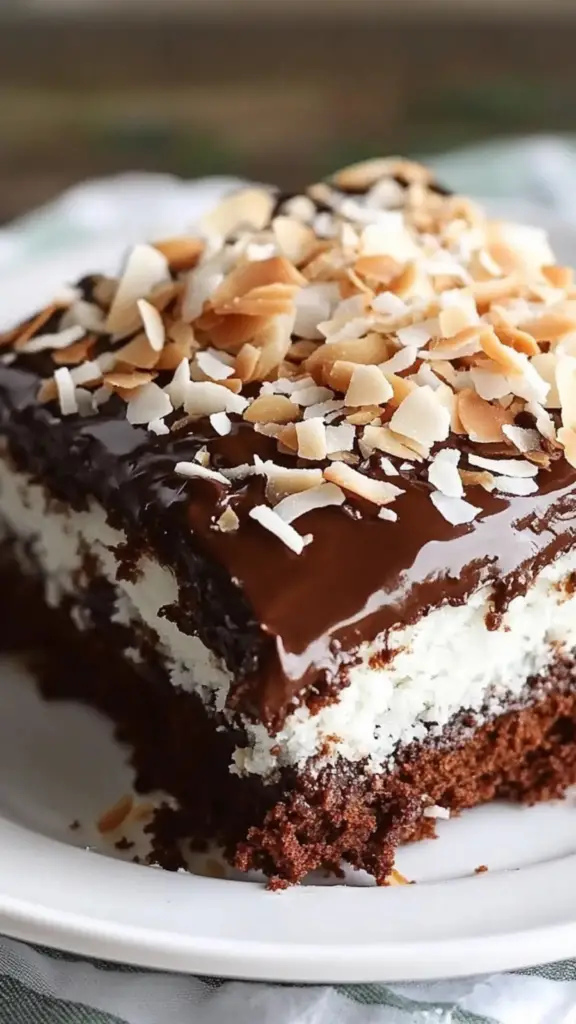
Imagine cutting into this cake: the first thing you’ll notice is the ultra-moist texture of the cake, which has absorbed the sweet coconut milk mixture. The rich chocolate frosting contrasts beautifully with the light, chewy coconut layer on top, creating an indulgent bite that’s both creamy and slightly crunchy. The coconut flavor is sweet but not overpowering, providing the perfect balance to the chocolate’s richness.
With every bite, you’ll experience a harmonious blend of coconut and chocolate, while the moistness of the cake makes it feel like a comforting indulgence.
Variations and Substitutions
Cake Mix Alternatives
While using a store-bought chocolate cake mix is the simplest option, you can always opt for a homemade chocolate cake recipe if you prefer a more from-scratch approach. A rich, fudgy chocolate cake would work perfectly in this recipe.
Coconut Cream Substitute
If you can’t find coconut cream, you can use coconut milk as an alternative. However, coconut cream will give you a thicker, richer consistency, which is ideal for this dessert.
Frosting Substitutes
If you’re looking for a lighter option, try using whipped cream frosting instead of traditional chocolate frosting. For a fun twist, you can also use dark chocolate ganache for an extra indulgent treat.
Pro Tips for Success
- Let the cake cool completely: While it might be tempting to dig in right away, it’s essential to let the cake cool to room temperature. This ensures the coconut milk soak has time to properly absorb and doesn’t make the cake soggy.
- Use a spatula to spread the frosting: After microwaving the frosting, use a spatula to spread it smoothly over the cake. This ensures that every bite has a layer of frosting, without it running off the sides.
- Make it ahead: This cake is a great make-ahead dessert. Prepare it the night before and refrigerate it overnight. It will allow the flavors to develop, and the cake will be even more flavorful the next day.
Conclusion
This Mounds Poke Cake is the perfect dessert for anyone who loves the delicious pairing of coconut and chocolate. It’s easy to make, incredibly moist, and packed with irresistible flavors. Whether you’re hosting a party or just craving a sweet treat, this cake will impress everyone at the table.
So what are you waiting for? Grab your ingredients, preheat that oven, and get ready to indulge in a slice of this creamy, chocolatey coconut goodness. You’ll be glad you did!


