As soon as fall rolls around, there’s one thing everyone seems to crave—pumpkin-flavored everything. From lattes to pies, the pumpkin spice craze is real, and there’s no better way to embrace this seasonal trend than with a batch of No Bake Pumpkin Cheesecake Balls. These little bites of heaven combine the creamy richness of cheesecake with the warm, comforting spices of pumpkin, making them the perfect fall treat. What makes them even better? They’re incredibly easy to make and don’t require an oven. Whether you’re planning a holiday gathering, attending a potluck, or simply craving something sweet, these no-bake cheesecake balls are a foolproof option. Let’s dive into why this recipe is perfect for beginner cooks and why it’s sure to become a staple in your fall dessert repertoire.

No Bake Pumpkin Cheesecake Balls: A Fall Favorite with Minimal Effort

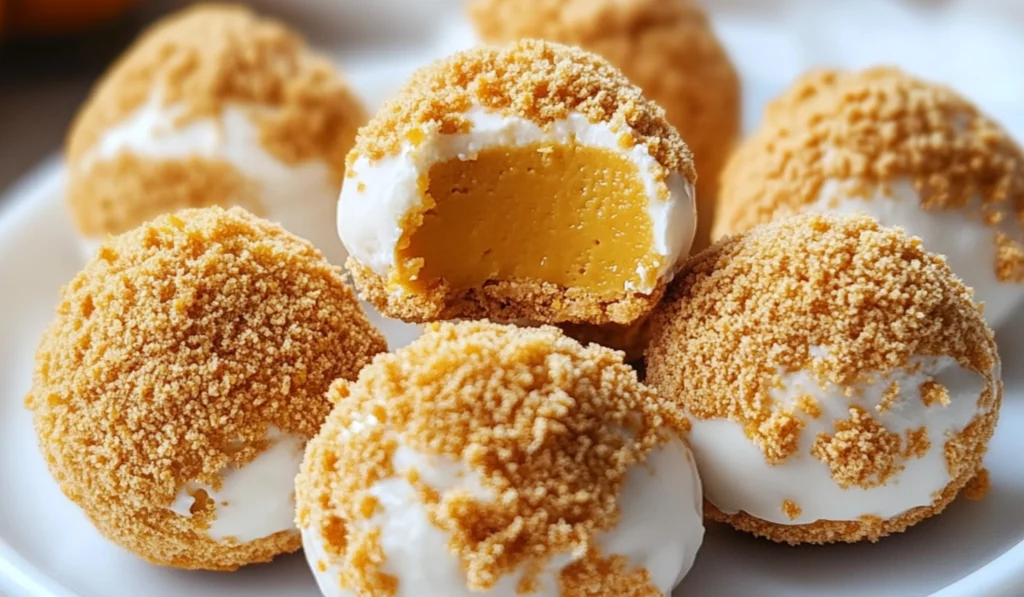
These No Bake Pumpkin Cheesecake Balls are the perfect dessert for fall—creamy, spiced, and totally delicious. With a rich pumpkin flavor and a smooth cheesecake filling, these bite-sized treats require no baking, making them a hassle-free dessert for any occasion. Whether you’re hosting a party or just craving something sweet, these pumpkin cheesecake balls are quick, easy, and guaranteed to impress!
- Prep Time: 20 minutes
- Cook Time: 0 minutes
- Total Time: 20 minutes
- Yield: 24 cheesecake balls 1x
- Category: Dessert
- Method: No-Bake
- Cuisine: American
- Diet: Vegetarian
Ingredients
- 8 oz cream cheese, softened
- ⅓ cup powdered sugar
- ⅔ cup pumpkin puree
- 1 tsp pumpkin pie spice
- 1 ½ cups graham cracker crumbs
- 1 ½ cups gingersnap crumbs
- 12 oz white almond bark (for coating)
- Optional: 1 cup orange candy melts (for drizzle)
Instructions
1. Prepare the Cheesecake Mixture:
Start by beating the softened cream cheese and powdered sugar together until the mixture is smooth and creamy. You can use a hand mixer or a stand mixer for this step, but a whisk will also do the trick if you don’t have an electric mixer. Once your cream cheese and sugar are well-combined, add in the pumpkin puree and pumpkin pie spice. Mix until fully combined. You should have a thick, creamy, and spiced pumpkin mixture. Tip: Make sure the cream cheese is fully mixed in without lumps. A smooth, creamy consistency is key to the perfect cheesecake filling.
2. Add the Crumbs:
Next, stir in the graham cracker and gingersnap crumbs. You can use a spoon, spatula, or mixer for this step—whichever is easier for you. The crumbs should be fully incorporated into the pumpkin cheesecake mixture, giving it a bit of texture and helping to form the base of the cheesecake balls. If the mixture feels too sticky, add a bit more crumbs until it’s easier to handle. Don’t worry, it will still be smooth and creamy even with the added texture. Tip: If you like a more distinct crunch in your cheesecake balls, you can increase the amount of crumbs to your liking. Just make sure the mixture holds together well when you form the balls.
3. Chill the Mixture:
Once the mixture is combined, transfer it to the refrigerator and chill for at least 2 hours. Chilling helps firm up the mixture, making it easier to roll into balls. The wait may feel like the hardest part of the recipe, but trust us, it’s worth it! Tip: If you’re short on time, you can place the mixture in the freezer for 30 minutes to an hour instead. However, chilling for 2 hours will give the best results.
4. Form the Balls:
After the mixture has chilled, use a spoon or cookie scoop to take small portions of the mixture. Roll them into 1-inch balls with your hands. It’s best to make them uniform in size so they look nice and even, but don’t worry if they’re not perfectly round. Place the balls on a baking sheet lined with parchment paper. Tip: If the mixture is too sticky to roll, wet your hands slightly or dust them with powdered sugar to make the process easier.
5. Chill the Balls:
Now, return the rolled balls to the refrigerator for 30 minutes to firm up even more. This step ensures they hold their shape while being dipped in the almond bark.
6. Coat with Almond Bark:
Melt the white almond bark in the microwave in 30-second intervals, stirring in between to prevent overheating. Once it’s fully melted and smooth, dip each chilled cheesecake ball into the almond bark, coating it completely. Allow any excess almond bark to drip off before setting the coated ball back onto the parchment paper. If you’re using orange candy melts for a festive drizzle, drizzle them over the coated balls at this point. Tip: For a smoother coating, ensure that your cheesecake balls are well-chilled before dipping. This will prevent the coating from melting too quickly.
Notes
Troubleshooting:
- The mixture is too sticky: If your cheesecake mixture feels sticky or hard to roll into balls, simply add a few more graham cracker or gingersnap crumbs. This will help thicken it up without compromising the flavor.
- Coating doesn’t stick properly: If the almond bark isn’t sticking well to the balls, it might be because they’re too warm. Make sure the cheesecake balls are fully chilled before dipping to get the best coating results.
Efficiency Tips:
- Prepare in advance: If you want to save time, you can make the mixture a day before and chill it overnight. This will save you a step on the day of serving.
- Quick chilling: If you’re in a rush, you can place the cheesecake balls in the freezer instead of the fridge. Freeze them for about 30 minutes, and they’ll be firm enough to coat.
Coating Options:
If you’d like to experiment with different coatings, here are a few ideas:
- Dark chocolate or milk chocolate: If you prefer a richer coating, dark or milk chocolate are great alternatives to white almond bark. Simply melt them in the microwave, and use them the same way.
- Crushed nuts: For a crunchier texture, consider rolling the balls in crushed nuts such as pecans or walnuts after coating them in the almond bark.
- Sprinkles: For a fun and festive look, roll the cheesecake balls in colorful sprinkles or holiday-themed decorations.
Why This Recipe is Perfect for Beginners
Making a delicious dessert doesn’t always mean spending hours in the kitchen or mastering complicated techniques. This No Bake Pumpkin Cheesecake Balls recipe is the epitome of simplicity and convenience. With just a few easy steps and minimal prep time, anyone—whether you’re an experienced cook or a kitchen novice—can whip up these bite-sized treats. There’s no need to worry about complicated baking techniques or waiting for the oven to heat up. Plus, they’re versatile! You can customize the flavors to suit your preferences, add your favorite coatings or drizzle, and even change the base crumbs. Whether you’re making these for a special occasion or just because, the result is guaranteed to impress. Additionally, these cheesecake balls combine the richness of cream cheese with the flavors of fall, offering both indulgence and a touch of seasonal warmth. They’re not just simple to make but also a healthier alternative to traditional pumpkin desserts—since they’re no-bake, you can control the sweetness and ingredients. So, grab your mixing bowl, and let’s get started!
Ingredients and Preparation
Before jumping into the fun part, it’s important to gather all the ingredients for this easy no-bake treat. Here’s what you’ll need:
Ingredients:
- 8 oz cream cheese, softened
- ⅓ cup powdered sugar
- ⅔ cup pumpkin puree
- 1 tsp pumpkin pie spice
- 1 ½ cups graham cracker crumbs
- 1 ½ cups gingersnap crumbs
- 12 oz white almond bark (for coating)
- Optional: 1 cup orange candy melts (for drizzle)
Ingredient Substitutes:
- If you don’t have gingersnap crumbs, you can replace them with additional graham cracker crumbs for a milder flavor. Alternatively, a pinch of cinnamon mixed into the graham cracker crumbs can give it a little spice boost.
- You can also swap out the white almond bark for milk or dark chocolate if you prefer a different coating.
- If you can’t find candy melts, you can use colored white chocolate or regular chocolate chips and melt them as an alternative drizzle.
Preparation Tips:
- Make sure the cream cheese is softened before starting the recipe. Softened cream cheese will mix more easily, creating a smooth cheesecake mixture.
- If you’re short on time, place the cream cheese in the microwave for about 10-15 seconds to soften it up.
Step-by-Step Instructions
Now that your ingredients are ready, it’s time to get hands-on! Here’s how to prepare these No Bake Pumpkin Cheesecake Balls in simple, beginner-friendly steps.
1. Prepare the Cheesecake Mixture:
Start by beating the softened cream cheese and powdered sugar together until the mixture is smooth and creamy. You can use a hand mixer or a stand mixer for this step, but a whisk will also do the trick if you don’t have an electric mixer. Once your cream cheese and sugar are well-combined, add in the pumpkin puree and pumpkin pie spice. Mix until fully combined. You should have a thick, creamy, and spiced pumpkin mixture. Tip: Make sure the cream cheese is fully mixed in without lumps. A smooth, creamy consistency is key to the perfect cheesecake filling.
2. Add the Crumbs:
Next, stir in the graham cracker and gingersnap crumbs. You can use a spoon, spatula, or mixer for this step—whichever is easier for you. The crumbs should be fully incorporated into the pumpkin cheesecake mixture, giving it a bit of texture and helping to form the base of the cheesecake balls. If the mixture feels too sticky, add a bit more crumbs until it’s easier to handle. Don’t worry, it will still be smooth and creamy even with the added texture. Tip: If you like a more distinct crunch in your cheesecake balls, you can increase the amount of crumbs to your liking. Just make sure the mixture holds together well when you form the balls.
3. Chill the Mixture:
Once the mixture is combined, transfer it to the refrigerator and chill for at least 2 hours. Chilling helps firm up the mixture, making it easier to roll into balls. The wait may feel like the hardest part of the recipe, but trust us, it’s worth it! Tip: If you’re short on time, you can place the mixture in the freezer for 30 minutes to an hour instead. However, chilling for 2 hours will give the best results.
4. Form the Balls:
After the mixture has chilled, use a spoon or cookie scoop to take small portions of the mixture. Roll them into 1-inch balls with your hands. It’s best to make them uniform in size so they look nice and even, but don’t worry if they’re not perfectly round. Place the balls on a baking sheet lined with parchment paper. Tip: If the mixture is too sticky to roll, wet your hands slightly or dust them with powdered sugar to make the process easier.
5. Chill the Balls:
Now, return the rolled balls to the refrigerator for 30 minutes to firm up even more. This step ensures they hold their shape while being dipped in the almond bark.
6. Coat with Almond Bark:
Melt the white almond bark in the microwave in 30-second intervals, stirring in between to prevent overheating. Once it’s fully melted and smooth, dip each chilled cheesecake ball into the almond bark, coating it completely. Allow any excess almond bark to drip off before setting the coated ball back onto the parchment paper. If you’re using orange candy melts for a festive drizzle, drizzle them over the coated balls at this point. Tip: For a smoother coating, ensure that your cheesecake balls are well-chilled before dipping. This will prevent the coating from melting too quickly.
Beginner Tips and Notes
This section is designed to provide even more guidance for beginners, helping you to avoid common pitfalls and offering practical solutions to ensure the best results.
Troubleshooting:
- The mixture is too sticky: If your cheesecake mixture feels sticky or hard to roll into balls, simply add a few more graham cracker or gingersnap crumbs. This will help thicken it up without compromising the flavor.
- Coating doesn’t stick properly: If the almond bark isn’t sticking well to the balls, it might be because they’re too warm. Make sure the cheesecake balls are fully chilled before dipping to get the best coating results.
Efficiency Tips:
- Prepare in advance: If you want to save time, you can make the mixture a day before and chill it overnight. This will save you a step on the day of serving.
- Quick chilling: If you’re in a rush, you can place the cheesecake balls in the freezer instead of the fridge. Freeze them for about 30 minutes, and they’ll be firm enough to coat.
Coating Options:
If you’d like to experiment with different coatings, here are a few ideas:
- Dark chocolate or milk chocolate: If you prefer a richer coating, dark or milk chocolate are great alternatives to white almond bark. Simply melt them in the microwave, and use them the same way.
- Crushed nuts: For a crunchier texture, consider rolling the balls in crushed nuts such as pecans or walnuts after coating them in the almond bark.
- Sprinkles: For a fun and festive look, roll the cheesecake balls in colorful sprinkles or holiday-themed decorations.
Serving Suggestions
These No Bake Pumpkin Cheesecake Balls are delicious on their own, but they pair well with a variety of fall treats or beverages. Consider serving them with:
- Caramel drizzle or a whipped cream topping to enhance the sweetness.
- A warm cup of spiced chai or pumpkin spice latte for the perfect cozy fall vibe.
- Fresh apple slices or cinnamon rolls for a complementary dessert spread.
Storage: Store these cheesecake balls in an airtight container in the refrigerator for up to 5 days. They can also be frozen for longer storage—simply place the chilled cheesecake balls in a single layer on a baking sheet, freeze until solid, then transfer them to a freezer-safe bag or container. When ready to eat, allow them to thaw in the refrigerator for a few hours.

Conclusion
Making these No Bake Pumpkin Cheesecake Balls is an easy, fun, and delicious way to celebrate the flavors of fall without all the hassle of baking. With their creamy texture, pumpkin spice flavor, and simple preparation, they’re sure to become a favorite in your fall dessert rotation. Whether you’re hosting a gathering, bringing a treat to a party, or just treating yourself to something sweet, these cheesecake balls are a crowd-pleaser. Give them a try and let us know how they turn out—because there’s nothing better than sharing good food with good company!


