I remember making peanut butter balls for the first time as a kid. It was a messy but incredibly fun experience. The combination of creamy peanut butter and sweet chocolate was irresistible. These simple treats were always a hit at family gatherings and school bake sales. This Peanut Butter Balls recipe is perfect for beginner cooks. It requires no baking, minimal ingredients, and is incredibly fun to make. It’s a guaranteed crowd-pleaser and a delightful treat for any occasion. If you’re looking for an easy, indulgent, and classic no-bake dessert, these peanut butter balls are your perfect solution. They offer a delightful balance of creamy, sweet, and rich textures, making them a perfect treat for any gathering. It’s a fantastic addition to your repertoire of quick and easy treats, especially when you’re craving something sweet and satisfying.

Peanut Butter Balls: A Sweet Bite of Nostalgia

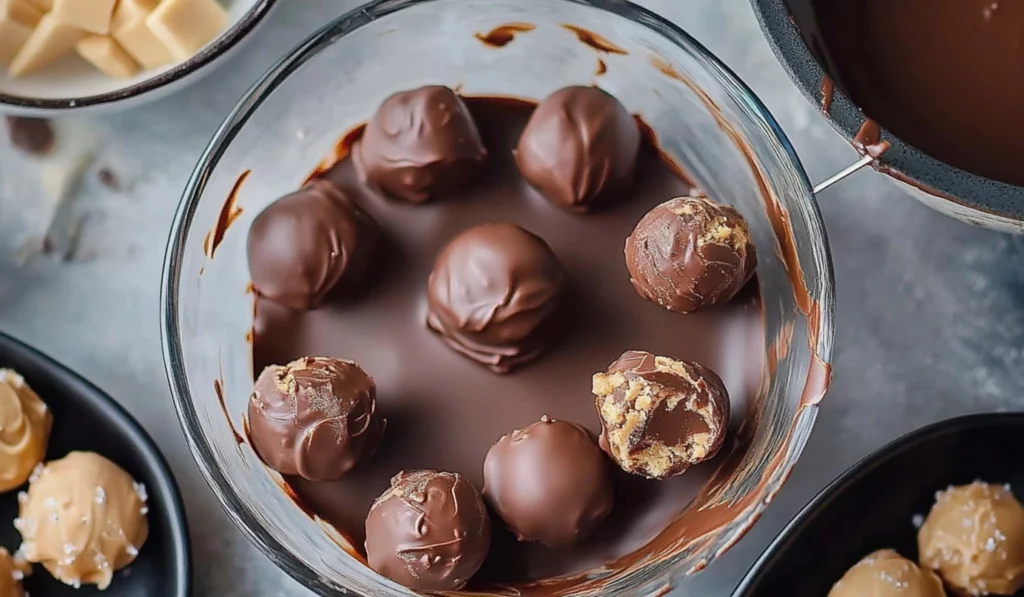
Peanut Butter Balls are a classic no-bake dessert featuring a creamy peanut butter filling coated in chocolate. They’re a simple and delicious treat perfect for beginner cooks.
- Prep Time: 20 minutes
- Cook Time: 0 minutes
- Total Time: 2 hours 20 minutes (including chilling time)
- Yield: 2 dozen 1x
- Category: Dessert
- Method: Mixing, Dipping, Chilling
- Cuisine: American
Ingredients
- 1 cup creamy peanut butter
- 6 tablespoons unsalted butter, softened
- 2 cups powdered sugar
- 16 oz chocolate bark
Instructions
-
Combine Peanut Butter and Butter: In a medium-sized bowl, mix together the creamy peanut butter and softened butter until creamy. Using a medium bowl provides enough space for mixing. Mixing until creamy ensures a smooth base.
-
Add Powdered Sugar: Slowly mix the powdered sugar into the peanut butter mixture. Continue to mix until well combined. It will appear crumbly at first, but keep mixing, and it will come together. Mixing slowly prevents a powdered sugar cloud.
-
Refrigerate the Mixture: Cover the peanut butter mixture in a small bowl and refrigerate for a few hours. Refrigerating allows the mixture to firm up, making it easier to shape. Firming up the mixture is essential for shaping.
-
Shape the Balls: Once ready, scoop 1-inch sized balls, roll them to shape, and place them on a cookie sheet. Using a cookie scoop ensures uniform sizes. Uniform sizes ensure even coating.
-
Freeze the Balls: Place the shaped balls into the freezer while you melt the chocolate. Freezing helps the chocolate set quickly. Freezing speeds up the setting process.
-
Melt the Chocolate: Using the double boiler method, place a heat-safe bowl on top of a saucepan filled with water. Turn the heat to boil and place the chocolate bark into the bowl. Stir the chocolate until completely melted. The double boiler method prevents burning the chocolate. Gentle melting prevents burning.
-
Dip the Balls: Remove the peanut butter balls from the freezer and begin dipping. Stick a toothpick into a ball, dip it into the melted chocolate, and tap your wrist a few times with your other hand to release excess drippage. Using a toothpick allows for easy dipping. Tapping removes excess chocolate.
-
Set the Balls: Drop the coated balls onto a sheet of wax paper and allow the chocolate to harden. Wax paper prevents sticking. Wax paper prevents sticking.
-
Store the Balls: Once hardened, place the balls into a container and store either on the counter or in the refrigerator. Storing properly maintains freshness. Proper storage maintains quality.
Notes
- Use creamy peanut butter; avoid natural oils.
- Freeze balls before dipping for quicker chocolate setting.
- Use a double boiler to prevent burning the chocolate.
- Get creative with chocolate coatings and toppings.
Ingredients and Preparation: Your Peanut Butter Ball Pantry – The Essentials
This Peanut Butter Balls recipe is wonderfully simple, but the quality of the ingredients matters. Remember, the key to stress-free dessert making is having all your ingredients and tools ready before you start assembling. This preparation ensures a smooth and enjoyable process. It also prevents you from forgetting a crucial ingredient mid-assembly.
The Peanut Butter Filling: The Creamy Core – The Heart of the Treat:
- 1 cup creamy peanut butter – Provides the creamy, nutty flavor. Alternatives: Avoid natural peanut butter with oils, as it can make the mixture too oily. You can use a different nut butter, like almond butter, for a variation. Creamy peanut butter ensures a smooth texture.
- 6 tablespoons unsalted butter, softened – Adds richness and binds the mixture. Alternatives: You can use plant-based butter for a dairy-free version. Ensure it is softened for easy mixing. Softened butter blends easily with peanut butter.
- 2 cups powdered sugar – Adds sweetness and structure. Alternatives: There are no direct substitutes for powdered sugar in this recipe. Powdered sugar creates the right consistency.
The Chocolate Coating: The Sweet Shell – The Decadent Finish:
- 16 oz chocolate bark – Provides the chocolate coating. Alternatives: You can use melting chocolate, semi-sweet chocolate chips, or dark chocolate. Choose your preferred chocolate for coating. Chocolate bark melts smoothly.
Step-by-Step Instructions: Your Guide to Peanut Butter Ball Perfection – Easy and Clear
- Combine Peanut Butter and Butter: In a medium-sized bowl, mix together the creamy peanut butter and softened butter until creamy. Using a medium bowl provides enough space for mixing. Mixing until creamy ensures a smooth base.
- Add Powdered Sugar: Slowly mix the powdered sugar into the peanut butter mixture. Continue to mix until well combined. It will appear crumbly at first, but keep mixing, and it will come together. Mixing slowly prevents a powdered sugar cloud.
- Refrigerate the Mixture: Cover the peanut butter mixture in a small bowl and refrigerate for a few hours. Refrigerating allows the mixture to firm up, making it easier to shape. Firming up the mixture is essential for shaping.
- Shape the Balls: Once ready, scoop 1-inch sized balls, roll them to shape, and place them on a cookie sheet. Using a cookie scoop ensures uniform sizes. Uniform sizes ensure even coating.
- Freeze the Balls: Place the shaped balls into the freezer while you melt the chocolate. Freezing helps the chocolate set quickly. Freezing speeds up the setting process.
- Melt the Chocolate: Using the double boiler method, place a heat-safe bowl on top of a saucepan filled with water. Turn the heat to boil and place the chocolate bark into the bowl. Stir the chocolate until completely melted. The double boiler method prevents burning the chocolate. Gentle melting prevents burning.
- Dip the Balls: Remove the peanut butter balls from the freezer and begin dipping. Stick a toothpick into a ball, dip it into the melted chocolate, and tap your wrist a few times with your other hand to release excess drippage. Using a toothpick allows for easy dipping. Tapping removes excess chocolate.
- Set the Balls: Drop the coated balls onto a sheet of wax paper and allow the chocolate to harden. Wax paper prevents sticking. Wax paper prevents sticking.
- Store the Balls: Once hardened, place the balls into a container and store either on the counter or in the refrigerator. Storing properly maintains freshness. Proper storage maintains quality.
Beginner Tips and Notes: Your Kitchen Companion – Helpful Advice and Hacks
- Troubleshooting: Peanut Butter Ball Problems Solved:
- Oily Mixture: Avoid using natural peanut butter with oils. Use creamy peanut butter.
- Crumbly Mixture: Keep mixing the powdered sugar until it comes together. Consistent mixing is key.
- Chocolate Not Melting Smoothly: Ensure the water in the double boiler is simmering, not boiling. Simmering prevents burning.
- Chocolate Not Setting: Freeze the peanut butter balls before dipping. Freezing speeds up setting.
- Prep Efficiency: Time-Saving Strategies:
- Use a Stand Mixer: A stand mixer makes mixing the peanut butter and sugar easier. A stand mixer saves time.
- Use a Cookie Scoop: A cookie scoop ensures uniform sizes. Uniform sizes ensure even coating.
- Melt Chocolate in Batches: Melt smaller batches of chocolate to prevent it from hardening. Small batches prevent hardening.
- Use a Double Boiler Insert: A double boiler insert makes melting chocolate easier. A double boiler insert simplifies melting.
- Tool Substitutions: Making Do with What You Have:
- No Double Boiler: Use a saucepan and a heat-safe bowl. A saucepan and bowl work as alternatives.
- No Cookie Scoop: Use a spoon or your hands to shape the balls. A spoon or hands can shape the balls.
- No Toothpicks: Use skewers or forks for dipping. Skewers or forks work for dipping.
- No Wax Paper: Use parchment paper or a silicone mat. Parchment paper or a silicone mat prevent sticking.
- Flavor Boosters: Adding Your Personal Touch:
- Add Vanilla Extract: A teaspoon of vanilla extract to the peanut butter mixture enhances the flavor. Vanilla extract adds flavor.
- Add Sprinkles: Add sprinkles to the chocolate coating before it hardens. Sprinkles add decoration.
- Use Different Chocolate: Use milk chocolate, dark chocolate, or white chocolate. Different chocolates add variety.
- Add Sea Salt: Sprinkle sea salt on top of the chocolate coating. Sea salt adds a salty-sweet balance.
Serving Suggestions: Elevating Your Peanut Butter Ball Experience
These Peanut Butter Balls are a delightful treat on their own, but you can enhance the experience with complementary sides and toppings.
- Sides: A Perfect Pairing:
- Milk: Serve with a glass of cold milk. Milk complements the sweetness.
- Coffee: Serve with a cup of coffee. Coffee balances the sweetness.
- Ice Cream: Serve alongside a scoop of vanilla ice cream. Ice cream adds creaminess.
- Fruit: Serve with fresh berries or sliced fruit. Fruit adds a refreshing contrast.
- Toppings: A Flavor Boost:
- Chocolate Drizzle: Drizzle with white chocolate or dark chocolate. Drizzle adds visual appeal.
- Caramel Drizzle: Drizzle with caramel sauce. Caramel sauce adds sweetness.
- Crushed Nuts: Sprinkle with crushed nuts. Nuts add texture.
- Coconut Flakes: Sprinkle with coconut flakes. Coconut flakes add texture and flavor.
- Storage: Keeping Leftovers Fresh:
- Refrigerate: Store leftover peanut butter balls in an airtight container in the refrigerator for up to a week. Refrigeration extends shelf life.
- Freeze: Freeze peanut butter balls in an airtight container for up to three months. Freezing extends shelf life.
- Room Temperature: Store at room temperature in an airtight container for a few days. Room temperature storage is suitable for short periods.

A Sweet Ending: Sharing the Joy of Peanut Butter Balls
These Peanut Butter Balls are a testament to how easy and delicious a homemade treat can be. They’re perfect for parties, holidays, or any time you want a sweet treat. So, gather your ingredients, follow the instructions, and get ready to enjoy these creamy, chocolatey delights! Don’t be afraid to experiment with different variations and add your personal touch. And most importantly, have fun! We’d love to see your Peanut Butter Ball creations! Share your photos and any variations you try in the comments below. Happy treat making!
What other quick, easy, and flavorful desserts would you like to see us explore? Are you interested in learning more about different dessert techniques or perhaps mastering other culinary skills? Let us know in the comments! We’re here to support you on your culinary journey, one delicious bite at a time. We can’t wait to hear about your culinary triumphs! Share your photos and tag us in your creations – we’re excited to see what you make! We’re confident that this recipe will become a regular part of your dessert repertoire. It’s a guaranteed way to bring some sweet, creamy, and chocolatey goodness to your table. Enjoy! And remember, dessert making doesn’t have to be complicated or intimidating. With a little planning and the right recipes, you can create delicious and impressive desserts that everyone will love. These Peanut Butter Balls are a perfect example of that. So, get in the kitchen, get creative, and get ready to impress your friends and family (and yourself!) with your dessert skills! You’ve got this! This is a great recipe for anyone looking for quick and healthy meals, especially when you need a little sweet treat.


