Peppermint Meringues are one of those irresistible treats that can take your baking to a whole new level, bringing a festive, minty touch to your cookie trays and dessert tables. Whether you’re preparing them as a gift for someone special, for a holiday celebration, or simply for a quiet evening treat, these meringues are a must-try. Their melt-in-your-mouth texture and refreshing peppermint flavor make them a crowd-pleaser, and best of all, they are incredibly easy to make, budget-friendly, and versatile enough to suit many occasions.
PrintPeppermint Meringues: A Sweet Delight for the Holidays and Beyond

Peppermint Meringues are one of those irresistible treats that can take your baking to a whole new level, bringing a festive, minty touch to your cookie trays and dessert tables. Whether you’re preparing them as a gift for someone special, for a holiday celebration, or simply for a quiet evening treat, these meringues are a must-try. Their melt-in-your-mouth texture and refreshing peppermint flavor make them a crowd-pleaser, and best of all, they are incredibly easy to make, budget-friendly, and versatile enough to suit many occasions.
- Prep Time: 15 minutes
- Cook Time: 1 hour 30 minutes
- Total Time: 2 hours 45 minutes
- Yield: 36 cookies 1x
- Category: Dessert
- Method: Baking
- Cuisine: American
- Diet: Vegetarian
Ingredients
- 2 large egg whites
- ⅛ teaspoon salt
- ⅛ teaspoon cream of tartar
- ½ cup sugar
- 2 peppermint candy canes (crushed)
Instructions
- Prepare Your Oven and Baking Sheets: Start by preheating your oven to a low temperature—225°F (107°C). This is essential for baking meringues, as they need a slow and gentle cooking process to dry out and become crisp without browning. While the oven heats up, line your baking sheets with foil. This makes for easy cleanup later and ensures the meringues don’t stick to the surface.
- Beat the Egg Whites: In a large mixing bowl, use either a hand mixer or a stand mixer to beat the egg whites on a low speed until they start to foam up. You’ll notice that the egg whites begin to bubble and increase in volume at this stage. It’s crucial that the egg whites are clean and free of any yolk, as even a small amount of fat can affect the meringue’s texture. If your egg whites aren’t foamy after a few minutes, try giving your mixing bowl and whisk attachment a quick wash and dry to eliminate any grease.
- Add Salt and Cream of Tartar: Once the egg whites have become foamy, sprinkle in the salt and cream of tartar. These two ingredients serve as stabilizers for the egg whites. Cream of tartar, in particular, helps the egg whites hold their shape and creates a smooth texture in the final meringue. Continue beating the egg whites on medium speed until soft peaks form. Soft peaks mean that when you lift the beaters out of the mixture, the peaks should bend over gently.
- Gradually Add Sugar: Once the soft peaks have formed, it’s time to add the sugar. This step is key for achieving the right texture in your meringues. Add the sugar gradually, about one tablespoon at a time, while continuing to beat the egg whites. Be patient during this step—if you add the sugar too quickly, it might not dissolve properly, which could result in grainy meringues. After all the sugar has been incorporated, continue to beat the mixture on high speed until stiff peaks form. This typically takes about 7-8 minutes. When the meringue is ready, it should be glossy and firm, standing tall when you lift the beaters out of the bowl.
- Fold in the Crushed Peppermint Candy Canes: Now that your meringue is ready, it’s time to add the crushed peppermint candy canes. Gently fold the crushed candy into the meringue using a spatula. This adds a delightful peppermint flavor and gives the meringues a touch of crunch. Be careful not to deflate the meringue by over-mixing. The crushed candy should be evenly distributed, but you don’t want to lose the lightness of the meringue.
- Shape and Bake the Meringues: Using a spoon or small cookie scoop, drop teaspoon-sized portions of the meringue onto the prepared baking sheets. Space the meringues about an inch apart. Meringues don’t spread much during baking, so you don’t need to worry too much about spacing them out. If you want more uniform shapes, you can use a piping bag to pipe the meringue onto the sheets.
- Bake the Meringues: Place the baking sheets in the preheated oven and bake for 90 minutes. This long, slow baking time is crucial for achieving that perfect meringue texture. The meringues should remain white and not brown. Once they’ve baked for 90 minutes, turn off the oven and leave the meringues inside with the oven door slightly ajar. This cooling process allows them to set properly and helps prevent cracks from forming.
- Cool and Store: Let the meringues cool completely in the oven for at least an hour. Once they’ve cooled, remove them from the oven and store them in an airtight container. They can be kept at room temperature for up to a week, and their light, crisp texture will remain intact. For longer storage, you can freeze them, though they’re best enjoyed fresh.
Notes
- Egg White Quality: It’s important to use fresh, room-temperature egg whites for the best results. Cold egg whites can be harder to whip into stiff peaks, so leave them out for about 30 minutes before starting. If you have any trouble, you can place the bowl over warm water to help the egg whites along.
- Sugar Substitutes: If you’re looking for a lower-sugar alternative, you can experiment with natural sweeteners like stevia or monk fruit. However, keep in mind that these alternatives may affect the final texture of the meringue. Traditional sugar is recommended for the best results.
- Flavor Variations: While peppermint is the classic flavor for these meringues, you can try experimenting with other extracts. For instance, vanilla, almond, or even chocolate mint extracts can offer a new twist on this recipe. You could also swap the crushed peppermint candy canes for chocolate chips or finely chopped nuts for a different flavor profile.
- Add-ins: You can make these meringues your own by adding a variety of mix-ins. Mini chocolate chips, crushed toffee bits, or even a few drops of food coloring for a fun, colorful twist can all be incorporated into the meringue before baking.
- Serving Suggestions: These Peppermint Meringues make the perfect addition to a holiday dessert spread or cookie exchange. Pair them with hot chocolate or coffee for a delightful snack. They also make an excellent gift when placed in a decorative box or tin.
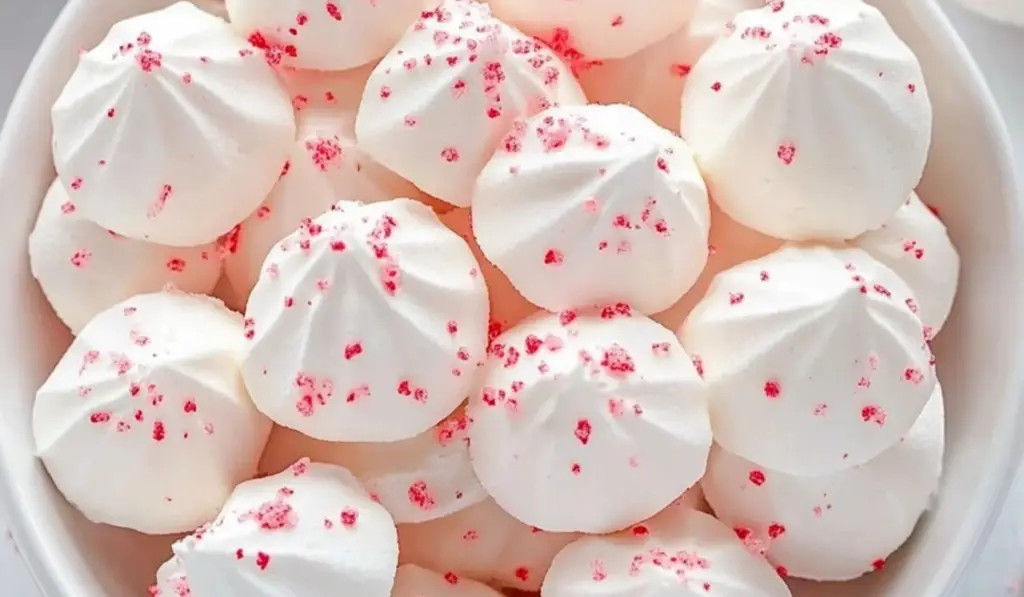
What sets these Peppermint Meringues apart is their delicate texture. They are crisp on the outside but soft and slightly chewy on the inside, offering the perfect balance of sweetness and minty freshness. This texture is achieved through a simple yet important technique that many bakers have perfected over time—whipping egg whites to stiff peaks and baking them slowly in a low-temperature oven. The result is a light and airy meringue that holds its shape and flavor, even days after baking.
Ingredients
Creating these Peppermint Meringues requires just a few basic ingredients that are typically easy to find in your pantry or local store. Here is a clear breakdown of what you’ll need for a batch of 36 delicious cookies:
- 2 large egg whites
- ⅛ teaspoon salt
- ⅛ teaspoon cream of tartar
- ½ cup sugar
- 2 peppermint candy canes (crushed)
These ingredients are all essential for creating the right texture and flavor. The egg whites are the star ingredient, providing the structure needed for the meringue. The salt and cream of tartar are added to stabilize the egg whites, helping them achieve stiff peaks. Sugar is added gradually to sweeten the meringue and allow it to form that signature crispness. Finally, the crushed peppermint candy canes are sprinkled in at the end to give the meringues their refreshing minty flavor and a bit of crunch.
Step-by-Step Instructions
To make these Peppermint Meringues, follow the step-by-step instructions below to create a batch that will impress your family and friends. This process is simple but requires a little patience, as meringues are all about achieving the perfect texture. But don’t worry—once you get the hang of it, you’ll be making these delicious treats in no time.
- Prepare Your Oven and Baking Sheets: Start by preheating your oven to a low temperature—225°F (107°C). This is essential for baking meringues, as they need a slow and gentle cooking process to dry out and become crisp without browning. While the oven heats up, line your baking sheets with foil. This makes for easy cleanup later and ensures the meringues don’t stick to the surface.
- Beat the Egg Whites: In a large mixing bowl, use either a hand mixer or a stand mixer to beat the egg whites on a low speed until they start to foam up. You’ll notice that the egg whites begin to bubble and increase in volume at this stage. It’s crucial that the egg whites are clean and free of any yolk, as even a small amount of fat can affect the meringue’s texture. If your egg whites aren’t foamy after a few minutes, try giving your mixing bowl and whisk attachment a quick wash and dry to eliminate any grease.
- Add Salt and Cream of Tartar: Once the egg whites have become foamy, sprinkle in the salt and cream of tartar. These two ingredients serve as stabilizers for the egg whites. Cream of tartar, in particular, helps the egg whites hold their shape and creates a smooth texture in the final meringue. Continue beating the egg whites on medium speed until soft peaks form. Soft peaks mean that when you lift the beaters out of the mixture, the peaks should bend over gently.
- Gradually Add Sugar: Once the soft peaks have formed, it’s time to add the sugar. This step is key for achieving the right texture in your meringues. Add the sugar gradually, about one tablespoon at a time, while continuing to beat the egg whites. Be patient during this step—if you add the sugar too quickly, it might not dissolve properly, which could result in grainy meringues. After all the sugar has been incorporated, continue to beat the mixture on high speed until stiff peaks form. This typically takes about 7-8 minutes. When the meringue is ready, it should be glossy and firm, standing tall when you lift the beaters out of the bowl.
- Fold in the Crushed Peppermint Candy Canes: Now that your meringue is ready, it’s time to add the crushed peppermint candy canes. Gently fold the crushed candy into the meringue using a spatula. This adds a delightful peppermint flavor and gives the meringues a touch of crunch. Be careful not to deflate the meringue by over-mixing. The crushed candy should be evenly distributed, but you don’t want to lose the lightness of the meringue.
- Shape and Bake the Meringues: Using a spoon or small cookie scoop, drop teaspoon-sized portions of the meringue onto the prepared baking sheets. Space the meringues about an inch apart. Meringues don’t spread much during baking, so you don’t need to worry too much about spacing them out. If you want more uniform shapes, you can use a piping bag to pipe the meringue onto the sheets.
- Bake the Meringues: Place the baking sheets in the preheated oven and bake for 90 minutes. This long, slow baking time is crucial for achieving that perfect meringue texture. The meringues should remain white and not brown. Once they’ve baked for 90 minutes, turn off the oven and leave the meringues inside with the oven door slightly ajar. This cooling process allows them to set properly and helps prevent cracks from forming.
- Cool and Store: Let the meringues cool completely in the oven for at least an hour. Once they’ve cooled, remove them from the oven and store them in an airtight container. They can be kept at room temperature for up to a week, and their light, crisp texture will remain intact. For longer storage, you can freeze them, though they’re best enjoyed fresh.
Flavor, Texture, and Aroma
When you bite into a Peppermint Meringue, you’re greeted with a satisfying crunch that quickly gives way to a light and airy interior. The peppermint flavor is subtle yet refreshing, offering a perfect balance with the sweetness of the meringue. The crushed candy canes add a nice contrast in texture, giving the meringues an extra layer of crunch and reinforcing the peppermint flavor. The overall experience is a wonderful combination of lightness, crispness, and minty freshness.
The aroma that fills the kitchen as these meringues bake is one of the best parts of the experience. The sweet scent of sugar and the cool, comforting aroma of peppermint waft through the air, making it hard to resist stealing a taste before the cookies are even fully cooled. The baking process itself is a reminder of the holidays, evoking memories of warm kitchens and festive celebrations.
Tips and Variations
- Egg White Quality: It’s important to use fresh, room-temperature egg whites for the best results. Cold egg whites can be harder to whip into stiff peaks, so leave them out for about 30 minutes before starting. If you have any trouble, you can place the bowl over warm water to help the egg whites along.
- Sugar Substitutes: If you’re looking for a lower-sugar alternative, you can experiment with natural sweeteners like stevia or monk fruit. However, keep in mind that these alternatives may affect the final texture of the meringue. Traditional sugar is recommended for the best results.
- Flavor Variations: While peppermint is the classic flavor for these meringues, you can try experimenting with other extracts. For instance, vanilla, almond, or even chocolate mint extracts can offer a new twist on this recipe. You could also swap the crushed peppermint candy canes for chocolate chips or finely chopped nuts for a different flavor profile.
- Add-ins: You can make these meringues your own by adding a variety of mix-ins. Mini chocolate chips, crushed toffee bits, or even a few drops of food coloring for a fun, colorful twist can all be incorporated into the meringue before baking.
- Serving Suggestions: These Peppermint Meringues make the perfect addition to a holiday dessert spread or cookie exchange. Pair them with hot chocolate or coffee for a delightful snack. They also make an excellent gift when placed in a decorative box or tin.

Why You Should Try These Peppermint Meringues
These Peppermint Meringues are a perfect treat for anyone looking for a light, sweet dessert with a refreshing twist. Whether you’re baking for yourself or sharing with friends and family, these cookies are a great way to bring some extra holiday cheer into your kitchen. With simple ingredients, easy-to-follow steps, and a delightful final product, these meringues are a baking success story waiting to happen. So, grab your mixing bowl, preheat your oven, and enjoy the process of making these sweet, minty treats that will surely become a holiday favorite.


