Valentine’s Day is just around the corner, and if you’re looking for a sweet, simple, and utterly delightful dessert to impress someone special (or just to treat yourself), look no further than these irresistible Red Velvet Truffles. Red velvet cake is a classic, and when transformed into little bite-sized truffles, it’s a game-changer. These soft, creamy, and decadent truffles are made with a few ingredients and are perfect for anyone, whether you’re a seasoned baker or a beginner looking for an easy dessert to make. Trust me, these little beauties will melt in your mouth and leave everyone asking for more!
Red Velvet Truffles: The Perfect Valentine’s Day Treat for Beginners
Red Velvet Truffles are the perfect treat to satisfy any sweet craving. With just a few simple ingredients—red velvet cake mix, cream cheese, and white chocolate—you can create these decadent, bite-sized delights. Ideal for beginners, this easy recipe is a crowd-pleaser for any occasion, from Valentine’s Day to a casual dessert night. Simple to make and even easier to enjoy, these truffles are sure to impress!
- Prep Time: 35 minutes
- Cook Time: 30 minutes
- Total Time: 1 hour 5 minutes
- Yield: 40 truffles 1x
- Category: Dessert
- Method: No-Bake
- Cuisine: American
- Diet: Vegetarian
Ingredients
- 1 box of red velvet cake mix (and ingredients listed on the box to prepare the cake)
- 8 oz cream cheese, softened (the cream cheese gives the truffles their rich, creamy texture)
- 16 oz white chocolate (for coating the truffles)
- 2 oz dark or semi-sweet chocolate (to pipe over the truffles for that finishing touch)
Instructions
- Prepare the Red Velvet Cake: Start by preparing the red velvet cake according to the package instructions. You’ll need the cake mix, eggs, oil, and water as per the directions on the box. Once your cake is baked, let it cool completely before proceeding. It’s important to let the cake cool fully to ensure your truffles hold their shape when rolled. While the cake cools, you can gather and prepare the other ingredients.
- Crumble the Cake: Once the cake has cooled, place it in a large mixing bowl and gently crumble it with your fingers. You want small, fine crumbs, so the texture will be perfect for mixing with the cream cheese. Don’t worry about making perfect crumbs; they don’t need to be uniform in size as long as they’re small enough to easily mix with the cream cheese.
- Add the Cream Cheese: Now, take your softened cream cheese and add it to the crumbled cake. Using your hands (yes, it’s a little messy, but trust me, it’s worth it), gently knead the mixture together until the cream cheese is fully incorporated into the cake crumbs. This step is key to making the truffles moist and creamy. You may want to take your time with this and make sure everything is evenly mixed. If the mixture feels too sticky, you can chill it for about 10-15 minutes to make it easier to handle.
- Shape the Truffles: Scoop out about one heaping tablespoon of the mixture and roll it into a ball. Place the ball on a baking sheet lined with parchment paper. Continue rolling the mixture until you have about 35-40 truffles. If the mixture feels too sticky, you can chill it in the fridge for about 10 minutes to make it easier to handle. It’s important to ensure the balls are evenly sized so they all chill and coat evenly in the chocolate.
- Chill the Truffles: Place the truffle balls in the fridge to chill for at least 30 minutes. This will help them firm up, making them easier to dip in chocolate later. The chilling process is crucial for ensuring the truffles hold their shape and don’t fall apart when you coat them with the chocolate.
- Melt the White Chocolate: While the truffles chill, melt the white chocolate in a microwave-safe bowl. Heat in short intervals, stirring in between, to ensure it doesn’t burn. White chocolate can be a little tricky to melt because it burns easily, so keep an eye on it. Once melted, remove the truffles from the fridge.
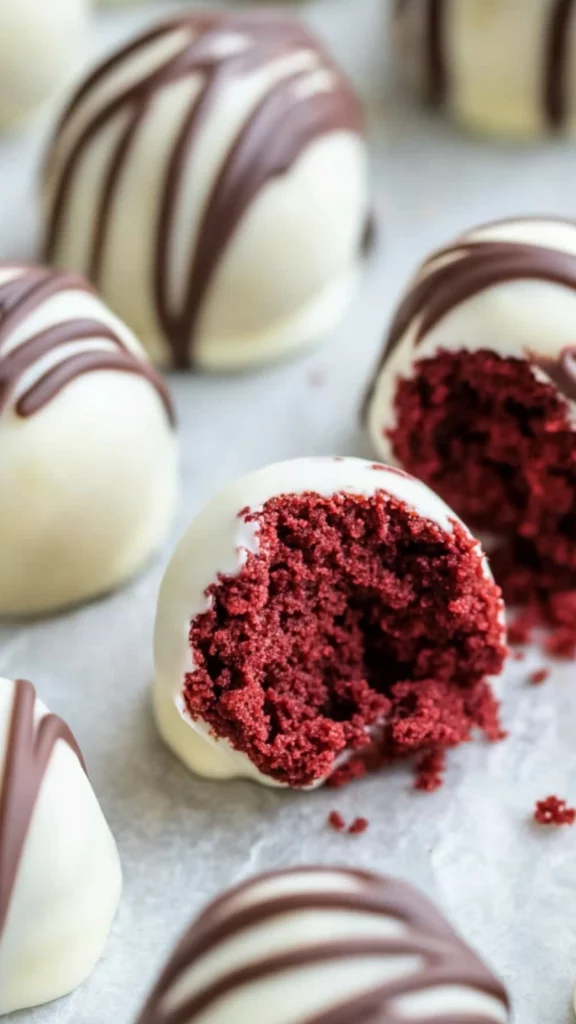
- Dip the Truffles in White Chocolate: Use a fork to dip each truffle into the melted white chocolate. Gently roll the truffle to ensure it is fully coated, then tap the fork against the side of the bowl to remove excess chocolate. Carefully place the truffle back on the parchment paper. Repeat with the remaining truffles. You can coat the truffles twice for a thicker chocolate layer if you prefer. Just be sure to let the first layer set before applying the second.
- Pipe Dark Chocolate Over the Truffles: Melt the dark chocolate and transfer it to a small piping bag or plastic sandwich bag. Snip off the tip of the bag and pipe the dark chocolate in a decorative pattern over each white-chocolate-coated truffle. This adds a lovely touch of flavor and visual appeal. You can be as creative as you like with the piping, making simple zigzags, drizzles, or even hearts for a fun Valentine’s Day look.
- Chill Again: Place the truffles back in the fridge for another 30 minutes to allow the chocolate coating to set and firm up. This will make them easier to handle and ensure the chocolate stays solid when you serve them.
- Serve and Enjoy: Once the chocolate has set, your Red Velvet Truffles are ready to serve! These truffles are as decadent as they are delicious, and they make a stunning addition to any dessert table. Store them in the fridge to keep them fresh. These truffles will stay good for about a week, but I bet they won’t last that long!
Notes
- Troubleshooting: If your truffles are too soft to handle when rolling, don’t panic! Just pop the mixture in the fridge for a few more minutes to firm it up before you continue. If they still don’t hold their shape, it might be a sign that the cream cheese wasn’t fully incorporated or that the cake wasn’t crumbled fine enough.
- Efficient Prep: To save time, you can prepare the cake the day before, crumble it, and refrigerate it overnight. This will make the truffle assembly go much faster and give you more flexibility in your baking schedule.
- Melting Chocolate: When melting your chocolate, be sure to do it in small bursts of 20-30 seconds in the microwave, stirring each time. This ensures that the chocolate doesn’t burn and stays smooth and glossy for dipping.
- Substitute Tools: If you don’t have a piping bag, a plastic sandwich bag works just as well. Just make sure to snip off a tiny corner for a controlled flow of chocolate.
I’ll never forget the first time I made these Red Velvet Truffles. It was a couple of years ago, right before Valentine’s Day. I was looking for a fun and easy dessert to bring to a gathering. I wanted something that was both elegant and delicious but didn’t require me to spend hours in the kitchen. When I stumbled across this recipe, I was sold immediately. The simplicity of the ingredients and the fact that I could make them ahead of time made this treat a no-brainer. Once they were finished, I couldn’t resist sneaking a taste. Let me tell you, I was hooked instantly. The white chocolate coating paired with the rich red velvet cake filling was just perfect. Not only were they a hit with my guests, but they quickly became a staple in my dessert repertoire. I’ve made them countless times since, for Valentine’s Day, birthday parties, and even for a random Friday night when I just want a little treat to indulge in.
This recipe is not just for seasoned bakers—it’s ideal for beginners, too. You don’t need a lot of fancy tools or complicated techniques, just a few basic ingredients and a little patience. In about 35 minutes, you can have 40 mouthwatering red velvet truffles ready to go. Plus, they’re a hit for any occasion, whether you’re preparing them for a romantic evening, a holiday celebration, or a sweet treat for your family.
Ingredients and Preparation: Keeping It Simple Yet Delicious
Let’s talk about the ingredients—these Red Velvet Truffles come together using a box of red velvet cake mix, a few extra items to prepare the cake, and a couple of chocolates that make the truffles truly irresistible. Here’s what you’ll need:
- 1 box of red velvet cake mix (and ingredients listed on the box to prepare the cake)
- 8 oz cream cheese, softened (the cream cheese gives the truffles their rich, creamy texture)
- 16 oz white chocolate (for coating the truffles)
- 2 oz dark or semi-sweet chocolate (to pipe over the truffles for that finishing touch)
Alternative Ingredient Suggestions:
If you don’t have cream cheese on hand or want a lighter alternative, you can substitute with a bit of Greek yogurt for a tangy twist. It won’t be quite as creamy, but it will still taste delicious and add a bit of extra tang that balances out the sweetness of the truffles.
For the white chocolate, feel free to use any type of chocolate you prefer—dark, milk, or even a combination of white and milk chocolate to customize the flavor. If you like a little extra bitterness to complement the sweetness of the red velvet, dark chocolate will add the perfect contrast.
If you don’t want to use store-bought cake mix, you can also make your red velvet cake from scratch. You can find recipes for homemade red velvet cake online, and the process is quite similar—just ensure you prepare enough cake to make about 40 truffles.
Dark chocolate can be substituted with semi-sweet chocolate if you want a slightly sweeter finish to your truffles. Semi-sweet chocolate will give you that perfect balance between the richness of dark chocolate and the sweetness of milk chocolate.
Step-by-Step Instructions: Easy, Fun, and Beginner-Friendly
Let’s break down this process into simple steps that are easy to follow. You’ll be making these truffles in no time, and before you know it, you’ll have a tray of truffles that are as gorgeous as they are delicious.
- Prepare the Red Velvet Cake: Start by preparing the red velvet cake according to the package instructions. You’ll need the cake mix, eggs, oil, and water as per the directions on the box. Once your cake is baked, let it cool completely before proceeding. It’s important to let the cake cool fully to ensure your truffles hold their shape when rolled. While the cake cools, you can gather and prepare the other ingredients.
- Crumble the Cake: Once the cake has cooled, place it in a large mixing bowl and gently crumble it with your fingers. You want small, fine crumbs, so the texture will be perfect for mixing with the cream cheese. Don’t worry about making perfect crumbs; they don’t need to be uniform in size as long as they’re small enough to easily mix with the cream cheese.
- Add the Cream Cheese: Now, take your softened cream cheese and add it to the crumbled cake. Using your hands (yes, it’s a little messy, but trust me, it’s worth it), gently knead the mixture together until the cream cheese is fully incorporated into the cake crumbs. This step is key to making the truffles moist and creamy. You may want to take your time with this and make sure everything is evenly mixed. If the mixture feels too sticky, you can chill it for about 10-15 minutes to make it easier to handle.
- Shape the Truffles: Scoop out about one heaping tablespoon of the mixture and roll it into a ball. Place the ball on a baking sheet lined with parchment paper. Continue rolling the mixture until you have about 35-40 truffles. If the mixture feels too sticky, you can chill it in the fridge for about 10 minutes to make it easier to handle. It’s important to ensure the balls are evenly sized so they all chill and coat evenly in the chocolate.
- Chill the Truffles: Place the truffle balls in the fridge to chill for at least 30 minutes. This will help them firm up, making them easier to dip in chocolate later. The chilling process is crucial for ensuring the truffles hold their shape and don’t fall apart when you coat them with the chocolate.
- Melt the White Chocolate: While the truffles chill, melt the white chocolate in a microwave-safe bowl. Heat in short intervals, stirring in between, to ensure it doesn’t burn. White chocolate can be a little tricky to melt because it burns easily, so keep an eye on it. Once melted, remove the truffles from the fridge.
- Dip the Truffles in White Chocolate: Use a fork to dip each truffle into the melted white chocolate. Gently roll the truffle to ensure it is fully coated, then tap the fork against the side of the bowl to remove excess chocolate. Carefully place the truffle back on the parchment paper. Repeat with the remaining truffles. You can coat the truffles twice for a thicker chocolate layer if you prefer. Just be sure to let the first layer set before applying the second.
- Pipe Dark Chocolate Over the Truffles: Melt the dark chocolate and transfer it to a small piping bag or plastic sandwich bag. Snip off the tip of the bag and pipe the dark chocolate in a decorative pattern over each white-chocolate-coated truffle. This adds a lovely touch of flavor and visual appeal. You can be as creative as you like with the piping, making simple zigzags, drizzles, or even hearts for a fun Valentine’s Day look.
- Chill Again: Place the truffles back in the fridge for another 30 minutes to allow the chocolate coating to set and firm up. This will make them easier to handle and ensure the chocolate stays solid when you serve them.
- Serve and Enjoy: Once the chocolate has set, your Red Velvet Truffles are ready to serve! These truffles are as decadent as they are delicious, and they make a stunning addition to any dessert table. Store them in the fridge to keep them fresh. These truffles will stay good for about a week, but I bet they won’t last that long!
Beginner Tips and Notes:
- Troubleshooting: If your truffles are too soft to handle when rolling, don’t panic! Just pop the mixture in the fridge for a few more minutes to firm it up before you continue. If they still don’t hold their shape, it might be a sign that the cream cheese wasn’t fully incorporated or that the cake wasn’t crumbled fine enough.
- Efficient Prep: To save time, you can prepare the cake the day before, crumble it, and refrigerate it overnight. This will make the truffle assembly go much faster and give you more flexibility in your baking schedule.
- Melting Chocolate: When melting your chocolate, be sure to do it in small bursts of 20-30 seconds in the microwave, stirring each time. This ensures that the chocolate doesn’t burn and stays smooth and glossy for dipping.
- Substitute Tools: If you don’t have a piping bag, a plastic sandwich bag works just as well. Just make sure to snip off a tiny corner for a controlled flow of chocolate.
Serving Suggestions:
These Red Velvet Truffles are perfect for serving at parties, holiday gatherings, or as a sweet surprise for someone you love. Pair them with a nice cup of coffee or hot chocolate for a cozy treat. For a little extra flair, try garnishing them with edible gold dust or sprinkles to make them extra festive.
You can also serve these truffles alongside other Valentine’s Day-themed treats like heart-shaped cookies, chocolate-dipped strawberries, or a rich, creamy cheesecake. The bright red color of the red velvet truffles will make them stand out on any dessert table.
Storage Tips:
Keep your truffles stored in an airtight container in the fridge. They’ll stay fresh for up to a week, though they are so delicious, they probably won’t last that long! You can also freeze the truffles for up to a month. Just make sure they are tightly sealed, and thaw them in the fridge before serving. Freezing the truffles is a great way to prep them in advance for a special occasion.

Conclusion:
I hope this Red Velvet Truffles recipe inspires you to get in the kitchen and make a batch for yourself or your loved ones. With its simple ingredients, easy-to-follow instructions, and elegant result, this is the perfect beginner-friendly treat. Whether you’re celebrating Valentine’s Day, a birthday, or just want to indulge in something sweet, these truffles are sure to win hearts. Try it today and let me know how your truffles turn out! I’d love to hear about your experiences in the comments. Happy baking!