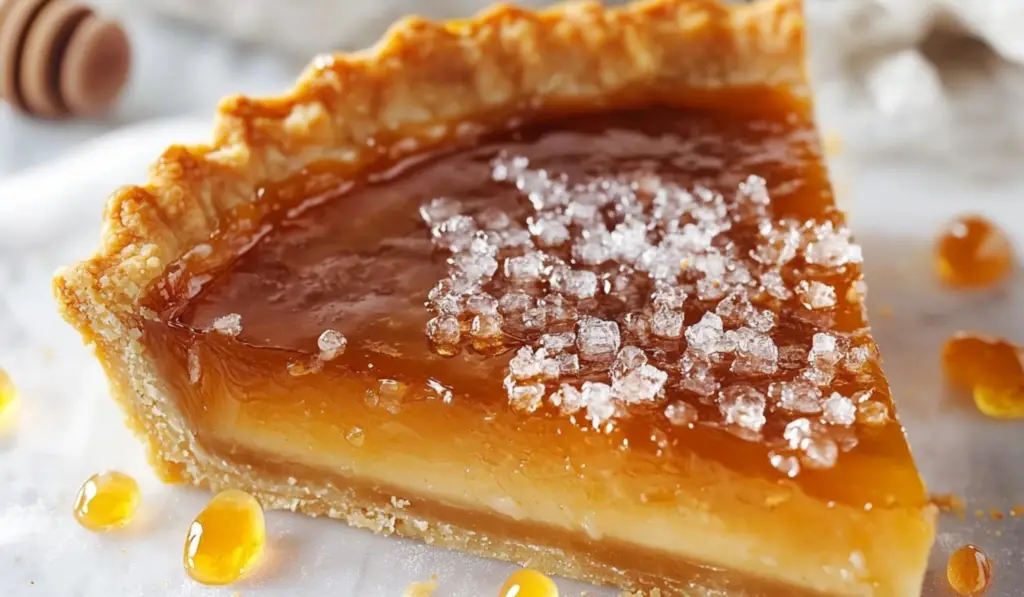
There are certain desserts that manage to combine simplicity and complexity in a way that delights every single sense. Salted Honey Pie is one of those rare treasures. This pie brings together the natural sweetness of honey, the rich creaminess of a custard filling, and the perfect sprinkle of sea salt that adds a contrasting kick to every bite. Each slice is a little piece of heaven—a perfect balance between sweet and savory. With its smooth texture, golden hue, and a delicate touch of flaky salt, Salted Honey Pie is sure to become your new favorite dessert.

Salted Honey Pie: A Perfect Harmony of Sweet and Salty Bliss

There are certain desserts that manage to combine simplicity and complexity in a way that delights every single sense. Salted Honey Pie is one of those rare treasures. This pie brings together the natural sweetness of honey, the rich creaminess of a custard filling, and the perfect sprinkle of sea salt that adds a contrasting kick to every bite. Each slice is a little piece of heaven—a perfect balance between sweet and savory. With its smooth texture, golden hue, and a delicate touch of flaky salt, Salted Honey Pie is sure to become your new favorite dessert.
- Prep Time: 35 minutes
- Cook Time: 40 minutes
- Total Time: 1 hour 15 minutes
- Yield: 8–10 slices 1x
- Category: Dessert
- Method: Oven
- Cuisine: American
- Diet: Vegetarian
Ingredients
- Pie crust, refrigerated or homemade
- 4 large egg yolks, lightly beaten
- 2 1/2 cups (600ml) heavy whipping cream
- 2/3 cup (150g) packed light brown sugar
- 1/3 cup (45g) cornstarch, sifted
- 1/2 tsp salt
- 1/2 cup (120ml) honey
- 2 tsp vanilla extract
- Flaky sea salt (for sprinkling)
Instructions
- Prepare the Pie Crust:
Begin by preparing your pie crust. Whether you are using a store-bought refrigerated crust or making your own from scratch, ensure that it fits into a deep-dish 8-inch pie pan (or a 9-inch pan if you prefer). Press the crust gently into the pan, making sure it fits snugly around the edges. Once the crust is in place, refrigerate it for at least 15 minutes before baking. This chilling process helps to prevent the crust from shrinking when baking. If you opt for a homemade pie crust, you can prepare it ahead of time and chill it while you prepare the filling. - Preheat the Oven:
Set your oven to preheat at 375°F (190°C). This ensures that the oven is fully heated when you place your pie inside, allowing the custard to bake evenly while giving the crust a golden, flaky texture. The combination of the hot oven and the chilled pie crust helps the dessert bake to perfection. - Prepare the Egg Yolks:
In a large mixing bowl, lightly beat the four large egg yolks. This is a crucial step, as the egg yolks will act as the base for the custard filling, contributing to its rich, creamy texture. Be sure to beat them until they are smooth and well-combined, without over-beating them. Once prepared, set them aside for later use. - Make the Custard Filling:
Now it’s time to create the custard filling that makes Salted Honey Pie so irresistible. In a medium saucepan, combine the 2 1/2 cups of heavy whipping cream, 2/3 cup of packed light brown sugar, 1/3 cup of sifted cornstarch, and 1/2 teaspoon of salt. Place the saucepan over medium heat and begin stirring the mixture continuously. As the ingredients heat up, they will slowly begin to thicken. Keep an eye on it, making sure it doesn’t scorch or burn, and continue stirring until the mixture comes to a rolling boil. Once it starts to bubble, you’ll notice it thickening to a custard-like consistency. - Temper the Eggs:
Once the cream mixture has come to a boil, it’s time to temper the eggs. This is an important step to prevent the egg yolks from curdling when they are added to the hot cream mixture. Start by taking a small amount of the hot cream mixture and slowly whisk it into the egg yolks. Add a little more at a time, whisking constantly to prevent the eggs from cooking too quickly. Once the egg yolks have been tempered and warmed up with the cream, slowly pour them back into the saucepan with the rest of the cream mixture. Continue stirring until the mixture is smooth and well-combined. This ensures that the filling will be silky and smooth once it bakes. - Add Honey and Vanilla:
Now that the egg mixture is fully incorporated with the cream, it’s time to add the honey and vanilla extract. Pour in the 1/2 cup of honey and stir to combine. The honey adds a floral sweetness that pairs beautifully with the brown sugar and custard. Then, add the 2 teaspoons of vanilla extract, which deepens the flavor of the custard and adds a comforting aroma. Stir until the mixture is evenly blended, and the custard should now have a smooth, rich consistency. - Fill the Pie Crust:
Pour the prepared custard mixture into the chilled pie crust. As you pour, be careful not to overfill the crust, as the custard may spill over while baking. Use a spatula to smooth the top of the pie, ensuring the custard is evenly distributed across the surface of the crust. This helps the pie bake uniformly and ensures that each slice will have the perfect balance of filling and crust. - Bake the Pie:
Place the pie in the preheated oven and bake it for 40-45 minutes. As the pie bakes, you will see the filling bubble up and begin to brown slightly on top. This is a sign that the custard is thickening and setting properly. The pie may still be a bit jiggly when you remove it from the oven, which is normal. The pie will firm up as it cools, creating the perfect texture. - Cool the Pie:
After baking, remove the pie from the oven and allow it to cool on a counter or cooling rack. Let it cool at room temperature for at least 30 minutes. This helps the filling to continue setting, making it easier to slice once it’s fully chilled. The pie will be slightly jiggly at this stage, but it will firm up significantly as it cools and refrigerates. - Chill the Pie:
Once the pie has cooled to room temperature, cover it and place it in the refrigerator for at least 2-3 hours, or preferably overnight. This chilling time is essential for allowing the custard to set completely. The pie will be firm, yet creamy, and the flavors will deepen as it rests in the fridge. - Finish with Sea Salt:
Just before serving, sprinkle a generous amount of flaky sea salt over the top of the pie. The salt adds the perfect contrast to the sweetness of the honey and the richness of the custard. The sprinkle of salt provides a delicate crunch and a burst of flavor that makes each bite even more satisfying. Be sure to sprinkle just before serving to maintain the texture of the sea salt.
Notes
- Pie Crust Options: If you’re short on time, you can always use a refrigerated pie crust from the store. However, for the best flavor and texture, a homemade crust is ideal. You can also try a gluten-free pie crust if you have dietary preferences or restrictions.
- Honey Variety: The type of honey you use can impact the overall flavor of the pie. Consider using different types of honey, such as clover honey, wildflower honey, or orange blossom honey, each offering its own subtle flavor notes.
- Flavor Enhancements: Experiment with adding a dash of cinnamon or nutmeg to the custard for an added layer of warmth. These spices pair beautifully with the honey and give the pie a more autumnal or holiday feel.
- Serving Suggestions: Top the pie with a dollop of freshly whipped cream or a scoop of vanilla ice cream for an added touch of indulgence. These cool toppings contrast nicely with the warm, rich custard.
Salted Honey Pie is not just a treat for the taste buds but also for the soul. Its easy-to-make custard filling is the star of the show, but the real magic happens when you combine the richness of honey and brown sugar with a hint of salt. It’s a beautiful dessert to serve at any occasion—whether it’s a holiday dinner, a birthday celebration, or just a cozy weekend dessert. The crust serves as a perfect base, while the creamy, caramelized filling offers deep flavors that continue to develop as the pie sets and cools.
The beauty of this pie lies not only in its flavor but also in its versatility. The sweet custard filling paired with the flakiness of the pie crust, topped with a sprinkle of sea salt, creates a deliciously unique experience. And because it’s so simple to make, you won’t need to spend hours in the kitchen to impress your guests or family. It’s an ideal dessert for both beginners and seasoned bakers.
Ingredients:
- Pie crust, refrigerated or homemade
- 4 large egg yolks, lightly beaten
- 2 1/2 cups (600ml) heavy whipping cream
- 2/3 cup (150g) packed light brown sugar
- 1/3 cup (45g) cornstarch, sifted
- 1/2 tsp salt
- 1/2 cup (120ml) honey
- 2 tsp vanilla extract
- Flaky sea salt (for sprinkling)
Step-by-Step Instructions:
- Prepare the Pie Crust:
Begin by preparing your pie crust. Whether you are using a store-bought refrigerated crust or making your own from scratch, ensure that it fits into a deep-dish 8-inch pie pan (or a 9-inch pan if you prefer). Press the crust gently into the pan, making sure it fits snugly around the edges. Once the crust is in place, refrigerate it for at least 15 minutes before baking. This chilling process helps to prevent the crust from shrinking when baking. If you opt for a homemade pie crust, you can prepare it ahead of time and chill it while you prepare the filling. - Preheat the Oven:
Set your oven to preheat at 375°F (190°C). This ensures that the oven is fully heated when you place your pie inside, allowing the custard to bake evenly while giving the crust a golden, flaky texture. The combination of the hot oven and the chilled pie crust helps the dessert bake to perfection. - Prepare the Egg Yolks:
In a large mixing bowl, lightly beat the four large egg yolks. This is a crucial step, as the egg yolks will act as the base for the custard filling, contributing to its rich, creamy texture. Be sure to beat them until they are smooth and well-combined, without over-beating them. Once prepared, set them aside for later use. - Make the Custard Filling:
Now it’s time to create the custard filling that makes Salted Honey Pie so irresistible. In a medium saucepan, combine the 2 1/2 cups of heavy whipping cream, 2/3 cup of packed light brown sugar, 1/3 cup of sifted cornstarch, and 1/2 teaspoon of salt. Place the saucepan over medium heat and begin stirring the mixture continuously. As the ingredients heat up, they will slowly begin to thicken. Keep an eye on it, making sure it doesn’t scorch or burn, and continue stirring until the mixture comes to a rolling boil. Once it starts to bubble, you’ll notice it thickening to a custard-like consistency. - Temper the Eggs:
Once the cream mixture has come to a boil, it’s time to temper the eggs. This is an important step to prevent the egg yolks from curdling when they are added to the hot cream mixture. Start by taking a small amount of the hot cream mixture and slowly whisk it into the egg yolks. Add a little more at a time, whisking constantly to prevent the eggs from cooking too quickly. Once the egg yolks have been tempered and warmed up with the cream, slowly pour them back into the saucepan with the rest of the cream mixture. Continue stirring until the mixture is smooth and well-combined. This ensures that the filling will be silky and smooth once it bakes. - Add Honey and Vanilla:
Now that the egg mixture is fully incorporated with the cream, it’s time to add the honey and vanilla extract. Pour in the 1/2 cup of honey and stir to combine. The honey adds a floral sweetness that pairs beautifully with the brown sugar and custard. Then, add the 2 teaspoons of vanilla extract, which deepens the flavor of the custard and adds a comforting aroma. Stir until the mixture is evenly blended, and the custard should now have a smooth, rich consistency. - Fill the Pie Crust:
Pour the prepared custard mixture into the chilled pie crust. As you pour, be careful not to overfill the crust, as the custard may spill over while baking. Use a spatula to smooth the top of the pie, ensuring the custard is evenly distributed across the surface of the crust. This helps the pie bake uniformly and ensures that each slice will have the perfect balance of filling and crust. - Bake the Pie:
Place the pie in the preheated oven and bake it for 40-45 minutes. As the pie bakes, you will see the filling bubble up and begin to brown slightly on top. This is a sign that the custard is thickening and setting properly. The pie may still be a bit jiggly when you remove it from the oven, which is normal. The pie will firm up as it cools, creating the perfect texture. - Cool the Pie:
After baking, remove the pie from the oven and allow it to cool on a counter or cooling rack. Let it cool at room temperature for at least 30 minutes. This helps the filling to continue setting, making it easier to slice once it’s fully chilled. The pie will be slightly jiggly at this stage, but it will firm up significantly as it cools and refrigerates. - Chill the Pie:
Once the pie has cooled to room temperature, cover it and place it in the refrigerator for at least 2-3 hours, or preferably overnight. This chilling time is essential for allowing the custard to set completely. The pie will be firm, yet creamy, and the flavors will deepen as it rests in the fridge. - Finish with Sea Salt:
Just before serving, sprinkle a generous amount of flaky sea salt over the top of the pie. The salt adds the perfect contrast to the sweetness of the honey and the richness of the custard. The sprinkle of salt provides a delicate crunch and a burst of flavor that makes each bite even more satisfying. Be sure to sprinkle just before serving to maintain the texture of the sea salt.
Tips and Variations:
- Pie Crust Options: If you’re short on time, you can always use a refrigerated pie crust from the store. However, for the best flavor and texture, a homemade crust is ideal. You can also try a gluten-free pie crust if you have dietary preferences or restrictions.
- Honey Variety: The type of honey you use can impact the overall flavor of the pie. Consider using different types of honey, such as clover honey, wildflower honey, or orange blossom honey, each offering its own subtle flavor notes.
- Flavor Enhancements: Experiment with adding a dash of cinnamon or nutmeg to the custard for an added layer of warmth. These spices pair beautifully with the honey and give the pie a more autumnal or holiday feel.
- Serving Suggestions: Top the pie with a dollop of freshly whipped cream or a scoop of vanilla ice cream for an added touch of indulgence. These cool toppings contrast nicely with the warm, rich custard.
Serving Suggestions:
Salted Honey Pie can be served in a variety of ways to suit the occasion. Whether it’s a special holiday dinner or a casual weeknight treat, this pie always makes an impression. Here are some ways to enjoy your pie:
- With Coffee or Tea: Salted Honey Pie pairs wonderfully with a hot beverage, whether it’s a rich cup of coffee, a cup of tea, or even a dessert wine. The pie’s combination of sweetness and saltiness complements the flavors of a hot drink.
- For Brunch: Add this pie to your next brunch spread. The creamy custard and flaky crust will make a delicious addition to fruit, muffins, and other breakfast treats.
- As a Holiday Dessert: This pie is perfect for festive occasions like Thanksgiving, Christmas, or any other holiday gathering. It’s rich enough to be the star of the dessert table, but still light enough to leave room for more.
- With Ice Cream or Whipped Cream: Serve the pie with a dollop of freshly whipped cream or a scoop of vanilla ice cream for added creaminess and texture.

Conclusion:
Salted Honey Pie is the perfect balance of sweet and savory, making it a standout dessert for any occasion. With its creamy, custard-based filling, buttery pie crust, and the irresistible sprinkle of sea salt, this pie is sure to become a favorite in your dessert repertoire. The combination of honey and brown sugar creates a warm, caramel-like flavor that is enhanced by the richness of the custard. Whether you’re baking for a special celebration or just treating yourself to a delicious homemade pie, this recipe is guaranteed to impress. So go ahead and try your hand at this delectable dessert—you won’t be disappointed!


