There’s something magical about the combination of cinnamon, sugar, and apples—a perfect trio that evokes the warmth and comfort of fall, no matter the season. These Snickerdoodle Apple Pie Bites are a delightful take on two beloved desserts, snickerdoodle cookies and apple pie, creating a fun, bite-sized treat that’s as easy to make as it is delicious. What’s even better is that these little bites require no baking expertise, making them perfect for beginners who want to impress at any holiday gathering or dinner party.

Snickerdoodle Apple Pie Bites: A Perfectly Sweet, Mini Dessert for Beginners

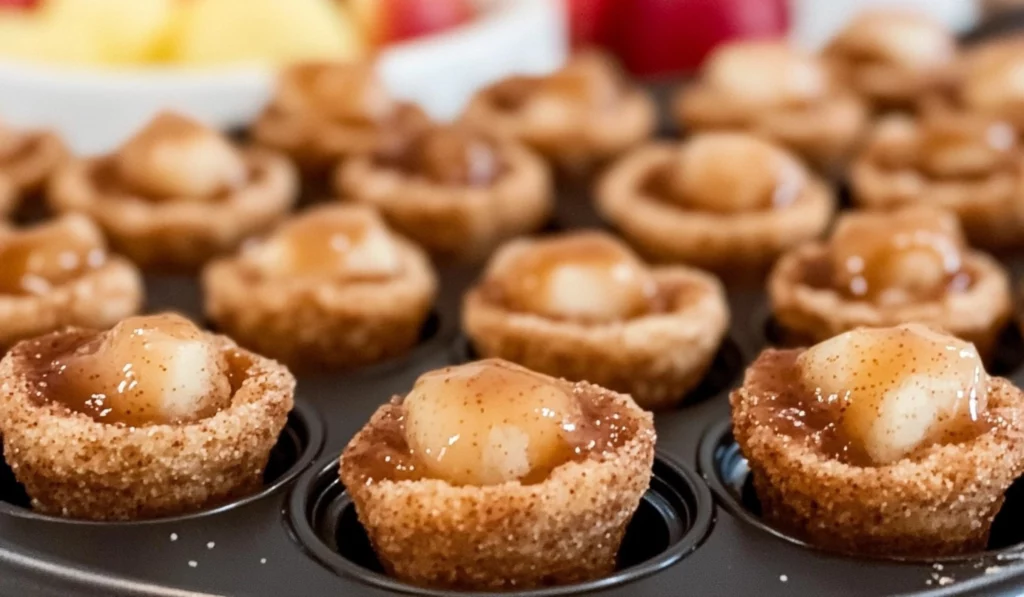
Imagine the warmth of cinnamon and sugar, the comforting sweetness of apples, and the irresistible allure of caramel—combined into one bite-sized treat. That’s exactly what you get with Snickerdoodle Apple Pie Bites, a dessert that brings together the beloved flavors of snickerdoodle cookies and classic apple pie in a fun, mini form. These adorable little bites are the perfect balance of cinnamon-sweet cookie cups filled with spiced apples, all topped with a drizzle of decadent caramel.
- Prep Time: 10 minutes
- Cook Time: 20 minutes
- Total Time: 30 minutes
- Yield: 24 bites 1x
- Category: Dessert
- Method: Baking
- Cuisine: American
- Diet: Vegetarian
Ingredients
-
- 1 Snickerdoodle Cookie Mix (17–18 ounces) – Using a store-bought mix is a real time-saver, especially for beginners. The cinnamon-sugar combination in the mix will give the cookie cups a wonderful flavor.
- ½ cup butter (softened) – This gives the dough richness and helps it come together beautifully.
- 1 egg – The egg binds the dough, giving it structure.
- 1 can apple pie filling (21 ounces) – The filling provides that sweet, cinnamon-spiced apple flavor with minimal prep.
- Caramel ice cream topping – This adds a decadent, sweet finish to each bite.
Instructions
-
- Preheat your oven and prepare your muffin pan. The first step in creating your Snickerdoodle Apple Pie Bites is to get your oven preheated. Set it to 375º F (190º C). This is a common temperature for baking cookies and helps ensure that your cookie cups bake evenly without overbaking. While the oven is heating up, take a mini muffin pan and generously spray each cup with cooking spray. This will prevent the cookie cups from sticking and help them come out easily after baking.
-
- Make the snickerdoodle dough. In a large mixing bowl, combine the snickerdoodle cookie mix, softened butter, and egg. Stir with a wooden spoon or spatula until the dough starts to come together. You might notice that the dough is a little thick, but that’s normal. If you find that the dough is a bit sticky, don’t worry! A little stickiness is a sign that the cookies will turn out soft. If the dough feels too sticky to handle, you can chill it for 10-15 minutes in the refrigerator to make it easier to roll.
-
- Roll the dough into balls and coat in cinnamon-sugar. In a separate small bowl, pour the cinnamon-sugar mixture from the snickerdoodle mix. This mixture will add the signature flavor to your cookie cups. Using a tablespoon-sized cookie scoop or a spoon, portion out the dough into 24 equal-sized balls. Roll each dough ball in the cinnamon-sugar mixture, ensuring the dough is fully coated. This is a fun step where you can really embrace the snickerdoodle flavor and enjoy the fragrance of cinnamon filling the kitchen.
-
- Place the dough balls in the muffin pan. Once all the dough balls are coated in the cinnamon-sugar, place each one in a prepared mini muffin cup. Gently press the dough into the bottom of each cup. The dough should fill the bottom of the cup but not be squished too tightly. The dough will spread as it bakes, so don’t worry if they’re not perfect little dough shapes right now.
-
- Bake the cookie cups. Place the muffin pan in the preheated oven and bake the cookie cups for 10-12 minutes. The exact time will depend on your oven, so keep an eye on them! The edges of the cookies should turn a light golden brown when they’re ready. Don’t worry if the centers look soft—that’s exactly what you want. The cookie cups will continue to set and firm up after they come out of the oven.
-
- Form the cookie cups. As soon as the cookie cups are done baking, take them out of the oven and immediately press the back of a tablespoon into the center of each cookie. This step is crucial to create the indentations that will hold the apple pie filling. If a tablespoon feels too large for your cookies, you can use a smaller spoon—just press gently to form a deep enough indentation. This will help the filling stay in place and make the bites easier to eat.
-
- Cool the cookie cups. Allow the cookie cups to cool in the muffin pan for about 3-5 minutes. This helps them firm up slightly and makes them easier to remove from the pan. Once they’ve cooled a bit, use a knife to gently pop each cookie out of the muffin pan. Place the cookies on a wire rack to continue cooling. Be careful while handling the cookies, as they’ll still be a little soft.
-
- Prepare the apple pie filling. Now that the cookie cups are cooling, it’s time to prepare the apple pie filling. Open the can of apple pie filling and scoop the apples out into a bowl. Use a knife to chop the apples into smaller, bite-sized pieces. This will make it easier to fit the filling into the cookie cups and ensure each bite has a good mix of cookie and apple. You can also add a sprinkle of cinnamon or a dash of vanilla extract to the apple filling if you’d like to customize the flavor.
-
- Fill the cookie cups. Once the cookie cups are fully cooled, use a tablespoon-sized scoop to fill each cookie cup with the apple pie filling. Be generous with the filling—each bite should have plenty of that sweet, spiced apple goodness. You can press the apples down gently to fit a bit more filling into each cup, but don’t worry if some of the filling spills over; it just adds to the charm of the dessert.
-
- Add the finishing touches. To elevate the flavor and presentation, sprinkle a little more of the leftover cinnamon-sugar mixture on top of the apple pie filling. This adds a beautiful touch of sweetness and extra cinnamon flavor to every bite. Then, finish each Snickerdoodle Apple Pie Bite with a drizzle of caramel ice cream topping. The caramel adds a rich, indulgent sweetness that complements the cinnamon apples perfectly.
Notes
- Troubleshooting Overcooking: If your snickerdoodle cookie cups are overcooked and too crunchy, next time reduce the baking time by a minute or two. Keep an eye on them after the 9-minute mark to avoid overbaking.
- Troubleshooting Undercooking: If your cookie cups are too soft or seem undercooked, give them an extra minute or two in the oven, but be careful not to let them brown too much. You can also gently press the centers down again after removing the pan from the oven to ensure they form the right shape.
- Using a Cookie Scoop: A cookie scoop is a great tool for even portioning of dough. If you don’t have one, simply use a spoon, but try to keep the sizes consistent for uniform baking. Using a scoop ensures your cookie cups come out even, which helps them bake more uniformly.
- Pressing the Dough: If the dough is too sticky to roll, chill it in the refrigerator for 10-15 minutes. This will make it easier to handle. You can also lightly flour your hands before rolling the dough balls if necessary.
- Customizing the Apple Filling: Feel free to add a pinch of cinnamon or nutmeg to the apple pie filling to enhance the flavor, or even a splash of vanilla extract for added depth. If you want to make it even more decadent, you can mix a bit of brown sugar with the apple filling before adding it to the cookie cups.
Whether you’re hosting a family dinner or attending a potluck, these mini apple pies are sure to be a hit. The snickerdoodle cookie cups are soft and sweet, while the apple pie filling adds a warm, comforting flavor. Add a drizzle of caramel ice cream topping, and you’ve got a dessert that’s simple, yet special. In just 30 minutes, you’ll have 24 perfectly adorable little desserts to serve and enjoy. Best of all? You don’t have to be a baking expert to pull this off—this recipe is beginner-friendly, stress-free, and full of flavor. Let’s dive in and get started!
Ingredients and Preparation
For these Snickerdoodle Apple Pie Bites, you’ll need just a handful of ingredients, most of which you probably already have in your pantry. This makes it an accessible and quick dessert option for beginners.
Ingredients:
- 1 Snickerdoodle Cookie Mix (17-18 ounces) – Using a store-bought mix is a real time-saver, especially for beginners. The cinnamon-sugar combination in the mix will give the cookie cups a wonderful flavor.
- ½ cup butter (softened) – This gives the dough richness and helps it come together beautifully.
- 1 egg – The egg binds the dough, giving it structure.
- 1 can apple pie filling (21 ounces) – The filling provides that sweet, cinnamon-spiced apple flavor with minimal prep.
- Caramel ice cream topping – This adds a decadent, sweet finish to each bite.
Alternative Ingredients:
- Gluten-free snickerdoodle cookie mix – If you need a gluten-free version, look for a gluten-free snickerdoodle cookie mix or make your own.
- Fresh apples – If you prefer homemade filling, you can substitute the canned apple pie filling with diced apples sautéed in butter, sugar, and cinnamon until soft.
- Homemade snickerdoodle dough – If you’re feeling adventurous, you can make snickerdoodle dough from scratch instead of using a mix. The homemade dough will add a slightly different texture but still provide the delicious cinnamon flavor.
By using just a few ingredients, these Snickerdoodle Apple Pie Bites come together quickly, making them ideal for beginner bakers or those short on time. The use of a cookie mix not only simplifies the process but ensures that your cookies will have a perfect texture with minimal effort. If you’re aiming for a more homemade touch, the alternative ingredients give you the flexibility to adjust the recipe to your tastes or dietary needs.
Step-by-Step Instructions
Now that we have everything prepared, let’s walk through each simple step to create these delightful Snickerdoodle Apple Pie Bites. You’ll find that the instructions are easy to follow, even for beginners!
- Preheat your oven and prepare your muffin pan. The first step in creating your Snickerdoodle Apple Pie Bites is to get your oven preheated. Set it to 375º F (190º C). This is a common temperature for baking cookies and helps ensure that your cookie cups bake evenly without overbaking. While the oven is heating up, take a mini muffin pan and generously spray each cup with cooking spray. This will prevent the cookie cups from sticking and help them come out easily after baking.
- Make the snickerdoodle dough. In a large mixing bowl, combine the snickerdoodle cookie mix, softened butter, and egg. Stir with a wooden spoon or spatula until the dough starts to come together. You might notice that the dough is a little thick, but that’s normal. If you find that the dough is a bit sticky, don’t worry! A little stickiness is a sign that the cookies will turn out soft. If the dough feels too sticky to handle, you can chill it for 10-15 minutes in the refrigerator to make it easier to roll.
- Roll the dough into balls and coat in cinnamon-sugar. In a separate small bowl, pour the cinnamon-sugar mixture from the snickerdoodle mix. This mixture will add the signature flavor to your cookie cups. Using a tablespoon-sized cookie scoop or a spoon, portion out the dough into 24 equal-sized balls. Roll each dough ball in the cinnamon-sugar mixture, ensuring the dough is fully coated. This is a fun step where you can really embrace the snickerdoodle flavor and enjoy the fragrance of cinnamon filling the kitchen.
- Place the dough balls in the muffin pan. Once all the dough balls are coated in the cinnamon-sugar, place each one in a prepared mini muffin cup. Gently press the dough into the bottom of each cup. The dough should fill the bottom of the cup but not be squished too tightly. The dough will spread as it bakes, so don’t worry if they’re not perfect little dough shapes right now.
- Bake the cookie cups. Place the muffin pan in the preheated oven and bake the cookie cups for 10-12 minutes. The exact time will depend on your oven, so keep an eye on them! The edges of the cookies should turn a light golden brown when they’re ready. Don’t worry if the centers look soft—that’s exactly what you want. The cookie cups will continue to set and firm up after they come out of the oven.
- Form the cookie cups. As soon as the cookie cups are done baking, take them out of the oven and immediately press the back of a tablespoon into the center of each cookie. This step is crucial to create the indentations that will hold the apple pie filling. If a tablespoon feels too large for your cookies, you can use a smaller spoon—just press gently to form a deep enough indentation. This will help the filling stay in place and make the bites easier to eat.
- Cool the cookie cups. Allow the cookie cups to cool in the muffin pan for about 3-5 minutes. This helps them firm up slightly and makes them easier to remove from the pan. Once they’ve cooled a bit, use a knife to gently pop each cookie out of the muffin pan. Place the cookies on a wire rack to continue cooling. Be careful while handling the cookies, as they’ll still be a little soft.
- Prepare the apple pie filling. Now that the cookie cups are cooling, it’s time to prepare the apple pie filling. Open the can of apple pie filling and scoop the apples out into a bowl. Use a knife to chop the apples into smaller, bite-sized pieces. This will make it easier to fit the filling into the cookie cups and ensure each bite has a good mix of cookie and apple. You can also add a sprinkle of cinnamon or a dash of vanilla extract to the apple filling if you’d like to customize the flavor.
- Fill the cookie cups. Once the cookie cups are fully cooled, use a tablespoon-sized scoop to fill each cookie cup with the apple pie filling. Be generous with the filling—each bite should have plenty of that sweet, spiced apple goodness. You can press the apples down gently to fit a bit more filling into each cup, but don’t worry if some of the filling spills over; it just adds to the charm of the dessert.
- Add the finishing touches. To elevate the flavor and presentation, sprinkle a little more of the leftover cinnamon-sugar mixture on top of the apple pie filling. This adds a beautiful touch of sweetness and extra cinnamon flavor to every bite. Then, finish each Snickerdoodle Apple Pie Bite with a drizzle of caramel ice cream topping. The caramel adds a rich, indulgent sweetness that complements the cinnamon apples perfectly.
Beginner Tips and Notes
- Troubleshooting Overcooking: If your snickerdoodle cookie cups are overcooked and too crunchy, next time reduce the baking time by a minute or two. Keep an eye on them after the 9-minute mark to avoid overbaking.
- Troubleshooting Undercooking: If your cookie cups are too soft or seem undercooked, give them an extra minute or two in the oven, but be careful not to let them brown too much. You can also gently press the centers down again after removing the pan from the oven to ensure they form the right shape.
- Using a Cookie Scoop: A cookie scoop is a great tool for even portioning of dough. If you don’t have one, simply use a spoon, but try to keep the sizes consistent for uniform baking. Using a scoop ensures your cookie cups come out even, which helps them bake more uniformly.
- Pressing the Dough: If the dough is too sticky to roll, chill it in the refrigerator for 10-15 minutes. This will make it easier to handle. You can also lightly flour your hands before rolling the dough balls if necessary.
- Customizing the Apple Filling: Feel free to add a pinch of cinnamon or nutmeg to the apple pie filling to enhance the flavor, or even a splash of vanilla extract for added depth. If you want to make it even more decadent, you can mix a bit of brown sugar with the apple filling before adding it to the cookie cups.
Serving Suggestions
These Snickerdoodle Apple Pie Bites are delightful on their own, but they can also be paired with a few simple additions to elevate your dessert table.
- Vanilla ice cream – A scoop of creamy vanilla ice cream pairs perfectly with these warm, cinnamon-spiced bites. The cold, creamy ice cream contrasts beautifully with the warm cookies and apples.
- Whipped cream – A dollop of freshly whipped cream would add a light, fluffy contrast to the rich caramel topping.
- Hot cider or coffee – Serve these mini pies with a hot cup of spiced cider or freshly brewed coffee for a cozy, fall-inspired treat. The warm drinks will complement the cinnamon and apple flavors beautifully.
- Chopped nuts – Add some crunch by sprinkling chopped pecans or walnuts on top of the caramel drizzle. This gives the dessert a delightful contrast in texture and adds a nutty, savory element to balance out the sweetness.
For leftovers, store the Snickerdoodle Apple Pie Bites in an airtight container at room temperature for up to 2-3 days. They can also be frozen for up to a month. To enjoy, simply thaw them at room temperature or warm them in the oven for a few minutes. They’ll taste just as delicious after being stored or frozen, making them a great make-ahead option.

Conclusion
These Snickerdoodle Apple Pie Bites are the ideal treat for beginner bakers looking to impress with minimal effort. With only a few ingredients and a handful of easy-to-follow steps, you can create a dessert that looks and tastes like it came from a bakery. The snickerdoodle cookie base pairs beautifully with the spiced apple filling and caramel drizzle, making every bite a burst of fall-inspired goodness.
So, whether you’re making them for a holiday party or a casual family gathering, these mini apple pies are sure to become a favorite. Don’t forget to share your creations in the comments below or tag us on social media—we’d love to see how your Snickerdoodle Apple Pie Bites turned out!
Remember, baking doesn’t have to be complicated. With recipes like this, you’ll gain confidence in the kitchen and have fun while doing it. Happy baking, and enjoy these sweet little bites!


