Bread-making has always been a special activity in my kitchen. The feel of dough in my hands, the smell of it rising, and the warm, golden crust when it’s freshly baked—it’s pure comfort. But when I first started baking bread, I was a little intimidated. I had heard that bread was a challenging dish to master, especially if you were a beginner. That’s why I was so delighted when I discovered these Soft Sweet Potato Rolls. They’re incredibly easy to make, and the results are nothing short of spectacular. This recipe is perfect for beginners because it simplifies the bread-baking process while still delivering a rich, flavorful roll with that sweet, earthy flavor of sweet potatoes. In this article, I’ll walk you through the entire process of making these soft, fluffy rolls, including all the tips and tricks you need to succeed. Whether you’re hosting a dinner party or simply looking for an amazing side dish to elevate a weeknight meal, these rolls are guaranteed to impress. Plus, sweet potatoes provide an extra nutritional boost, making them not only delicious but also a healthy choice for your bread basket. Let’s dive into this delightful recipe!

Soft Sweet Potato Rolls: A Deliciously Fluffy and Flavorful Treat for Any Meal

There’s nothing like the aroma of freshly baked bread, and these soft sweet potato rolls take that experience to the next level. With a slightly sweet flavor from the sweet potatoes and a soft, fluffy texture, these rolls are easy to make and perfect for any meal. Whether you’re new to baking or an experienced cook, this simple recipe will fill your home with warmth and your family’s bellies with deliciousness. Let’s dive in!
- Prep Time: 3 hours, 20 minutes
- Cook Time: 25 minutes
- Total Time: 3 hours, 45 minutes
- Yield: 20 rolls 1x
- Category: Bread, Side Dish, Holiday Recipes
- Method: Baking
- Cuisine: American
- Diet: Vegetarian
Ingredients
- 1 medium sweet potato (about 250-290g), peeled and chopped (to yield 1 cup mashed)
- 3/4 cup (180ml) whole milk, warmed to about 110°F (43°C)
- 2 and 1/4 teaspoons Platinum Yeast from Red Star (1 standard-size packet)
- 1/3 cup (113g) honey, divided
- 2 large eggs, at room temperature
- 5 Tablespoons (71g) unsalted butter, softened
- 1 and 3/4 teaspoons salt
- 5 and 1/2 cups (715g) bread flour* (spooned and leveled), plus more as needed
- Optional: 2 Tablespoons (28g) melted butter and flaky sea salt, for finishing
Instructions
Step 1: Prepare the Sweet Potato
Start by boiling the chopped sweet potato. Place it in a medium saucepan and add enough water to cover the sweet potato. Bring it to a boil over high heat, then reduce the heat to medium-high. Let it boil for about 10-12 minutes, or until the sweet potato is very soft and tender when pierced with a fork. Drain off the water, then mash the sweet potato as well as you can. It’s okay if there are a few small lumps; just make sure it’s mostly smooth. Measure 1 cup (230g) of mashed sweet potato to use in your dough and set it aside to cool slightly.
Step 2: Proof the Yeast
In the bowl of a stand mixer, whisk together the warm milk, yeast, and 2 tablespoons of honey. The milk should be about 110°F (43°C)—just warm to the touch, not hot. Let this mixture sit for about 5 minutes to allow the yeast to activate. You’ll know it’s ready when the mixture becomes foamy or bubbly. If you don’t have a stand mixer, you can use a large mixing bowl and mix the dough by hand with a wooden spoon or silicone spatula.
Step 3: Make the Dough
Once the yeast is activated, add the remaining honey, eggs, softened butter, mashed sweet potato, salt, and 1 cup of flour to the yeast mixture. Using the dough hook or paddle attachment of your stand mixer, mix everything on low speed for about 1 minute. Scrape down the sides of the bowl with a spatula to make sure all ingredients are combined. Add the remaining flour, about 1/2 cup at a time, and continue mixing on medium speed until the dough begins to pull away from the sides of the bowl. This should take about 3 minutes. If the dough feels too wet and sticky to handle, you can add more flour, 1 tablespoon at a time. The dough should feel soft and slightly sticky but manageable to knead.
Step 4: Knead the Dough
Kneading helps develop the gluten and gives the dough structure. You can knead the dough in the mixer on low speed for about 5 minutes or turn it out onto a lightly floured surface and knead by hand. If you’re new to bread baking, don’t be afraid to take your time. You want the dough to become smooth and elastic. If it becomes too sticky, sprinkle it with a small amount of flour to make it easier to work with. After kneading, test the dough by poking it with your finger—it should slowly bounce back. You can also perform a “windowpane test” to check if the dough is ready to rise: stretch a small piece of dough until it’s thin enough to let light through. If it doesn’t tear, your dough is ready.
Step 5: First Rise
Lightly grease a large bowl with oil or nonstick spray, then place the dough inside. Turn it around to coat all sides with the oil. Cover the bowl with a clean kitchen towel or plastic wrap and let the dough rise in a warm place for about 1-2 hours, or until it has doubled in size. If you’re short on time, placing the bowl in a slightly warm oven (turned off) can speed up the process.
Step 6: Shape the Rolls
Once the dough has doubled in size, punch it down to release the air. Turn the dough out onto a floured surface and divide it into 20 equal pieces. Each piece should weigh about 65-75g, but it doesn’t need to be exact. Use your hands to shape each piece into a smooth ball and arrange the dough balls in a greased 9×13-inch baking pan.
Step 7: Second Rise
Cover the shaped rolls with a clean kitchen towel or plastic wrap and let them rise for 30-45 minutes, or until they’ve become puffy and have risen to fill the pan.
Step 8: Bake the Rolls
Preheat your oven to 350°F (177°C) and place the pan on the lower oven rack to avoid the tops of the rolls browning too quickly. Bake the rolls for 25 minutes, or until golden brown on top. You can check for doneness by using an instant-read thermometer—the internal temperature should reach 190°F. If the tops of the rolls are browning too quickly, loosely cover them with aluminum foil after 20 minutes to prevent over-browning.
Step 9: Finish and Serve
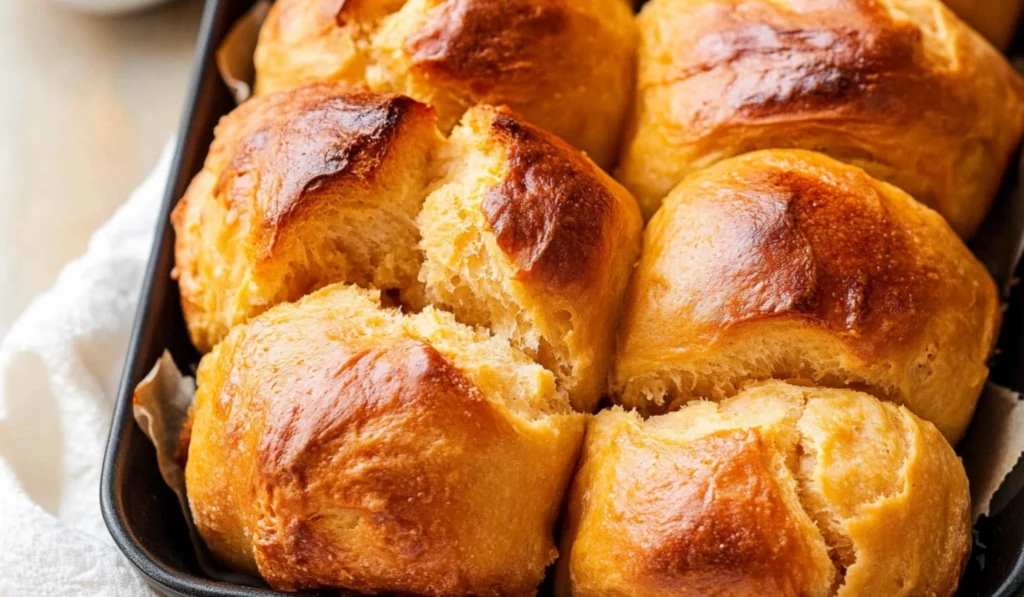
Once the rolls are done, remove them from the oven and brush them with melted butter. Sprinkle with flaky sea salt for an extra touch of flavor. Let the rolls cool for about 15 minutes before serving. The longer they cool, the better the flavor will develop.
Notes
- If your dough is too sticky: Don’t be afraid to add a little extra flour, but remember that the dough should still be soft and slightly tacky, not dry. You can always sprinkle more flour on the dough and your work surface as you knead.
- If your dough doesn’t rise: Ensure that your yeast is fresh and active. The milk should be warm (not hot) to activate the yeast. If the dough hasn’t risen after 2 hours, it might be too cold in your kitchen, so find a warmer spot.
- Not enough time for the first rise?: If you’re in a hurry, you can speed up the rise by placing the dough in an oven with just the light on, creating a warm, draft-free environment.
- Don’t have a dough hook?: No worries! Knead the dough by hand on a clean, lightly floured surface. It will take a bit more effort, but your hands will do the job just fine.
Ingredients and Preparation: What You’ll Need to Make These Soft Sweet Potato Rolls
Before you start, make sure you have everything on hand. The ingredients for these rolls are simple and can be easily found in your local grocery store. Below is the list of ingredients and their measurements. I’ll also provide some alternatives if you want to experiment or need substitutions.
Ingredients:
- 1 medium sweet potato (about 250-290g), peeled and chopped (to yield 1 cup mashed)
- 3/4 cup (180ml) whole milk, warmed to about 110°F (43°C)
- 2 and 1/4 teaspoons Platinum Yeast from Red Star (1 standard-size packet)
- 1/3 cup (113g) honey, divided
- 2 large eggs, at room temperature
- 5 Tablespoons (71g) unsalted butter, softened
- 1 and 3/4 teaspoons salt
- 5 and 1/2 cups (715g) bread flour* (spooned and leveled), plus more as needed
- Optional: 2 Tablespoons (28g) melted butter and flaky sea salt, for finishing
Ingredient Substitutes and Notes:
- Sweet Potato: If you don’t have a sweet potato, you can substitute it with pumpkin puree or butternut squash for a similar texture and slightly different flavor.
- Whole Milk: You can use any milk alternative (like almond milk or oat milk) for a dairy-free version, but make sure it’s warmed to about 110°F.
- Honey: You can use maple syrup or agave syrup instead of honey if you prefer a vegan-friendly option.
- Bread Flour: If you don’t have bread flour, you can use all-purpose flour, but bread flour will give your rolls a better structure and a fluffier texture.
- Butter: Unsalted butter is ideal, but if you only have salted butter, reduce the amount of salt in the dough to balance the flavors.
Step-by-Step Instructions: How to Make Soft Sweet Potato Rolls
Now that you have all your ingredients ready, let’s walk through the steps to make these rolls. Don’t worry if you’re a beginner—I’ll guide you through each step with easy-to-follow instructions.
Step 1: Prepare the Sweet Potato
Start by boiling the chopped sweet potato. Place it in a medium saucepan and add enough water to cover the sweet potato. Bring it to a boil over high heat, then reduce the heat to medium-high. Let it boil for about 10-12 minutes, or until the sweet potato is very soft and tender when pierced with a fork. Drain off the water, then mash the sweet potato as well as you can. It’s okay if there are a few small lumps; just make sure it’s mostly smooth. Measure 1 cup (230g) of mashed sweet potato to use in your dough and set it aside to cool slightly.
Step 2: Proof the Yeast
In the bowl of a stand mixer, whisk together the warm milk, yeast, and 2 tablespoons of honey. The milk should be about 110°F (43°C)—just warm to the touch, not hot. Let this mixture sit for about 5 minutes to allow the yeast to activate. You’ll know it’s ready when the mixture becomes foamy or bubbly. If you don’t have a stand mixer, you can use a large mixing bowl and mix the dough by hand with a wooden spoon or silicone spatula.
Step 3: Make the Dough
Once the yeast is activated, add the remaining honey, eggs, softened butter, mashed sweet potato, salt, and 1 cup of flour to the yeast mixture. Using the dough hook or paddle attachment of your stand mixer, mix everything on low speed for about 1 minute. Scrape down the sides of the bowl with a spatula to make sure all ingredients are combined. Add the remaining flour, about 1/2 cup at a time, and continue mixing on medium speed until the dough begins to pull away from the sides of the bowl. This should take about 3 minutes. If the dough feels too wet and sticky to handle, you can add more flour, 1 tablespoon at a time. The dough should feel soft and slightly sticky but manageable to knead.
Step 4: Knead the Dough
Kneading helps develop the gluten and gives the dough structure. You can knead the dough in the mixer on low speed for about 5 minutes or turn it out onto a lightly floured surface and knead by hand. If you’re new to bread baking, don’t be afraid to take your time. You want the dough to become smooth and elastic. If it becomes too sticky, sprinkle it with a small amount of flour to make it easier to work with. After kneading, test the dough by poking it with your finger—it should slowly bounce back. You can also perform a “windowpane test” to check if the dough is ready to rise: stretch a small piece of dough until it’s thin enough to let light through. If it doesn’t tear, your dough is ready.
Step 5: First Rise
Lightly grease a large bowl with oil or nonstick spray, then place the dough inside. Turn it around to coat all sides with the oil. Cover the bowl with a clean kitchen towel or plastic wrap and let the dough rise in a warm place for about 1-2 hours, or until it has doubled in size. If you’re short on time, placing the bowl in a slightly warm oven (turned off) can speed up the process.
Step 6: Shape the Rolls
Once the dough has doubled in size, punch it down to release the air. Turn the dough out onto a floured surface and divide it into 20 equal pieces. Each piece should weigh about 65-75g, but it doesn’t need to be exact. Use your hands to shape each piece into a smooth ball and arrange the dough balls in a greased 9×13-inch baking pan.
Step 7: Second Rise
Cover the shaped rolls with a clean kitchen towel or plastic wrap and let them rise for 30-45 minutes, or until they’ve become puffy and have risen to fill the pan.
Step 8: Bake the Rolls
Preheat your oven to 350°F (177°C) and place the pan on the lower oven rack to avoid the tops of the rolls browning too quickly. Bake the rolls for 25 minutes, or until golden brown on top. You can check for doneness by using an instant-read thermometer—the internal temperature should reach 190°F. If the tops of the rolls are browning too quickly, loosely cover them with aluminum foil after 20 minutes to prevent over-browning.
Step 9: Finish and Serve
Once the rolls are done, remove them from the oven and brush them with melted butter. Sprinkle with flaky sea salt for an extra touch of flavor. Let the rolls cool for about 15 minutes before serving. The longer they cool, the better the flavor will develop.
Beginner Tips and Notes: Troubleshooting and Helpful Hints
Making bread for the first time can feel intimidating, but with these tips, you’ll be a pro in no time!
- If your dough is too sticky: Don’t be afraid to add a little extra flour, but remember that the dough should still be soft and slightly tacky, not dry. You can always sprinkle more flour on the dough and your work surface as you knead.
- If your dough doesn’t rise: Ensure that your yeast is fresh and active. The milk should be warm (not hot) to activate the yeast. If the dough hasn’t risen after 2 hours, it might be too cold in your kitchen, so find a warmer spot.
- Not enough time for the first rise?: If you’re in a hurry, you can speed up the rise by placing the dough in an oven with just the light on, creating a warm, draft-free environment.
- Don’t have a dough hook?: No worries! Knead the dough by hand on a clean, lightly floured surface. It will take a bit more effort, but your hands will do the job just fine.
Serving Suggestions: How to Enjoy Your Soft Sweet Potato Rolls
These soft sweet potato rolls are so delicious on their own, but you can elevate them with a few simple additions. Cinnamon Butter: Whip up some homemade cinnamon butter by combining butter, powdered sugar, cinnamon, and a pinch of salt. It’s the perfect spread for these rolls. Serve with Soups or Stews: These rolls make an excellent accompaniment to soups, stews, or even roasted meats. The soft texture and subtle sweetness of the rolls balance well with savory dishes. As a Snack: They’re perfect for snacking—warm or cold, they’re just irresistible!
Leftover Storage:
If you have any leftovers, you can store the rolls at room temperature for up to 3 days. If you want them to last longer, you can store them in the refrigerator for up to a week. Reheat them in the oven at 350°F for about 10 minutes to bring back the soft texture.

Conclusion: A Delicious, Homemade Bread You Can Be Proud Of
Whether you’re a seasoned baker or just starting out, these Soft Sweet Potato Rolls are a perfect addition to any meal. They are fluffy, slightly sweet, and full of flavor. With their golden-brown crust and soft, pillowy inside, they will become your go-to bread recipe for holidays, family dinners, or any time you’re craving something homemade. Don’t be afraid to get creative—try different flavor variations or serve them with a variety of spreads. I hope this recipe inspires you to get in the kitchen and bake a batch of these amazing rolls. Enjoy the process and the incredible aroma that will fill your home, and most of all, enjoy the delicious results!


