Who doesn’t love the indulgent combination of creamy cheesecake, tangy fruit, and a crisp, salty crust? Strawberry Cheesecake Dessert Cups offer all of that in a fun, easy-to-serve format that will satisfy anyone’s sweet tooth. This dessert is a classic favorite, elevated with the sweetness of strawberries and the crunch of salted pretzels. Perfect for any occasion, from casual get-togethers to special celebrations, these cheesecake cups are sure to steal the show.

Strawberry Cheesecake Dessert Cups: A Beginner-Friendly, No-Bake Delight

When it comes to dessert, there’s something irresistibly satisfying about a sweet, creamy treat with a hint of tartness, perfectly balanced by a crunchy base. If you’re on the lookout for a tasty recipe that is sure to impress but doesn’t require complex skills or a long time in the kitchen, Strawberry Cheesecake Dessert Cups are exactly what you need. With a delightful combination of a salty pretzel crust, a velvety vanilla cheesecake filling, and a homemade strawberry sauce, these no-bake cheesecake cups are the ultimate indulgence without the stress.
- Prep Time: 30 minutes
- Cook Time: 10 minutes
- Total Time: 40 minutes
- Yield: 28 2-ounce cups 1x
- Category: Dessert
- Method: No-bake, Assemble
- Cuisine: American
- Diet: Vegetarian
Ingredients
Strawberry Sauce (Make Ahead)
- 2 cups frozen strawberries
- ¼ cup granulated sugar
- 2 tbsp lemon juice
- 1 tbsp cornstarch
- 1 tbsp water
Pretzel Crust
- 1 ½ cups crushed salted pretzels
- 2 tbsp granulated sugar
- 6 tbsp unsalted butter, melted
Vanilla Cheesecake Filling
- 8 oz cream cheese, room temperature
- ¾ cup granulated sugar
- 2 tsp vanilla extract
- 1 ½ cups heavy cream
Instructions
1. Prepare the Strawberry Sauce
The strawberry sauce is a crucial element that adds both flavor and color to the dessert. Start by combining the frozen strawberries, granulated sugar, and lemon juice in a medium saucepan. Cook the mixture over medium heat, stirring occasionally until the strawberries have softened and released their juices.
Once softened, mash the strawberries with the back of a spoon or a potato masher to break them down further. This step will create a smoother texture and release more liquid, allowing the sauce to thicken.
Next, in a small bowl, mix together the cornstarch and water to form a slurry. This is a mixture that will thicken the sauce without clumping. Add the slurry to the strawberry mixture while stirring constantly. Continue to stir until the sauce thickens to a syrupy consistency. Remove the saucepan from the heat and set the sauce aside to cool. It can be stored in the refrigerator for up to a week if made in advance.
2. Make the Pretzel Crust
While the strawberry sauce cools, it’s time to prepare the pretzel crust. Begin by crushing the pretzels. You can do this by placing them in a plastic bag and using a rolling pin or the bottom of a pan to crush them into small crumbs. Alternatively, you can use a food processor for a quicker result.
In a small bowl, combine the crushed pretzels, granulated sugar, and melted butter. Stir the mixture until everything is evenly coated. The butter should help bind the pretzel crumbs together, making it easy to press into the cups.
Spoon the crust mixture into the bottom of 28 small dessert cups. Use the back of a spoon or a small glass to press the crumbs into the bottom, ensuring the crust is compact. This step will help the crust hold together once the dessert is assembled. Refrigerate the cups for at least 15 minutes to let the crust set.
3. Prepare the Vanilla Cheesecake Filling
Next, you’ll make the smooth and fluffy cheesecake filling. In a mixing bowl, combine the room temperature cream cheese, granulated sugar, and vanilla extract. Use an electric hand mixer to beat the mixture on medium speed until smooth and well combined. The key here is to make sure the cream cheese is soft and easy to blend so that there are no lumps.
Once the cream cheese mixture is smooth, add the heavy cream and increase the speed to medium-high. Continue to whip the mixture until it becomes light and fluffy, forming stiff peaks. The whipped cream helps create a soft, airy texture for the cheesecake filling.
4. Assemble the Cheesecake Cups
Now, it’s time to assemble the dessert cups. Using a piping bag or a spoon, carefully pipe or spoon the cheesecake filling into the prepared cups. Fill each cup until it’s about three-quarters full, leaving some room for the strawberry sauce. Smooth the top with the back of a spoon or the tip of a knife to make it even.
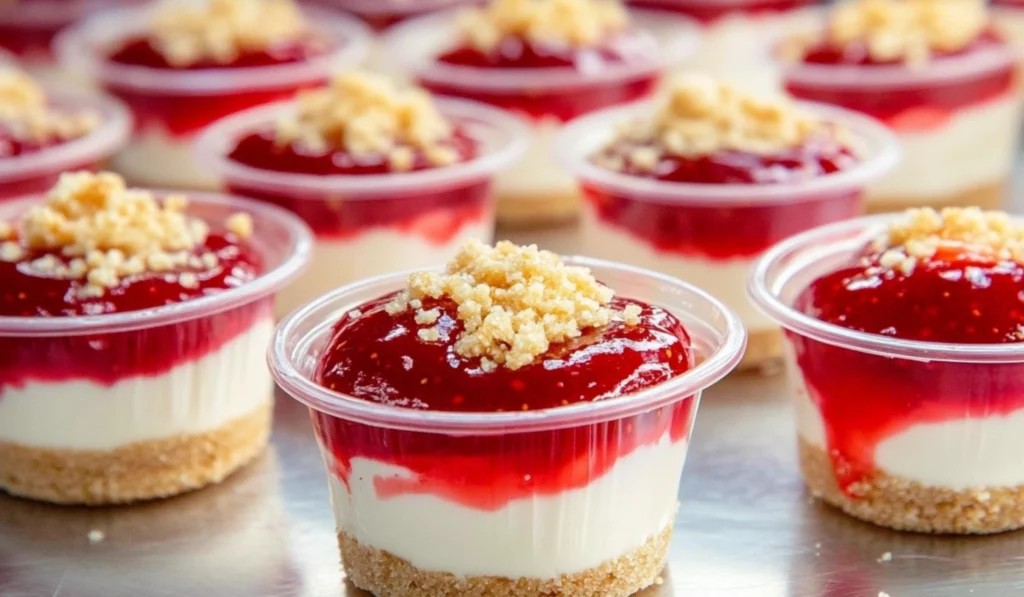
Once the cheesecake is in place, spoon the homemade strawberry sauce over the top of each cup. You can add as much or as little as you prefer, depending on how fruity you want each bite. If you have extra pretzel crumbs, sprinkle them on top for added texture and flavor. The combination of the creamy filling, sweet strawberries, and crunchy pretzel is the perfect balance.
5. Chill the Dessert Cups
To ensure everything sets properly, cover each dessert cup with a lid or plastic wrap and place them in the refrigerator for at least 2-3 hours. The filling will firm up, and the flavors will have time to meld together. This chilling process is crucial for the perfect texture and flavor. If you’re making these cups in advance, they can be stored in the fridge overnight.
6. Serve and Enjoy!
Once the cups have chilled and the flavors have developed, they’re ready to serve. The pretzel crust will stay crisp, while the cheesecake filling will be creamy and smooth. The strawberry sauce will add a refreshing burst of fruitiness that ties everything together. These cups are perfect for any occasion, whether it’s a birthday party, holiday gathering, or casual family dinner.
Notes
- How to Avoid Soggy Crust: The key to a good crust is making sure it is compacted and evenly distributed in the cup. If you find that the crust is a bit soggy, try baking it for 5-10 minutes at 350°F before filling the cups. Let it cool before assembling the dessert.
- How to Ensure a Smooth Filling: Be sure to beat the cream cheese and sugar thoroughly before adding the heavy cream. This will prevent lumps and create a smooth, velvety filling. Additionally, make sure your heavy cream is cold when you whip it.
- Creative Variations: Once you’ve mastered the base recipe, you can try variations such as adding a touch of chocolate or citrus zest to the filling. For an even richer flavor, consider adding a spoonful of peanut butter or Nutella to the cheesecake filling before whipping it.
What makes this recipe particularly ideal for beginner cooks is its simplicity. No baking is involved, and the steps are straightforward. The beauty of this no-bake dessert is that it requires just a few ingredients, a bit of assembly, and some chill time in the refrigerator to firm up. This means you can enjoy a delicious homemade dessert with minimal effort, making it perfect for both new and experienced bakers alike.
Let’s dive into why this recipe is an excellent choice for beginners and how you can easily prepare these delightful strawberry cheesecake cups.
Why This Recipe is Perfect for Beginners
If you’re new to the world of cooking and baking, desserts can sometimes seem intimidating, especially those that require an oven. But the Strawberry Cheesecake Dessert Cups recipe takes all of the stress out of the equation. It is a no-bake dessert, which means you won’t need to worry about precise baking temperatures or timing—just follow a few simple steps, and you’ll have a delicious treat ready in no time. Here’s why it’s perfect for beginner cooks:
- Simplicity: The ingredients are straightforward and easy to find at any grocery store. You don’t need specialized tools, and most of the steps are things you’ve likely done before (mixing, stirring, pressing, and chilling).
- No Oven Required: This is a no-bake recipe, so you won’t need to worry about burning the cake or keeping an eye on the oven. This is a huge bonus for beginners who might not feel confident using an oven just yet.
- Time-Efficient: The total preparation time for this dessert is relatively short. After assembling the cups, they only need to chill for a few hours, which means you can make them ahead of time and let them rest while you focus on other things.
- Customizable: Once you get the hang of the basics, you can experiment with different fruits, flavorings, or even add extra elements like chocolate shavings or caramel drizzle to create your signature version.
This recipe is as much about learning basic kitchen techniques as it is about creating a delicious treat. By the end of this, you’ll not only have a great dessert to serve but also gain some helpful culinary skills.
Ingredients and Preparation
Before diving into the steps, let’s break down the ingredients. Understanding them and their role in the recipe will ensure that you feel confident when you start putting everything together.
Strawberry Sauce (Make Ahead)
- 2 cups frozen strawberries
- ¼ cup granulated sugar
- 2 tbsp lemon juice
- 1 tbsp cornstarch
- 1 tbsp water
Ingredient Tips:
- Frozen strawberries are perfect for this sauce because they break down easily when cooked and have a consistent sweetness, making them great for making sauces. You can use fresh strawberries if you prefer, but they may require a little more mashing and may not have the same depth of flavor.
- The cornstarch acts as a thickening agent to give the sauce a syrupy texture that will hold nicely on top of the cheesecake filling. You could substitute cornstarch with arrowroot powder or tapioca starch if you prefer an alternative thickening agent.
- Lemon juice adds a bright, tart contrast to the sweetness of the strawberries. If you don’t have fresh lemons, bottled lemon juice will work just fine.
Pretzel Crust
- 1 ½ cups crushed salted pretzels
- 2 tbsp granulated sugar
- 6 tbsp unsalted butter, melted
Ingredient Tips:
- Salted pretzels are essential for this crust because they add the right balance of saltiness to complement the sweet cheesecake filling. If you don’t have pretzels, you can easily substitute with graham crackers for a different flavor profile.
- Make sure the butter is melted to ensure it binds the pretzel crumbs together to create a cohesive crust. If you want a healthier version, you can opt for coconut oil instead of butter.
Vanilla Cheesecake Filling
- 8 oz cream cheese, room temperature
- ¾ cup granulated sugar
- 2 tsp vanilla extract
- 1 ½ cups heavy cream
Ingredient Tips:
- Room temperature cream cheese is crucial to avoid lumps in the filling. If you forget to take it out of the fridge ahead of time, microwave it for 10-15 seconds to soften it quickly.
- The heavy cream is what gives the cheesecake filling its smooth and fluffy texture. Make sure to whip it until stiff peaks form for the best consistency.
- Vanilla extract adds depth of flavor, but if you’d like, you can swap it with almond extract for a different twist.
Step-by-Step Instructions
1. Prepare the Strawberry Sauce
The strawberry sauce is a crucial element that adds both flavor and color to the dessert. Start by combining the frozen strawberries, granulated sugar, and lemon juice in a medium saucepan. Cook the mixture over medium heat, stirring occasionally until the strawberries have softened and released their juices.
Once softened, mash the strawberries with the back of a spoon or a potato masher to break them down further. This step will create a smoother texture and release more liquid, allowing the sauce to thicken.
Next, in a small bowl, mix together the cornstarch and water to form a slurry. This is a mixture that will thicken the sauce without clumping. Add the slurry to the strawberry mixture while stirring constantly. Continue to stir until the sauce thickens to a syrupy consistency. Remove the saucepan from the heat and set the sauce aside to cool. It can be stored in the refrigerator for up to a week if made in advance.
2. Make the Pretzel Crust
While the strawberry sauce cools, it’s time to prepare the pretzel crust. Begin by crushing the pretzels. You can do this by placing them in a plastic bag and using a rolling pin or the bottom of a pan to crush them into small crumbs. Alternatively, you can use a food processor for a quicker result.
In a small bowl, combine the crushed pretzels, granulated sugar, and melted butter. Stir the mixture until everything is evenly coated. The butter should help bind the pretzel crumbs together, making it easy to press into the cups.
Spoon the crust mixture into the bottom of 28 small dessert cups. Use the back of a spoon or a small glass to press the crumbs into the bottom, ensuring the crust is compact. This step will help the crust hold together once the dessert is assembled. Refrigerate the cups for at least 15 minutes to let the crust set.
3. Prepare the Vanilla Cheesecake Filling
Next, you’ll make the smooth and fluffy cheesecake filling. In a mixing bowl, combine the room temperature cream cheese, granulated sugar, and vanilla extract. Use an electric hand mixer to beat the mixture on medium speed until smooth and well combined. The key here is to make sure the cream cheese is soft and easy to blend so that there are no lumps.
Once the cream cheese mixture is smooth, add the heavy cream and increase the speed to medium-high. Continue to whip the mixture until it becomes light and fluffy, forming stiff peaks. The whipped cream helps create a soft, airy texture for the cheesecake filling.
4. Assemble the Cheesecake Cups
Now, it’s time to assemble the dessert cups. Using a piping bag or a spoon, carefully pipe or spoon the cheesecake filling into the prepared cups. Fill each cup until it’s about three-quarters full, leaving some room for the strawberry sauce. Smooth the top with the back of a spoon or the tip of a knife to make it even.
Once the cheesecake is in place, spoon the homemade strawberry sauce over the top of each cup. You can add as much or as little as you prefer, depending on how fruity you want each bite. If you have extra pretzel crumbs, sprinkle them on top for added texture and flavor. The combination of the creamy filling, sweet strawberries, and crunchy pretzel is the perfect balance.
5. Chill the Dessert Cups
To ensure everything sets properly, cover each dessert cup with a lid or plastic wrap and place them in the refrigerator for at least 2-3 hours. The filling will firm up, and the flavors will have time to meld together. This chilling process is crucial for the perfect texture and flavor. If you’re making these cups in advance, they can be stored in the fridge overnight.
6. Serve and Enjoy!
Once the cups have chilled and the flavors have developed, they’re ready to serve. The pretzel crust will stay crisp, while the cheesecake filling will be creamy and smooth. The strawberry sauce will add a refreshing burst of fruitiness that ties everything together. These cups are perfect for any occasion, whether it’s a birthday party, holiday gathering, or casual family dinner.
Beginner Tips and Notes
- How to Avoid Soggy Crust: The key to a good crust is making sure it is compacted and evenly distributed in the cup. If you find that the crust is a bit soggy, try baking it for 5-10 minutes at 350°F before filling the cups. Let it cool before assembling the dessert.
- How to Ensure a Smooth Filling: Be sure to beat the cream cheese and sugar thoroughly before adding the heavy cream. This will prevent lumps and create a smooth, velvety filling. Additionally, make sure your heavy cream is cold when you whip it.
- Creative Variations: Once you’ve mastered the base recipe, you can try variations such as adding a touch of chocolate or citrus zest to the filling. For an even richer flavor, consider adding a spoonful of peanut butter or Nutella to the cheesecake filling before whipping it.
Serving Suggestions
While these dessert cups are delightful on their own, pairing them with complementary sides or beverages can elevate the experience. Here are a few ideas:
- Vanilla Ice Cream or Whipped Cream: A scoop of vanilla ice cream or a dollop of whipped cream would add a cool and creamy complement to the sweetness of the cheesecake.
- Fruit Salad: Serve these cheesecake cups alongside a fresh fruit salad to balance the richness of the dessert.
- Beverage Pairings: A cup of tea or a glass of sparkling water can cut through the sweetness of the cheesecake and add a refreshing element to the meal.

Conclusion
This Strawberry Cheesecake Dessert Cups recipe is the perfect treat for beginner cooks, offering a simple yet impressive dessert that everyone will love. The no-bake aspect, easy-to-find ingredients, and straightforward preparation steps make it an ideal recipe for any home cook looking to impress with minimal effort. Whether you’re making it for a holiday gathering, a special celebration, or just because you’re craving something sweet, these cheesecake cups will hit the spot every time.
Enjoy making this delicious treat, and feel free to experiment with your own variations! With a bit of practice, you’ll soon be whipping up all kinds of cheesecake variations that are as creative as they are delicious. Happy baking!


