Chocolate chip cookies are a classic favorite, but when you add a little creativity to the mix, they can become something extra special. Enter Teddy Bear Chocolate Chip Cookies – a whimsical twist on the traditional cookie that combines adorable shapes, soft textures, and a delicious balance of sweetness and salt. These cookies not only satisfy your sweet tooth but also bring joy to your baking experience with their charming bear faces. Perfect for any occasion, these cookies can brighten up your dessert table, make wonderful gifts, or simply add some fun to your snack time.
PrintTeddy Bear Chocolate Chip Cookies with Easy Icing Recipe

Chocolate chip cookies are a classic favorite, but when you add a little creativity to the mix, they can become something extra special. Enter Teddy Bear Chocolate Chip Cookies – a whimsical twist on the traditional cookie that combines adorable shapes, soft textures, and a delicious balance of sweetness and salt. These cookies not only satisfy your sweet tooth but also bring joy to your baking experience with their charming bear faces. Perfect for any occasion, these cookies can brighten up your dessert table, make wonderful gifts, or simply add some fun to your snack time.
- Prep Time: 15 minutes
- Cook Time: 13 minutes
- Total Time: 33 minutes
- Yield: 12 bear cookies 1x
- Category: Dessert
- Method: Bake
- Cuisine: American
- Diet: Vegetarian
Ingredients
Dry Ingredients:
- 1 ½ cup (187.5 g) all-purpose flour – This forms the base of your cookie dough, providing structure and texture.
- ¼ tsp (1 g) baking powder – A leavening agent that helps the cookies rise slightly, giving them a fluffy texture.
- ½ tsp (2 g) baking soda – Another leavening agent that contributes to the cookies’ lightness and helps them spread out in the oven.
- ¾ tsp (4.5 g) table salt – A crucial ingredient for balancing the sweetness of the cookie dough and enhancing the overall flavor.
Wet Ingredients:
- ½ cup (113.5 g) unsalted butter, melted and cooled – Butter adds richness to the dough and gives the cookies their soft, melt-in-your-mouth texture.
- ⅓ cup (73.33 g) brown sugar, packed – Brown sugar gives the cookies a deep, molasses-like flavor and helps them stay chewy.
- ½ cup (100 g) granulated sugar – This adds sweetness and helps the cookies brown in the oven.
- 1 egg – The egg binds the dough together and contributes to the cookies’ texture.
- 1 tsp (4 g) vanilla extract – Vanilla enhances the flavor of the cookies, adding a fragrant sweetness.
Mix-ins:
- 1 cup (180 g) chocolate chips – The star of the show! The chocolate chips add richness and indulgence to each cookie.
Decorations for the Bear Face:
- 4 tbsp (32 g) powdered sugar – The base for the icing that will bring the teddy bear face to life.
- 1–2 ½ tsp (7.5–18.75 g) water – Water is added gradually to the powdered sugar to achieve the right consistency for piping the icing.
Instructions
Step 1: Prepare the Cookie Dough
Start by stirring together the dry ingredients in a medium bowl. Combine the all-purpose flour, baking powder, baking soda, and salt, mixing them well so that the dry ingredients are evenly distributed. This ensures a uniform texture in the dough.
In a separate large bowl, use a silicone spatula to mix the melted butter, brown sugar, and granulated sugar. The butter should be melted and slightly cooled, so it doesn’t cook the egg when added. Stir the mixture until it’s smooth and combined. Add the egg and vanilla extract to the mixture and continue stirring until everything is well incorporated.
Once the wet ingredients are mixed, gradually add the dry ingredients to the wet ingredients, stirring as you go. This will prevent any dry spots and ensure the dough is smooth and even. Finally, fold in the chocolate chips, making sure they are evenly distributed throughout the dough.
Step 2: Scoop and Shape the Cookies
Preheat your oven to 350°F (177°C). Line two baking sheets with parchment paper or silicone mats to prevent the cookies from sticking. Using a medium cookie dough scoop (about 2-3 tablespoons), portion out the dough and place it on the prepared baking sheets, spacing them 3-4 inches apart.
To form the teddy bear ears, take about 1 teaspoon of dough and roll it into small balls. Place one ball of dough on the left side and one on the right side of each cookie, pressing them slightly into the dough. These will become the bear’s ears once baked.
Bake the cookies in the preheated oven for 11-13 minutes, or until the edges are set and golden brown. For rounder bears, use a silicone spatula to gently push the edges of the cookies around while they are still hot from the oven. This will round them out and give them a more bear-like shape.
Allow the cookies to cool on the baking sheets for 5 minutes before transferring them to a wire rack to cool completely.
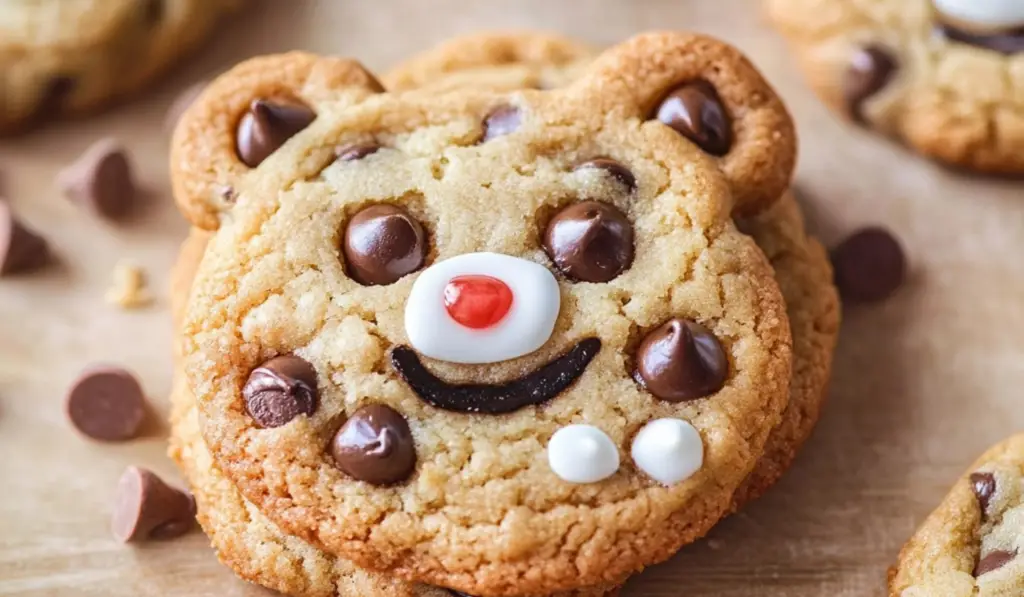
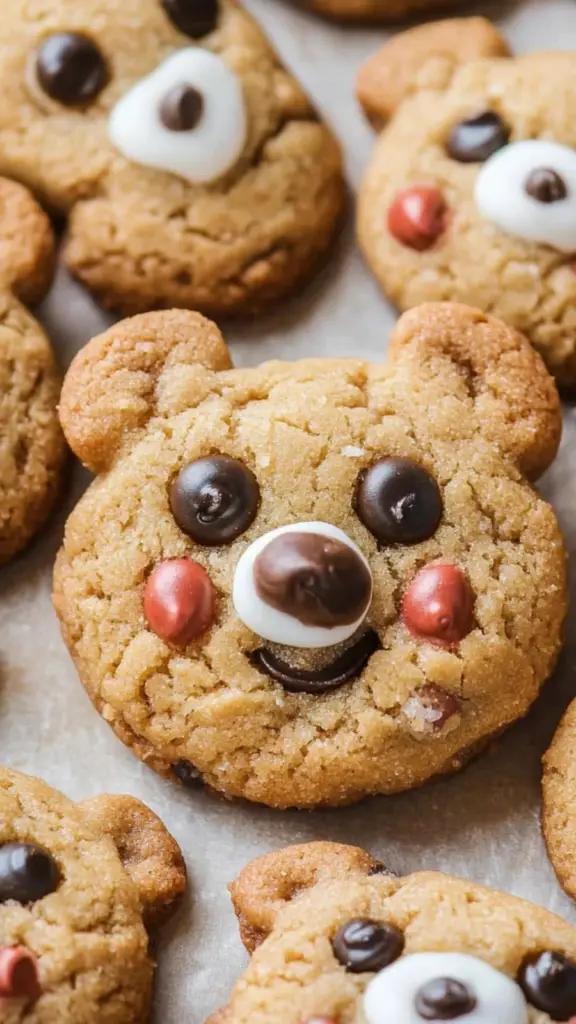
Step 3: Decorate the Bear Faces
While the cookies cool, prepare the icing for the bear faces. In a small bowl, combine the powdered sugar and water, adding the water gradually until the mixture reaches a pipeable consistency. You may need up to 2 ½ teaspoons of water, depending on the humidity and the consistency you desire. If the icing becomes too thin, simply add more powdered sugar to thicken it up.
Divide the icing into three portions. To one portion, add a few drops of pink food coloring to create the blush for the bear’s cheeks. To the second portion, add a few drops of black food coloring to create the eyes and nose. Leave the third portion white for the bear’s snout and ears.
Fill piping bags with each color of icing. First, use the white icing to pipe the bear’s snout and ears onto the cookies. Once the snouts have dried slightly, pipe the black icing to form the eyes and nose. Finally, use the pink icing to add a little blush to the cheeks. Let the icing set before serving or storing the cookies.
Step 4: Enjoy Your Teddy Bear Cookies!
Once the icing has set, your teddy bear chocolate chip cookies are ready to be enjoyed. These cookies are perfect for any occasion, whether it’s a party, a holiday gathering, or just a fun baking project to do with your kids. With their soft, chewy texture and adorable bear faces, they’re sure to bring a smile to everyone’s face.
Notes
- Substitute the Chocolate Chips: Feel free to mix things up with different types of chocolate chips, such as white chocolate, milk chocolate, or even butterscotch chips. You could also add in other mix-ins like chopped nuts or dried fruit.
- Make the Icing in Different Colors: You can change the color of the bear’s face for different occasions. For example, use blue or pink for baby showers, or get creative with rainbow-colored bears for a fun party treat.
- Storage: These cookies store well in an airtight container at room temperature for up to 5 days. They also freeze beautifully, so you can make them ahead of time and thaw them as needed.
- Add More Texture: For a more textured cookie, add a ¼ cup of oats to the dough. This gives the cookies a slightly heartier texture and adds some extra flavor.
The Appeal of Teddy Bear Chocolate Chip Cookies
What makes these cookies stand out from the crowd is their delightful appearance. Shaped like little teddy bears, they are both cute and delicious. Imagine biting into a soft, chewy cookie packed with gooey chocolate chips, only to discover a sweet, smooth icing face staring back at you. These teddy bear cookies are more than just a treat – they’re a conversation starter, a fun activity for kids, or a perfect addition to a themed party. The best part? They are surprisingly easy to make, even with the adorable bear face decorations.
As much as these cookies are a treat for the eyes, they don’t skimp on flavor. The combination of brown sugar, granulated sugar, and vanilla extract gives the dough a warm, comforting sweetness. Meanwhile, the chocolate chips provide bursts of chocolatey goodness in every bite. Topped off with a simple yet effective icing for the bear’s face, these cookies offer a sweet and slightly salty flavor profile that will keep you coming back for more.
Breakdown of the Ingredients
To make these cute and delicious teddy bear chocolate chip cookies, you’ll need a handful of simple ingredients. The best part about these cookies is that they use common pantry staples, so you may already have most of them in your kitchen.
Dry Ingredients:
- 1 ½ cup (187.5 g) all-purpose flour – This forms the base of your cookie dough, providing structure and texture.
- ¼ tsp (1 g) baking powder – A leavening agent that helps the cookies rise slightly, giving them a fluffy texture.
- ½ tsp (2 g) baking soda – Another leavening agent that contributes to the cookies’ lightness and helps them spread out in the oven.
- ¾ tsp (4.5 g) table salt – A crucial ingredient for balancing the sweetness of the cookie dough and enhancing the overall flavor.
Wet Ingredients:
- ½ cup (113.5 g) unsalted butter, melted and cooled – Butter adds richness to the dough and gives the cookies their soft, melt-in-your-mouth texture.
- ⅓ cup (73.33 g) brown sugar, packed – Brown sugar gives the cookies a deep, molasses-like flavor and helps them stay chewy.
- ½ cup (100 g) granulated sugar – This adds sweetness and helps the cookies brown in the oven.
- 1 egg – The egg binds the dough together and contributes to the cookies’ texture.
- 1 tsp (4 g) vanilla extract – Vanilla enhances the flavor of the cookies, adding a fragrant sweetness.
Mix-ins:
- 1 cup (180 g) chocolate chips – The star of the show! The chocolate chips add richness and indulgence to each cookie.
Decorations for the Bear Face:
- 4 tbsp (32 g) powdered sugar – The base for the icing that will bring the teddy bear face to life.
- 1-2 ½ tsp (7.5-18.75 g) water – Water is added gradually to the powdered sugar to achieve the right consistency for piping the icing.
Step-by-Step Instructions
Making Teddy Bear Chocolate Chip Cookies is an enjoyable process that results in a delicious treat. Let’s walk through the steps to bring these cute bears to life.
Step 1: Prepare the Cookie Dough
Start by stirring together the dry ingredients in a medium bowl. Combine the all-purpose flour, baking powder, baking soda, and salt, mixing them well so that the dry ingredients are evenly distributed. This ensures a uniform texture in the dough.
In a separate large bowl, use a silicone spatula to mix the melted butter, brown sugar, and granulated sugar. The butter should be melted and slightly cooled, so it doesn’t cook the egg when added. Stir the mixture until it’s smooth and combined. Add the egg and vanilla extract to the mixture and continue stirring until everything is well incorporated.
Once the wet ingredients are mixed, gradually add the dry ingredients to the wet ingredients, stirring as you go. This will prevent any dry spots and ensure the dough is smooth and even. Finally, fold in the chocolate chips, making sure they are evenly distributed throughout the dough.
Step 2: Scoop and Shape the Cookies
Preheat your oven to 350°F (177°C). Line two baking sheets with parchment paper or silicone mats to prevent the cookies from sticking. Using a medium cookie dough scoop (about 2-3 tablespoons), portion out the dough and place it on the prepared baking sheets, spacing them 3-4 inches apart.
To form the teddy bear ears, take about 1 teaspoon of dough and roll it into small balls. Place one ball of dough on the left side and one on the right side of each cookie, pressing them slightly into the dough. These will become the bear’s ears once baked.
Bake the cookies in the preheated oven for 11-13 minutes, or until the edges are set and golden brown. For rounder bears, use a silicone spatula to gently push the edges of the cookies around while they are still hot from the oven. This will round them out and give them a more bear-like shape.
Allow the cookies to cool on the baking sheets for 5 minutes before transferring them to a wire rack to cool completely.
Step 3: Decorate the Bear Faces
While the cookies cool, prepare the icing for the bear faces. In a small bowl, combine the powdered sugar and water, adding the water gradually until the mixture reaches a pipeable consistency. You may need up to 2 ½ teaspoons of water, depending on the humidity and the consistency you desire. If the icing becomes too thin, simply add more powdered sugar to thicken it up.
Divide the icing into three portions. To one portion, add a few drops of pink food coloring to create the blush for the bear’s cheeks. To the second portion, add a few drops of black food coloring to create the eyes and nose. Leave the third portion white for the bear’s snout and ears.
Fill piping bags with each color of icing. First, use the white icing to pipe the bear’s snout and ears onto the cookies. Once the snouts have dried slightly, pipe the black icing to form the eyes and nose. Finally, use the pink icing to add a little blush to the cheeks. Let the icing set before serving or storing the cookies.
Step 4: Enjoy Your Teddy Bear Cookies!
Once the icing has set, your teddy bear chocolate chip cookies are ready to be enjoyed. These cookies are perfect for any occasion, whether it’s a party, a holiday gathering, or just a fun baking project to do with your kids. With their soft, chewy texture and adorable bear faces, they’re sure to bring a smile to everyone’s face.
Tips and Variations
- Substitute the Chocolate Chips: Feel free to mix things up with different types of chocolate chips, such as white chocolate, milk chocolate, or even butterscotch chips. You could also add in other mix-ins like chopped nuts or dried fruit.
- Make the Icing in Different Colors: You can change the color of the bear’s face for different occasions. For example, use blue or pink for baby showers, or get creative with rainbow-colored bears for a fun party treat.
- Storage: These cookies store well in an airtight container at room temperature for up to 5 days. They also freeze beautifully, so you can make them ahead of time and thaw them as needed.
- Add More Texture: For a more textured cookie, add a ¼ cup of oats to the dough. This gives the cookies a slightly heartier texture and adds some extra flavor.
Final Thoughts
Teddy Bear Chocolate Chip Cookies are not only a delightful treat but also a fun way to get creative in the kitchen. Whether you’re baking with kids or looking to impress guests with something a little different, these cookies hit the mark. Their soft, chewy texture paired with the chocolatey goodness and adorable bear faces makes them a unique twist on the classic chocolate chip cookie. With simple ingredients, easy-to-follow steps, and a touch of creativity, these cookies are sure to become a favorite in your baking repertoire. So, gather your ingredients, preheat the oven, and get ready to make some of the cutest and most delicious cookies you’ve ever seen!


