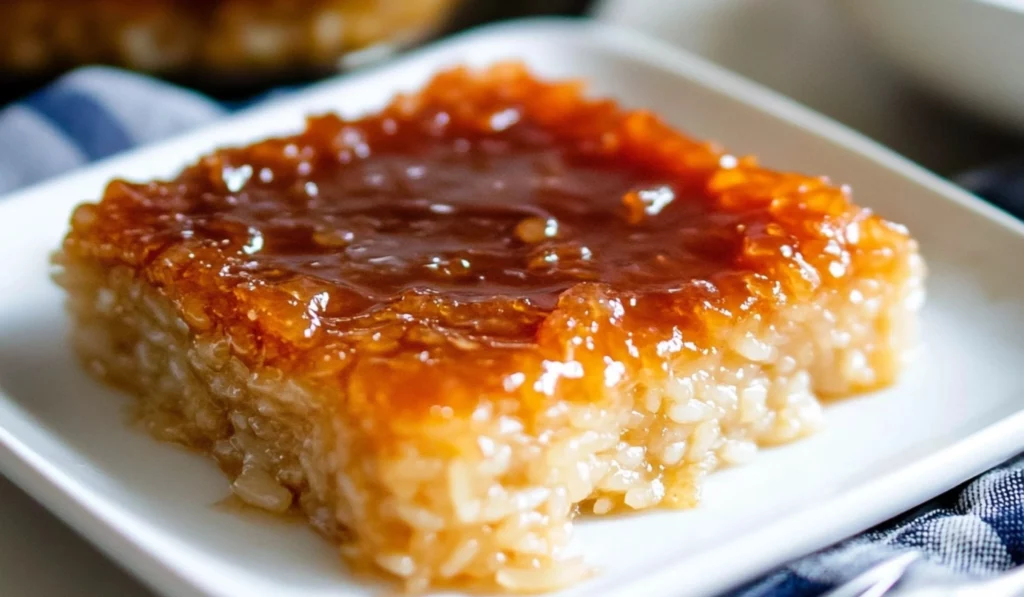
Biko is a Filipino dessert that’s beloved for its sticky, sweet texture and rich flavor. It’s made from glutinous rice, which provides the chewy base, while the coconut milk adds a creamy, fragrant quality. Dark brown sugar infuses the rice with a caramel-like sweetness, and the final result is a delectable treat that’s rich and comforting. This dessert holds a special place in Filipino culture, often served during festivals, holidays, and family gatherings. The best part? It’s simple to make with a handful of ingredients you might already have in your kitchen.

Discover the Joy of Homemade Filipino Dessert: Easy Biko Recipe

Biko is a Filipino dessert that’s beloved for its sticky, sweet texture and rich flavor. It’s made from glutinous rice, which provides the chewy base, while the coconut milk adds a creamy, fragrant quality. Dark brown sugar infuses the rice with a caramel-like sweetness, and the final result is a delectable treat that’s rich and comforting. This dessert holds a special place in Filipino culture, often served during festivals, holidays, and family gatherings. The best part? It’s simple to make with a handful of ingredients you might already have in your kitchen.
- Prep Time: 20 minutes
- Cook Time: 1 hour
- Total Time: 9 hours 20 minutes (includes soaking time)
- Yield: 12–16 servings 1x
- Category: Dessert
- Method: Baking
- Cuisine: Filipino
- Diet: Vegetarian
Ingredients
- 4 cups glutinous rice
- 5 cups full-fat coconut milk (divided)
- 1 1/2 cups water
- 2 1/2 cups dark brown sugar (divided)
- 1/2 tsp salt
Instructions
- Prepping the Rice: The first step to making Biko is soaking the glutinous rice in water overnight. The soaking process is crucial for ensuring that the rice becomes wonderfully sticky, which is the hallmark of this dessert. Soaking also helps the rice cook evenly and absorb the sweet coconut mixture more effectively. Once the rice has soaked, drain it well and rinse it under cold water to remove any excess starch. Set the rice aside, ready for the next steps.
- Cooking the Rice: After the rice has soaked, it’s time to cook it. In a large pot, combine 4 1/4 cups of coconut milk with 1 1/2 cups of water. Bring the mixture to a gentle boil over medium heat. Once boiling, add the soaked rice to the pot, stirring it gently to ensure it’s evenly distributed in the liquid. Reduce the heat to medium-low, allowing the rice to simmer. Stir occasionally, ensuring the rice doesn’t stick to the bottom of the pot. Continue cooking for about 6-8 minutes or until the rice has absorbed most of the liquid and is tender, but still slightly firm in texture. You’ll know it’s done when the rice is sticky and has absorbed the coconut milk mixture. The consistency should be thick, not runny. If necessary, add a little more water during the cooking process, depending on how much liquid the rice absorbs.
- Adding Sweetness: Now comes the magic of Biko—the sweetness! Once the rice has absorbed most of the coconut milk and water mixture, reduce the heat to medium-low. Stir in 1 1/2 cups of dark brown sugar and 1/2 teaspoon of salt. The brown sugar adds a rich, molasses-like flavor to the rice, creating that signature caramel taste that makes Biko so irresistible. Stir the mixture continuously to dissolve the sugar fully into the rice. The mixture will begin to thicken further, and the sticky rice will take on a beautiful, glossy sheen as it cooks. Be sure to keep an eye on it and stir constantly to prevent burning. After about 4-7 minutes, the rice should be thick and sticky, with a deeply sweet flavor. Taste the mixture at this point and adjust the sweetness if desired—if you prefer a sweeter Biko, you can add a bit more brown sugar.
- Letting It Set: Preheat your oven to 350°F (175°C). While the rice mixture is thickening, prepare your baking dish. Grease a 9×13-inch baking dish or pan with cooking spray or butter. This will prevent the Biko from sticking to the pan and make for easier removal once it’s done. Once your rice mixture is perfectly sticky and sweet, transfer it to the prepared dish, spreading it out evenly. Use a spatula to press the rice down gently, making sure it’s compacted into an even layer. This ensures that the Biko will set properly in the oven and hold together when sliced.
- Caramel Topping: Now for the finishing touch—the caramel topping! To create the topping, combine the remaining 3/4 cup of coconut milk with 1 cup of dark brown sugar in a small saucepan. Bring the mixture to a boil over medium heat, stirring regularly until the sugar dissolves completely. Allow the mixture to cook for a few minutes, thickening slightly as it does. Once the sugar has dissolved and the mixture has thickened, remove the saucepan from the heat and allow it to cool for about 5 minutes. The caramel should be smooth and glossy, ready to pour over the rice.
- Baking: After the caramel has cooled slightly, pour it evenly over the rice mixture in the baking dish. Use a spoon to spread the caramel out if needed, ensuring that every corner is covered. The caramel will seep into the rice and form a golden, glossy layer on top. Now, place the baking dish in the preheated oven and bake for 60-65 minutes. The top of the Biko should turn golden brown and slightly crispy, with the edges caramelized to perfection. You’ll know it’s done when the top has a rich, glossy finish, and the house will be filled with the sweet, inviting aroma of coconut and brown sugar.
- Serving and Enjoying: Once the Biko is baked to perfection, remove it from the oven and let it cool for about 10 minutes. This helps the dessert set and makes it easier to cut. Slice the Biko into squares or diamonds, and it’s ready to be served! The warm, sticky rice combined with the caramelized coconut topping makes each bite irresistible. Trust me, once you take that first bite, you’ll be hooked. Serve it as a sweet snack or dessert, and watch as your family and friends fall in love with this Filipino classic.
Notes
- Glutinous Rice: If you can’t find glutinous rice (also called sticky rice or malagkit rice), you can use other types of rice, like jasmine rice or sushi rice. However, glutinous rice is key to achieving the desired sticky texture, so try to find it if you can. Some grocery stores carry glutinous rice in the international or Asian food section, or you can find it at specialty markets.
- Coconut Milk: For a lighter version of Biko, you can substitute full-fat coconut milk with light coconut milk. Keep in mind that the flavor and richness may be slightly less intense, but it will still be delicious. If you’re looking for a non-dairy alternative, ensure that the coconut milk you’re using is free from added sugars or preservatives. You can also use coconut cream for an extra-rich flavor.
- Sweeteners: Dark brown sugar is traditionally used in Biko because it provides that deep, molasses-like flavor that pairs perfectly with the coconut milk. If you prefer a less intense sweetness, you can use light brown sugar, or even substitute with coconut sugar for a more natural, lower-glycemic option. Just note that the flavor may change slightly depending on the sugar you choose.
- Topping Variations: While the traditional caramel topping uses coconut milk and brown sugar, you can also experiment with adding condensed milk for a richer, creamier topping. Some people add a splash of vanilla extract to enhance the flavor. If you prefer a lighter topping, you could use a simple sugar syrup or skip the topping altogether for a more minimalistic version.
For many, Biko is more than just a dessert; it’s a nostalgic taste of home. Its sticky, sweet nature makes it a hit at potlucks or gatherings where people come together to share good food and create lasting memories. The dish’s warm, inviting aroma, as it bakes in the oven, fills the air with the promise of something special to enjoy. This recipe is an easy way to recreate that classic Filipino comfort food right in your own kitchen.
If you’ve never made Biko before, don’t worry! This recipe breaks down the steps in a clear, easy-to-follow way, ensuring your Biko turns out perfectly every time. Whether you’re introducing yourself to Filipino desserts or looking for a new treat to enjoy with your family, this Easy Biko Recipe will quickly become a favorite. Let’s dive in!
Ingredients:
- 4 cups glutinous rice
- 5 cups full-fat coconut milk (divided)
- 1 1/2 cups water
- 2 1/2 cups dark brown sugar (divided)
- 1/2 tsp salt
Instructions:
- Prepping the Rice: The first step to making Biko is soaking the glutinous rice in water overnight. The soaking process is crucial for ensuring that the rice becomes wonderfully sticky, which is the hallmark of this dessert. Soaking also helps the rice cook evenly and absorb the sweet coconut mixture more effectively. Once the rice has soaked, drain it well and rinse it under cold water to remove any excess starch. Set the rice aside, ready for the next steps.
- Cooking the Rice: After the rice has soaked, it’s time to cook it. In a large pot, combine 4 1/4 cups of coconut milk with 1 1/2 cups of water. Bring the mixture to a gentle boil over medium heat. Once boiling, add the soaked rice to the pot, stirring it gently to ensure it’s evenly distributed in the liquid. Reduce the heat to medium-low, allowing the rice to simmer. Stir occasionally, ensuring the rice doesn’t stick to the bottom of the pot. Continue cooking for about 6-8 minutes or until the rice has absorbed most of the liquid and is tender, but still slightly firm in texture. You’ll know it’s done when the rice is sticky and has absorbed the coconut milk mixture. The consistency should be thick, not runny. If necessary, add a little more water during the cooking process, depending on how much liquid the rice absorbs.
- Adding Sweetness: Now comes the magic of Biko—the sweetness! Once the rice has absorbed most of the coconut milk and water mixture, reduce the heat to medium-low. Stir in 1 1/2 cups of dark brown sugar and 1/2 teaspoon of salt. The brown sugar adds a rich, molasses-like flavor to the rice, creating that signature caramel taste that makes Biko so irresistible. Stir the mixture continuously to dissolve the sugar fully into the rice. The mixture will begin to thicken further, and the sticky rice will take on a beautiful, glossy sheen as it cooks. Be sure to keep an eye on it and stir constantly to prevent burning. After about 4-7 minutes, the rice should be thick and sticky, with a deeply sweet flavor. Taste the mixture at this point and adjust the sweetness if desired—if you prefer a sweeter Biko, you can add a bit more brown sugar.
- Letting It Set: Preheat your oven to 350°F (175°C). While the rice mixture is thickening, prepare your baking dish. Grease a 9×13-inch baking dish or pan with cooking spray or butter. This will prevent the Biko from sticking to the pan and make for easier removal once it’s done. Once your rice mixture is perfectly sticky and sweet, transfer it to the prepared dish, spreading it out evenly. Use a spatula to press the rice down gently, making sure it’s compacted into an even layer. This ensures that the Biko will set properly in the oven and hold together when sliced.
- Caramel Topping: Now for the finishing touch—the caramel topping! To create the topping, combine the remaining 3/4 cup of coconut milk with 1 cup of dark brown sugar in a small saucepan. Bring the mixture to a boil over medium heat, stirring regularly until the sugar dissolves completely. Allow the mixture to cook for a few minutes, thickening slightly as it does. Once the sugar has dissolved and the mixture has thickened, remove the saucepan from the heat and allow it to cool for about 5 minutes. The caramel should be smooth and glossy, ready to pour over the rice.
- Baking: After the caramel has cooled slightly, pour it evenly over the rice mixture in the baking dish. Use a spoon to spread the caramel out if needed, ensuring that every corner is covered. The caramel will seep into the rice and form a golden, glossy layer on top. Now, place the baking dish in the preheated oven and bake for 60-65 minutes. The top of the Biko should turn golden brown and slightly crispy, with the edges caramelized to perfection. You’ll know it’s done when the top has a rich, glossy finish, and the house will be filled with the sweet, inviting aroma of coconut and brown sugar.
- Serving and Enjoying: Once the Biko is baked to perfection, remove it from the oven and let it cool for about 10 minutes. This helps the dessert set and makes it easier to cut. Slice the Biko into squares or diamonds, and it’s ready to be served! The warm, sticky rice combined with the caramelized coconut topping makes each bite irresistible. Trust me, once you take that first bite, you’ll be hooked. Serve it as a sweet snack or dessert, and watch as your family and friends fall in love with this Filipino classic.
Tips for Ingredient Substitutions and Variations:
- Glutinous Rice: If you can’t find glutinous rice (also called sticky rice or malagkit rice), you can use other types of rice, like jasmine rice or sushi rice. However, glutinous rice is key to achieving the desired sticky texture, so try to find it if you can. Some grocery stores carry glutinous rice in the international or Asian food section, or you can find it at specialty markets.
- Coconut Milk: For a lighter version of Biko, you can substitute full-fat coconut milk with light coconut milk. Keep in mind that the flavor and richness may be slightly less intense, but it will still be delicious. If you’re looking for a non-dairy alternative, ensure that the coconut milk you’re using is free from added sugars or preservatives. You can also use coconut cream for an extra-rich flavor.
- Sweeteners: Dark brown sugar is traditionally used in Biko because it provides that deep, molasses-like flavor that pairs perfectly with the coconut milk. If you prefer a less intense sweetness, you can use light brown sugar, or even substitute with coconut sugar for a more natural, lower-glycemic option. Just note that the flavor may change slightly depending on the sugar you choose.
- Topping Variations: While the traditional caramel topping uses coconut milk and brown sugar, you can also experiment with adding condensed milk for a richer, creamier topping. Some people add a splash of vanilla extract to enhance the flavor. If you prefer a lighter topping, you could use a simple sugar syrup or skip the topping altogether for a more minimalistic version.
Serving Suggestions:
Biko is often served as a dessert at family gatherings, fiestas, and special occasions. It’s perfect for sharing, as the sticky rice is easy to slice into bite-sized pieces. Serve it as a snack with a hot cup of coffee or tea for a delicious afternoon treat. If you’re hosting a Filipino-themed party or meal, Biko pairs wonderfully with other traditional dishes like lechon (roast pig), adobo (marinated meat), or sinigang (sour soup). For an extra indulgent touch, you could serve it with a scoop of vanilla ice cream or a dollop of whipped cream.

Why You’ll Love This Recipe:
This easy Biko recipe brings a taste of the Philippines right to your kitchen. The sticky rice, combined with the sweet coconut topping, creates a dessert that’s both comforting and satisfying. It’s perfect for those who love rich, flavorful treats, and its texture—chewy, soft rice topped with a crunchy caramel—makes it a truly unique dessert experience. Whether you’re familiar with Filipino food or new to it, this recipe will quickly become a favorite for both novice and seasoned cooks alike. Plus, it’s simple enough to make that anyone can give it a try, even if you’ve never made a sticky rice dessert before.
Biko is more than just a dessert—it’s a connection to the heart of Filipino culture. With every bite, you’re not just tasting a delicious treat, you’re experiencing the warmth and hospitality that Filipinos are known for. So go ahead, give this recipe a try, and discover the joy of making and sharing Biko with your loved ones.


