I remember my first attempt at making a trifle. It was a chaotic mess of soggy sponge and runny custard. I was determined to master this classic dessert, and after some practice, I discovered the magic of Mini Trifles. These individual servings are not only visually stunning but also incredibly easy to assemble. The layers of jelly, sponge, custard, and berries create a symphony of flavors and textures that are simply irresistible. This recipe is perfect for beginner cooks. It requires no baking, minimal cooking, and is a fun way to experiment with layering and presentation. Plus, it’s a great make-ahead dessert, perfect for parties and gatherings. If you’re looking for an easy, impressive, and delicious dessert, these Mini Trifles are your perfect solution. They offer a delightful balance of sweet, fruity, and creamy textures, making them a perfect treat for any occasion.

Mini Trifles: Layers of Joy in Every Bite

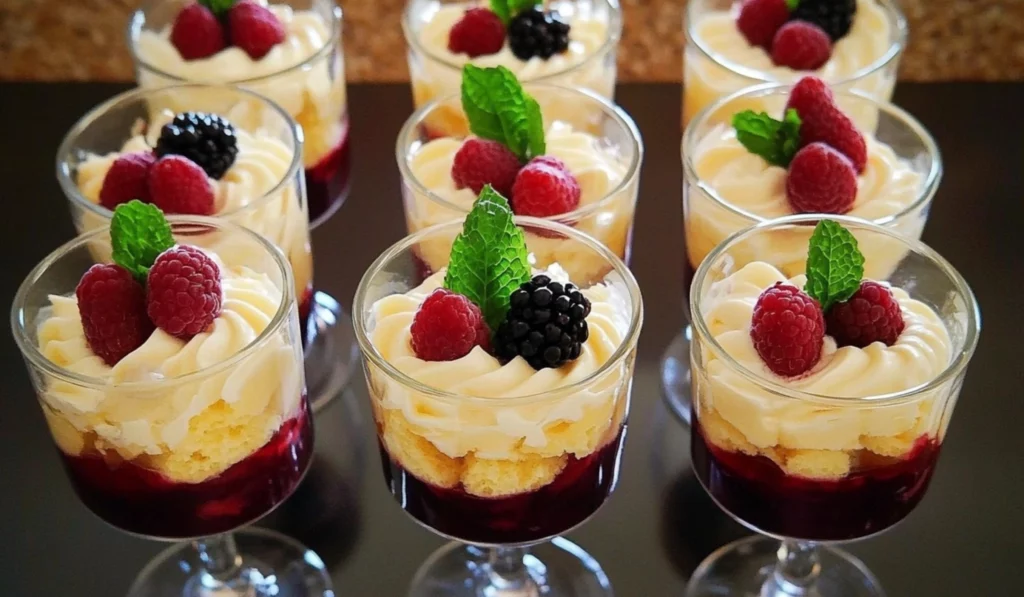
Mini Trifles are delightful layered desserts featuring jelly, sponge, custard, berries, and whipped cream. They are easy to assemble and perfect for any occasion. This recipe is ideal for beginner cooks, requiring simple steps and delivering maximum flavor.
- Prep Time: 45 minutes
- Cook Time: 0 minutes
- Total Time: 4 hours 45 minutes (including setting time)
- Yield: 6 servings 1x
- Category: Dessert
- Method: Assembling, Layering, Chilling, Whipping
- Cuisine: Australian, British
- Diet: Vegetarian
Ingredients
- 85 grams jelly crystals
- 125 mls cream
- 12 Tiramisu sponge fingers
- ½ cup port, sherry, muscat, or juice
- 1 ½ cups custard
- 400 grams berries
- 200 mls thickened cream
- 1 teaspoon custard powder
- Mint leaves for decorating
Instructions
-
Make the Jelly: Make up jelly following the instructions. This should make about 2 cups of jelly. Following the packet instructions ensures the jelly sets correctly.
-
Fill the Glasses: Use 1 ¼ cups of the liquid jelly mixture to fill the bottoms of 6 small dessert dishes or wine glasses. Filling the glasses evenly creates a consistent base for each trifle.
-
Chill the Jelly: Put the 6 glasses and remaining mixture into the fridge. Chilling allows the jelly to set and solidify.
-
Prepare the Flummery: When the remaining mixture is close to setting (but still able to be poured (this may take 1-2 hours), combine the mixture with cream and beat on high for 4 minutes. Beating on high incorporates air and creates a light and fluffy flummery texture.
-
Add Flummery Layer: The jelly in the cups should almost be set by this stage. Carefully pour the jelly and cream mixture (flummery) to add another layer to each of the glasses. Pouring carefully prevents disturbing the already set jelly layer.
-
Set the Flummery: Allow to set. Setting ensures the flummery layer firms up and holds its shape.
-
Prepare the Sponge: Crush sponge fingers in a tray and then pour over port, sherry or muscat. Substitute juice if you’d prefer a kids or non-alcoholic version of the trifle. Soaking the sponge adds moisture and flavor, enhancing the overall taste.
-
Add Sponge Layer: Add sponge fingers as the next layer and then pour a layer of custard in each glass. Layering creates distinct flavors and textures in each bite.
-
Add Fruit Layer: Add chopped berries as another layer, reserving 6 berries for decorating. Adding a fruit layer adds freshness and color to the trifles.
-
Whip the Cream: Whip thickened cream and custard powder until the cream forms stiff peaks. Whipping until stiff peaks ensures a stable and fluffy topping that holds its shape.
-
Pipe and Decorate: Pipe cream onto top of layers and decorate each trifle with a berry and mint leaf. Piping adds a decorative touch, making the trifles visually appealing.
Notes
- Use any flavor of jelly crystals.
- Soak sponge fingers thoroughly.
- Chill layers for proper setting.
- Get creative with fruit and toppings.
Ingredients and Preparation: Your Mini Trifle Arsenal – The Building Blocks of Deliciousness
These Mini Trifles are wonderfully adaptable. Feel free to adjust the fruits, liquors, and toppings to your preference. Remember, the key to stress-free dessert making is having all your ingredients prepped and ready to go before you start assembling. This mise en place approach makes the process smooth and enjoyable. It also prevents you from forgetting a crucial ingredient mid-recipe.
The Jelly Layers: The Sweet Foundation – The Colorful Base:
- 85 grams jelly crystals (1 packet Aeroplane jelly if you’re in Australia) – Provides a sweet and colorful base. Alternatives: You can use any flavor of jelly crystals you like. Different flavors create unique colors and tastes.
- 125 mls cream (tinned cream, thickened cream or heavy cream) – Adds richness and creaminess to the flummery layer. Cream adds a smooth and creamy texture.
The Sponge Layer: The Soft Heart – The Textural Element:
- 12 pieces Tiramisu sponge fingers (about 1 cup fresh sponge chopped in small squares) – Provides a soft and absorbent layer. Alternatives: You can use ladyfingers, pound cake, or even leftover cake. Sponge fingers add a light and airy texture.
- ½ cup port, sherry or muscat (or juice for a non-alcoholic version) – Adds flavor and moisture. Alternatives: Use apple juice, grape juice, or even tea. Liquid adds moisture and flavor to the sponge.
The Custard Layer: The Creamy Comfort – The Rich Component:
- 1 ½ cups custard (bought or home-made) – Provides a smooth and creamy layer. Alternatives: You can use instant custard or make your own from scratch. Custard adds a rich and creamy texture.
The Fruit Layer: The Burst of Freshness – The Vibrant Addition:
- 400 grams berries (I used strawberries, raspberries and blackberries) – Provides a fresh and fruity layer. Alternatives: You can use any combination of berries or other fruits like peaches, mangoes, or kiwi. Fresh berries add a vibrant and juicy layer.
The Topping: The Finishing Touch – The Decorative Element:
- 200 mls thickened cream (known as heavy cream in US) – Provides a rich and creamy topping. Thickened cream creates a stable and fluffy topping.
- 1 teaspoon custard powder – Helps stabilize the whipped cream. Custard powder helps the cream hold its shape.
- Mint leaves for decorating – Adds a fresh and decorative touch. Mint leaves add a refreshing and aromatic garnish.
Step-by-Step Instructions: Your Path to Mini Trifle Perfection – A Beginner-Friendly and Detailed Guide
- Make the Jelly: Make up jelly following the instructions. This should make about 2 cups of jelly. Following the packet instructions ensures the jelly sets correctly.
- Fill the Glasses: Use 1 ¼ cups of the liquid jelly mixture to fill the bottoms of 6 small dessert dishes or wine glasses. Filling the glasses evenly creates a consistent base for each trifle.
- Chill the Jelly: Put the 6 glasses and remaining mixture into the fridge. Chilling allows the jelly to set and solidify.
- Prepare the Flummery: When the remaining mixture is close to setting (but still able to be poured (this may take 1-2 hours), combine the mixture with cream and beat on high for 4 minutes. Beating on high incorporates air and creates a light and fluffy flummery texture.
- Add Flummery Layer: The jelly in the cups should almost be set by this stage. Carefully pour the jelly and cream mixture (flummery) to add another layer to each of the glasses. Pouring carefully prevents disturbing the already set jelly layer.
- Set the Flummery: Allow to set. Setting ensures the flummery layer firms up and holds its shape.
- Prepare the Sponge: Crush sponge fingers in a tray and then pour over port, sherry or muscat. Substitute juice if you’d prefer a kids or non-alcoholic version of the trifle. Soaking the sponge adds moisture and flavor, enhancing the overall taste.
- Add Sponge Layer: Add sponge fingers as the next layer and then pour a layer of custard in each glass. Layering creates distinct flavors and textures in each bite.
- Add Fruit Layer: Add chopped berries as another layer, reserving 6 berries for decorating. Adding a fruit layer adds freshness and color to the trifles.
- Whip the Cream: Whip thickened cream and custard powder until the cream forms stiff peaks. Whipping until stiff peaks ensures a stable and fluffy topping that holds its shape.
- Pipe and Decorate: Pipe cream onto top of layers and decorate each trifle with a berry and mint leaf. Piping adds a decorative touch, making the trifles visually appealing.
Beginner Tips and Notes: Your Kitchen Companion – Helpful Hints and Hacks for Culinary Success
- Troubleshooting: Kitchen Calamities Conquered:
- If the jelly doesn’t set, ensure you followed the packet instructions and chill for longer. Follow instructions closely and allow ample chilling time.
- If the flummery is too runny, beat for a few more minutes. Additional beating incorporates more air.
- If the sponge is too dry, add more liquid. More liquid ensures a moist sponge.
- If the whipped cream is not stiff, chill the bowl and beaters before whipping. Chilled equipment helps create stiff peaks.
- Prep Efficiency: Time-Saving Strategies:
- Use store-bought custard and sponge fingers. Pre-made ingredients save time.
- Prepare the jelly and soak the sponge ahead of time. Preparing in advance streamlines the process.
- Chop the fruits and whip the cream while the jelly is setting. Multitasking saves time.
- Assemble the trifles a few hours before serving. Pre-assembling allows flavors to meld.
- Tool Substitutions: Improvise and Adapt:
- If you don’t have dessert glasses, use small bowls or mason jars. Alternatives provide suitable serving vessels.
- If you don’t have a piping bag, use a ziploc bag with a corner cut off. A ziploc bag with a cut corner is a simple piping alternative.
- If you don’t have an electric mixer, use a whisk. A whisk can be used to whip cream.
- If you don’t have custard powder, use cornstarch. Cornstarch is a suitable thickening agent.
- Flavor Boosters: Culinary Creativity Unleashed:
- Add a layer of chocolate shavings or sprinkles. Toppings add texture and flavor.
- Use different extracts like vanilla or almond in the custard. Extracts enhance flavor.
- Add a layer of chopped nuts or granola. Nuts and granola add texture.
- Use a variety of fruit compotes or jams. Fruit compotes and jams add flavor variety.
Serving Suggestions: Completing the Culinary Picture – From Simple Dessert to Elegant Treat
These Mini Trifles are delicious on their own, but you can elevate them with complementary sides and sauces.
- Sides: A Perfect Pairing:
- Serve with a scoop of vanilla ice cream. Ice cream adds a creamy complement.
- Pair with a side of fresh fruit salad. Fruit salad adds a refreshing side.
- Serve with a drizzle of chocolate sauce. Chocolate sauce adds a rich topping.
- Enjoy with a warm beverage like tea or coffee. Warm beverages complement the dessert.
- Sauces: A Flavor Boost:
- Drizzle with caramel sauce or honey. Caramel and honey add sweet toppings.
- Serve with a fruit coulis. Fruit coulis enhances fruit flavors.
- Offer a side of chocolate ganache. Chocolate ganache adds a decadent option.
- Drinks: A Refreshing Addition:
- Pair with a sparkling wine or prosecco. Sparkling wine adds a festive touch.
- Serve with a fruit smoothie or milkshake. Smoothies and milkshakes add creamy drinks.
- Enjoy with a dessert wine. Dessert wine complements the sweet dessert.
- Leftovers: Repurposing Deliciousness – Extending the Enjoyment:
- Store leftover trifles in the refrigerator for up to 2 days. Proper storage maintains freshness.
- Refrigerate each layer separately for longer storage. Separating layers extends shelf life.
- Use leftover custard as a topping for fruit or yogurt. Leftover custard adds a creamy topping.

A Culinary Adventure: From Simple Dessert to Elegant Sensation
These Mini Trifles are a testament to how easy and delicious a layered dessert can be. They’re perfect for parties, holidays, or any time you want a visually stunning and flavorful treat. So, gather your ingredients, follow the instructions, and get ready to enjoy a culinary triumph! Don’t be afraid to experiment with different fruits and flavor combinations to create your own signature version. And most importantly, have fun! Cooking should be an enjoyable experience, a chance to express your creativity and share delicious food with the people you love. We’d love to see your Mini Trifle creations! Share your photos and any variations you try in the comments below. Happy cooking!
What other quick, easy, and flavorful recipes would you like to see us explore? Are you interested in learning more about different cooking techniques or perhaps mastering other culinary skills? Let us know in the comments! We’re here to support you on your culinary journey, one delicious bite at a time. We can’t wait to hear about your culinary triumphs! Share your photos and tag us in your creations – we’re excited to see what you make! We’re confident that this recipe will become a regular part of your dessert repertoire. It’s a guaranteed way to bring some sweet, fruity, and creamy goodness to your table. Enjoy!


